پیژندنه
د پیرودلو لپاره مننهasing the Edifier Tick Tock Retro Multifunctional Alarm Clock. This device combines a retro design with modern functionality, offering an alarm clock, FM radio, and media playback from SD cards, USB drives, and auxiliary input. This manual provides detailed instructions for setup, operation, and maintenance to ensure optimal performance and longevity of your device.
د محصول ځانګړتیاوې
- SD card reader and USB input port for media playback.
- LCD display screen for time, date, alarm status, and input mode (SD/USB/FM/AUX).
- Alarm clock function with customizable audio sources: SD card, USB drive, FM radio, or Auxiliary input.
- Auxiliary 3.5mm input jack for connecting external audio devices.
- FM radio function with 24 preset channels for easy access to your favorite stations.
- Two 360° omni-directional full-range speakers for rich, multi-directional sound.
کنټرولونه او بندرونه
د شا پینل بندرونه
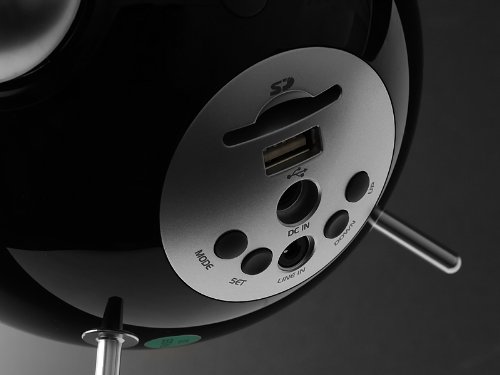
This image displays the rear panel of the Edifier Tick Tock alarm clock. Visible ports and buttons include:
- د SD کارت سلاټ: Insert an SD card for music playback.
- USB پورټ: Connect a USB flash drive for music playback.
- په DC کې: د شامل شوي AC اډاپټر لپاره د بریښنا ان پټ.
- لاین ان (AUX): د بهرنیو وسیلو لپاره د 3.5 ملي میتر آډیو ان پټ.
- د موډ تڼۍ: Cycles through input modes (SD, USB, FM, AUX).
- د SET تtonۍ: Used for entering settings menus (e.g., time, alarm).
- پورته / ښکته تڼۍ: Navigate menus, adjust volume, or change settings.
د سرلیک پینل کنټرولونه

This image shows the top panel controls of the Edifier Tick Tock alarm clock. These include:
- د پلی کولو/پاز بټن: د رسنیو پلې بیک پیل یا بندوي.
- مخکینی/راتلونکی ټریک بټن: Skips to the previous or next track during media playback. Also used for tuning FM radio.
- حجم پورته / ښکته تtۍ: د آډیو آوټ پټ حجم تنظیموي.
- د سنوز/رڼا تڼۍ: د الارم په جریان کې سنوز فعالوي یا د سکرین روښانتیا تنظیموي.
چمتو کول
- بسته بندي کول: Carefully remove the alarm clock and all accessories from the packaging. Ensure all components are present: the alarm clock unit, AC power adapter, and this user manual.
- د بریښنا پیوستون: Connect the AC power adapter to the "DC IN" port on the rear of the alarm clock. Plug the adapter into a standard wall outlet. The display should illuminate.
- ابتدايي بریښنا فعاله: The unit should power on automatically. If not, press the power button (if available, otherwise it's always on when plugged in).
- Antenna (FM Radio): Extend the FM antenna located at the back of the unit for optimal radio reception.
عملیاتي لارښوونې
د وخت او نیټې ترتیب کول
- فشار ورکړئ او ونیسئ SET تڼۍ تر هغه وخته پورې چې د وخت ښودنه چمکۍ پیل شي.
- د کارولو UP او ښکته د ساعت تنظیمولو لپاره تڼۍ. فشار ورکړئ SET د تایید لپاره او دقیقو ته لاړ شئ.
- دقیقې تنظیم کړئ په کارولو سره UP او ښکته. مطبوعاتي SET تصدیق کول.
- Continue this process to set the year, month, and day. Press SET د وخت/نیټې تنظیم کولو حالت څخه د وتلو لپاره.
د الارم تنظیم کول
- فشار ورکړئ SET button once (do not hold) to enter alarm setting mode. The alarm time will flash.
- د کارولو UP او ښکته د الارم ساعت تنظیمولو لپاره تڼۍ. فشار ورکړئ SET د تایید لپاره او دقیقو ته لاړ شئ.
- دقیقې تنظیم کړئ په کارولو سره UP او ښکته. مطبوعاتي SET تصدیق کول.
- Next, select the alarm source (FM, SD, USB, AUX). Use UP او ښکته to cycle through options. Press SET تصدیق کول.
- If FM is selected, use UP او ښکته to select a preset FM station (P01-P24).
- If SD or USB is selected, ensure a card/drive with audio is inserted. The alarm will play the first track.
- If AUX is selected, ensure an external device is connected and playing audio.
- مطبوعاتي SET د الارم فعالولو لپاره بیا. د الارم آیکون به په نندارتون کې څرګند شي.
- د الارم غیر فعالولو لپاره، فشار ورکړئ SET until the alarm icon disappears.
- کله چې د الارم غږ کیږي ، فشار ورکړئ ننوتل / روښانه کول button to activate snooze (typically 9 minutes). To turn off the alarm completely, press any other button.
د ایف ایم راډیو عملیات
- فشار ورکړئ موډ تڼۍ په مکرر ډول فشار ورکړئ تر هغه چې "FM" په نندارتون کې څرګند شي.
- Auto Scan and Preset: فشار ورکړئ او ونیسئ پلی/پاز button. The radio will automatically scan for available stations and save them to presets (P01-P24).
- لاسي لارښود: د کارولو مخکینی/راتلونکی لار د فریکونسۍ د ښه کولو لپاره تڼۍ.
- د پریسیټونو غوره کول: In FM mode, briefly press the مخکینی/راتلونکی لار د خوندي شوي مخکیني سټیشنونو له لارې د سایکل کولو لپاره تڼۍ.
- د. په کارولو حجم تنظیم کړئ UP او ښکته buttons on the rear panel.
SD Card / USB Playback
- Insert an SD card into the SD card slot or a USB flash drive into the USB port on the rear panel.
- فشار ورکړئ موډ button repeatedly until "SD" or "USB" appears on the display. The device will automatically start playing audio files.
- د کارولو پلی/پاز د پلې بیک د بندولو یا بیا پیلولو لپاره تڼۍ.
- د کارولو مخکینی/راتلونکی لار buttons on the top panel to skip tracks.
- د. په کارولو حجم تنظیم کړئ UP او ښکته buttons on the rear panel.
Auxiliary Input (LINE IN)
- Connect an external audio device (e.g., smartphone, MP3 player) to the "LINE IN" (3.5mm) port on the rear panel using an audio cable (not included).
- فشار ورکړئ موډ تڼۍ په مکرر ډول فشار ورکړئ تر هغه چې "AUX" په نندارتون کې څرګند شي.
- په خپل وصل شوي بهرني وسیله کې پلې بیک پیل کړئ.
- د. په کارولو حجم تنظیم کړئ UP او ښکته buttons on the rear panel, and also control volume from your external device.
روښانتیا ښکاره کړئ
په لنډه توګه فشار ورکړئ ننوتل / روښانه کول button on the top panel to cycle through different display brightness levels.
ساتنه
- پاکول: Use a soft, dry cloth to clean the surface of the alarm clock. Do not use abrasive cleaners, waxes, or solvents.
- ځای په ځای کول: Place the unit on a stable, flat surface. Avoid direct sunlight, high temperatures, humidity, or dusty environments.
- ځواک: که چیرې واحد د اوږدې مودې لپاره ونه کارول شي، نو د بریښنا اډاپټر د دیوال له سایټ څخه جلا کړئ.
د ستونزو حل کول
| ستونزه | احتمالي لامل / حل |
|---|---|
| بریښنا نشته / ښودل بند دي |
|
| د سپیکرو څخه هیڅ غږ نشته |
|
| د ایف ایم راډیو ضعیف استقبال |
|
| Alarm does not sound or plays static |
|
| Display is too bright at night |
|
مشخصات
| برانډ | ایډیفیر |
| د ماډل شمیره | MF240Reto |
| د ښودلو ډول | LCD |
| د ارتباط ټیکنالوژي | اکس، USB |
| ځانګړي ځانګړتیاوې | Alarm, Radio, SD Card Reader, USB Playback |
| د بریښنا سرچینه | د بریښنا تار شوی |
| مواد | پلاستیک |
| د توکي وزن | ۰.۴۵ پونډه (تقریبا ۰.۴ کیلوګرامه) |
| جوړونکی | Edifier USA |
تضمین او ملاتړ
This Edifier product comes with a د تولید کونکي 2 کلن تضمین. For warranty claims, technical support, or further assistance, please contact Edifier USA customer service. Please retain your proof of purchase for warranty validation.
د ملاتړ په اړه د تازه معلوماتو لپاره، مهرباني وکړئ رسمي ایډیفیر ته مراجعه وکړئ webسایټ