DIYHD M0083
DIYHD 6FT Ceiling Mount Sliding Barn Door Hardware Kit Instruction Manual
Model: M0083 | Brand: DIYHD
1. پیژندنه
This manual provides detailed instructions for the installation, operation, and maintenance of your DIYHD 6FT Ceiling Mount Sliding Barn Door Hardware Kit. This kit is designed for both indoor and exterior applications, offering a robust solution for sliding doors with a maximum load capacity of 300 lbs. Please read this manual thoroughly before beginning installation to ensure proper setup and safe operation.
2. د خوندیتوب معلومات
- د مسلکي نصب کولو وړاندیز شوی: Due to the sturdy construction and weight of this hardware, single-person DIY installation is not recommended. We strongly advise at least two professional installers to ensure proper setup, stability, and safety.
- د وزن ظرفیت: Do not exceed the maximum weight capacity of 300 lbs for the door.
- Door Panel Not Included: This kit includes hardware only. The door panel and handle must be purchased separately.
- د دروازې ضخامت: Ensure your door panel is between 1-1/2" to 2" thick for proper fitment.
- Ceiling Height Calculation: For optimal operation, the door panel's height should be calculated as ceiling height minus 4-3/4" to 6".
- خوندي نصب کول: All mounting hardware must be securely fastened into structural supports (e.g., ceiling joists or blocking) to prevent failure.
- Integrated Stoppers: The built-in stoppers are designed for enhanced safety and a cleaner aesthetic. Ensure they are correctly installed to prevent the door from sliding off the track.
3. د بسته محتويات
Please verify that all components listed below are present and undamaged before beginning installation. The door panel is NOT included.

Figure 3.1: All included hardware components.
- 3FT Box Rail ×2
- Track Connector ×1
- Box Rail Brackets (Ceiling Mount Brackets) ×2
- رولر ×2
- Stoppers ×2
- End Caps ×2
- L Guide ×2 (Floor Mount Guides)
- Wall Mount Guide ×1
- د سکرو او اینکرونو نصب کول
4. مشخصات
| فیچر | تفصیل |
|---|---|
| برانډ | DIYHD |
| د ماډل شمیره | M0083 |
| د تعقیب اوږدوالی | 6FT (composed of two 3FT box rails) |
| د نصب کولو ډول | د چت غره |
| مواد | Heavy-duty Galvanized Carbon Steel with Black Powder-Coated Finish |
| د دروازې اعظمي وزن | 300 پونډه |
| د دروازې ضخامت سره مطابقت لري | له ۳-۱/۸" څخه تر ۲۰" پورې |
| د دروازې د پرانیستلو اعظمي حد | 36 inches (for a single door) |
| د رولر ډول | Durable hard-plastic coated metal wheels |
| د محصول ابعاد | 1.57 x 72 x 2.38 inches (assembled track) |
| د توکي وزن | ۲.۴۵ پونډه |
5. ترتیب او نصب کول
مهم: Professional installation by at least two individuals is strongly recommended for safety and proper functionality.
5.1 د نصب کولو دمخه چکونه
- د بستې ټول محتويات د دریمې برخې په لیست کې تایید کړئ.
- Ensure your door panel meets the thickness requirements (1-1/2" to 2").
- Measure your ceiling height and calculate the appropriate door panel height: Ceiling Height - (4-3/4" to 6").
- Locate and mark ceiling joists or ensure adequate blocking is in place for secure mounting of the track.
5.2 Assembling the Track
- Connect the two 3FT box rails using the track connector. Ensure the connection is secure and flush.
- Attach the end caps to both ends of the assembled track.

Figure 5.2.1: Track connector detail.
5.3 Mounting the Track to the Ceiling
- Position the assembled track on the ceiling above the desired door opening. Mark the locations for the ceiling mount brackets, ensuring they align with structural supports.
- په نښه شوي ځایونو کې پیلوټ سوراخونه ډرل کړئ.
- Securely fasten the ceiling mount brackets to the ceiling using the provided screws and anchors.
- Attach the track to the ceiling mount brackets.
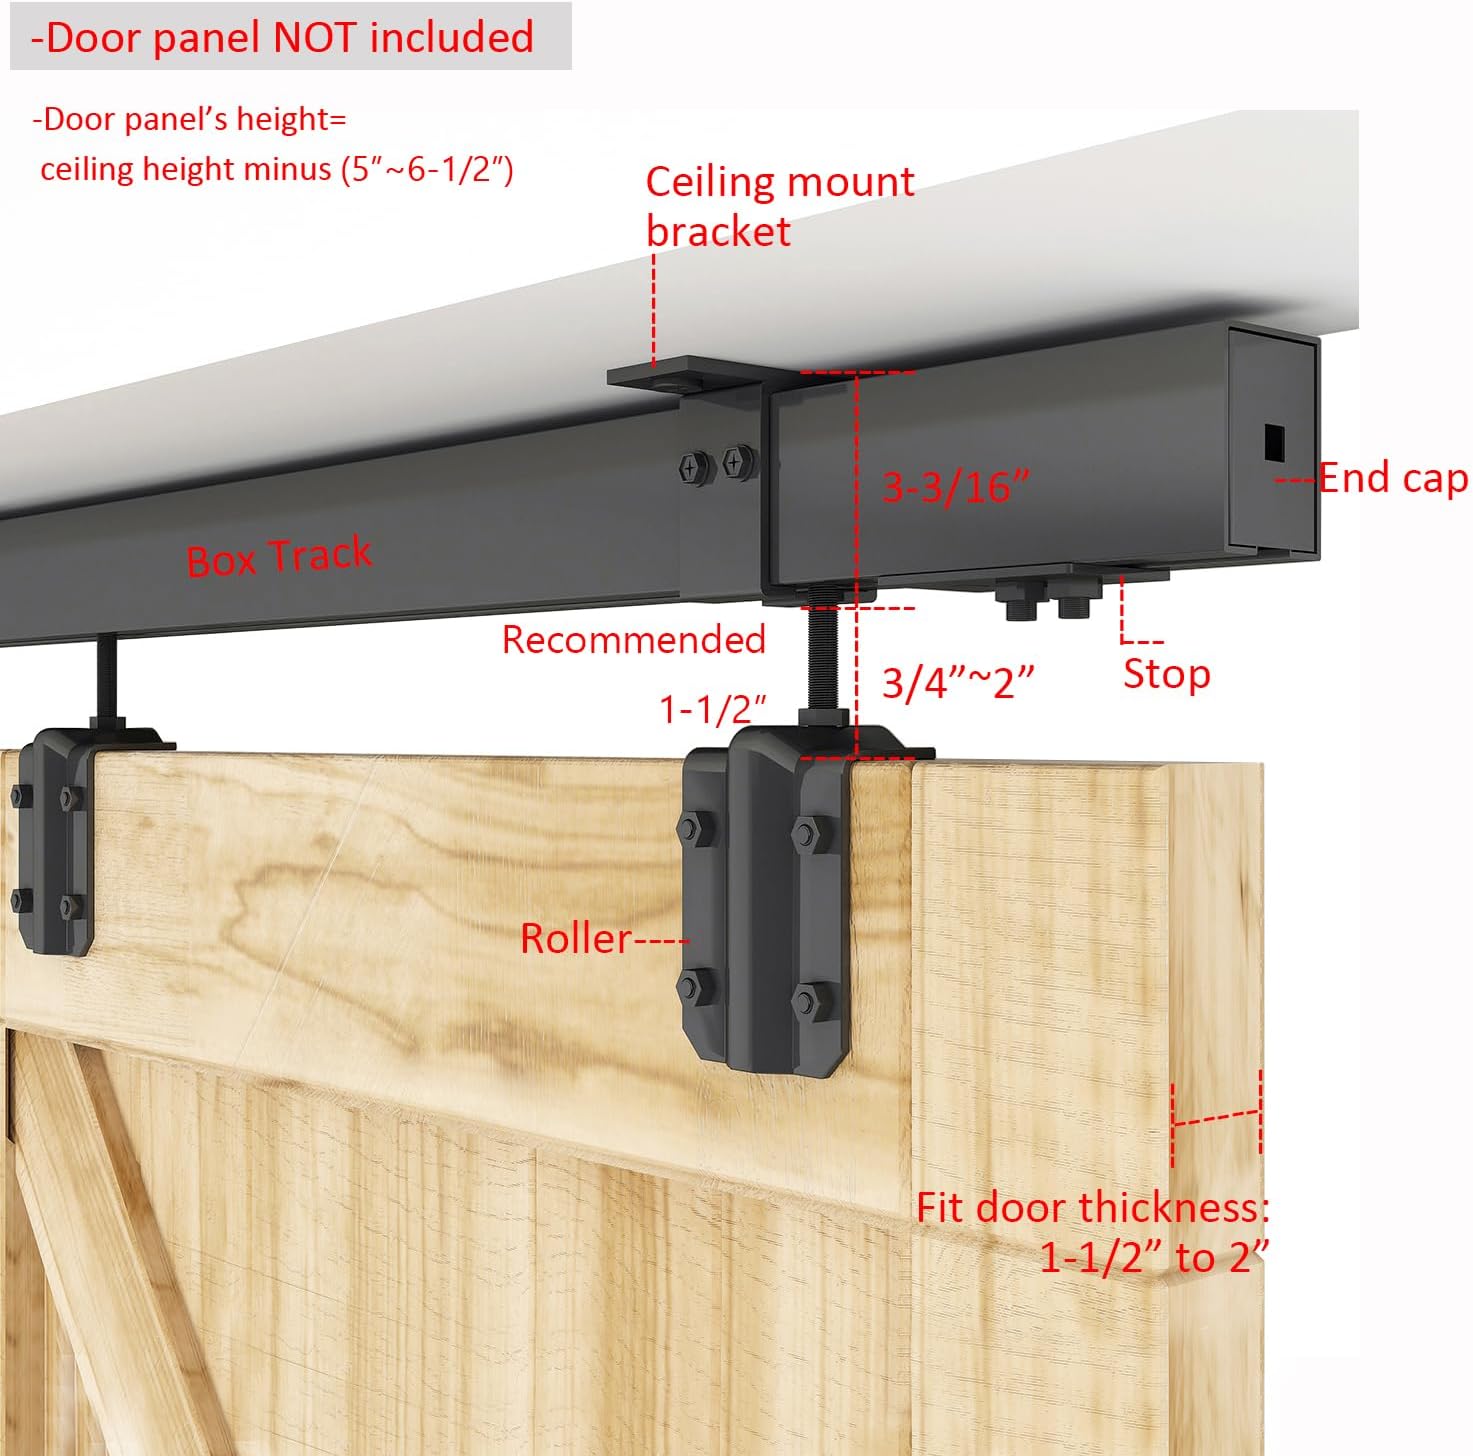
Figure 5.3.1: Ceiling mount bracket and track dimensions.
5.4 Attaching Rollers to the Door Panel
- Measure and mark the positions for the rollers on the top edge of your door panel. Ensure even spacing and proper alignment.
- Drill pilot holes for the roller mounting bolts.
- Attach the rollers to the door panel using the provided hardware. Ensure they are securely fastened and the adjustable mechanism is set to accommodate your door's thickness (3/4" to 2").

Figure 5.4.1: Roller detail and door thickness adjustment.
5.5 Hanging the Door and Installing Floor Guides
- With assistance, carefully lift the door panel and engage the rollers with the track.
- Slide the door to its closed position.
- Install the floor guides. Two types are provided:
- Floor Mount Guide (L Guide): Position on the floor directly beneath the door, ensuring it guides the door smoothly. Mark and drill holes, then secure.
- Wall Mount Guide: If preferred or necessary, install the wall mount guide to the wall at the bottom edge of the door.
- Adjust the stoppers within the track to limit the door's travel and prevent it from rolling off the ends.

Figure 5.5.1: Floor guide options.

Figure 5.5.2: Integrated stoppers for safety.
6. عملیات
Once installed, the DIYHD sliding barn door hardware allows for smooth and quiet operation. Simply push or pull the door panel along the track. The hard-plastic coated rollers are designed to minimize noise during movement.

شکل 6.1: مثالample of an installed sliding barn door (open).

Figure 6.2: Door in open and closed positions.
7. ساتنه
- منظم پاکول: Wipe down the track and rollers periodically with a damp د دوړو او کثافاتو لرې کولو لپاره ټوکر.
- غوړول: If the door's movement becomes less smooth, apply a silicone-based lubricant to the roller bearings and the inside of the track. Avoid oil-based lubricants as they can attract dirt.
- د هارډویر معاینه: Periodically inspect all mounting screws and bolts for tightness. Re-tighten if necessary to ensure continued safety and stability.
- د هوا مقاومت: While designed for outdoor use, extreme weather conditions may require more frequent inspection and maintenance.
8. ستونزه حل کول
| ستونزه | احتمالي لامل | د حل لاره |
|---|---|---|
| Door is difficult to slide or noisy. | Dirt/debris in track, rollers need lubrication, misaligned track/rollers. | Clean track and rollers. Apply silicone lubricant. Check track and roller alignment and adjust if necessary. |
| Door wobbles or feels unstable. | Loose mounting hardware, improper installation into structural supports. | Inspect and re-tighten all screws and bolts. Ensure track is securely mounted into ceiling joists or blocking. If unsure, consult a professional. |
| Door hits the end of the track too hard. | Stoppers are not correctly positioned or tightened. | Adjust the stoppers to the desired position and tighten them securely within the track. |
| Door panel rubs against the floor or ceiling. | Incorrect door panel height, rollers not adjusted properly. | Verify door panel height calculation. Adjust roller height if possible, or ensure door thickness is within specifications. |
9. تضمین او ملاتړ
Specific warranty information for the DIYHD 6FT Ceiling Mount Sliding Barn Door Hardware Kit is not provided in this manual. For warranty details or technical support, please contact DIYHD directly through their official webسایټ یا پرچون پلورونکی چیرې چې محصول اخیستل شوی و.
For additional information and product offerings, you may visit the DIYHD Store on Amazon.