1. پیژندنه
Thank you for choosing the S7 CUT50 Plasma Cutter. This manual provides essential information for the safe and efficient operation, setup, maintenance, and troubleshooting of your new plasma cutting machine. Please read this manual thoroughly before operating the equipment to ensure proper use and to prevent injury or damage.
The S7 CUT50 is a powerful and portable plasma cutter designed for both professional and DIY applications. It features a 65A output, high-frequency non-touch pilot arc starting, and dual voltage capability (110V/220V), allowing for clean cuts on various metals including carbon steel, stainless steel, and aluminum.
2. د خوندیتوب معلومات
د پلازما پرې کول لوړ حجم لريtage, high temperature, and compressed air. Always follow safety precautions to prevent electric shock, burns, fire, and other injuries.
- د بریښنا شاک خطر: Ensure the machine is properly grounded. Do not operate in wet conditions. Wear dry gloves and protective clothing.
- لوګي او ګازونه: Ensure adequate ventilation. Avoid inhaling fumes. Use a respirator if necessary.
- د قوس وړانګې: Protect eyes and skin from arc rays. Wear a welding helmet with appropriate shade, protective clothing, and gloves.
- اور او چاودنه: د اور لګېدونکي توکي د پرې کولو له ساحې څخه لرې وساتئ. د اور وژنې وسیله په اسانۍ سره ولرئ.
- ګرمې برخې: Allow the torch and workpiece to cool before handling.
- کمیدونکی هوا: Ensure air lines are securely connected. Do not exceed recommended air pressure.
- د ډیر تودوخې ساتنه: The machine is equipped with overheat protection. If the machine stops, allow it to cool down before resuming operation.
- ساتنه: Disconnect power before performing any maintenance or changing consumables.
3. محصول ختم شوview او اجزا
The S7 CUT50 Plasma Cutter comes with the main unit and several essential accessories. Familiarize yourself with each component before operation.

Figure 3.1: S7 CUT50 Plasma Cutter and included accessories. This image shows the main plasma cutter unit, plasma torch, ground clamp, air pressure regulator, air hose, and various consumables.

Figure 3.2: Labeled components of the S7 CUT50 Plasma Cutter kit.
- CUT-50 Pilot Arc Plasma Cutter (Main Unit)
- 13.2ft/4m AG60 Torch
- CUT-50 Consumables (Nozzles, Electrodes, Swirl Rings, Shield Cups)
- 220V->110V Adapter (Power Adapter)
- 6ft/2m Ground Clamp
۴.۱ د اصلي واحد ځانګړتیاوې
- ډیجیټل ډیزاین: اوسنی ښيي ampد عمر ترتیب.
- د اوسني سمون غوټۍ: For precise control of cutting amperage (20A to 65A).
- د هوا د فشار ګیج: Displays incoming air pressure.
- Built-in Air Pressure Regulator: Manages air flow for optimal cutting.
- Pilot Arc: Non-touch arc starting for extended electrode life and cutting through rusty/painted surfaces.
- دوه ګونی والیtage: په ۱۱۰ وولټ او ۲۲۰ وولټ دواړو بریښنا رسولو کې کار کوي.
- IGBT Technology: For stable and efficient performance.

Figure 3.3: Front panel of the S7 CUT50 Plasma Cutter, highlighting High Frequency, Pilot Arc, IGBT Technology, 50/60Hz, and Dual Voltage وړتیاوې.
3.2 ابعاد

Figure 3.4: Physical dimensions of the S7 CUT50 Plasma Cutter, showing approximate measurements of 16 inches (40.6 cm) in length, 6 inches (15.2 cm) in width, and 10 inches (25.4 cm) in height.
3.3 مصرفي توکي
The plasma torch requires specific consumables for optimal performance. These include the nozzle, electrode, swirl ring, and shield cup. The orifice size of the nozzle tip is 1.3mm.

Figure 3.5: Detailed dimensions of plasma cutter consumables, including the nozzle, electrode, and shield cup. The nozzle tip orifice is 1.3mm.
4. ترتیب کول
Follow these steps to set up your S7 CUT50 Plasma Cutter for operation.
- ځای په ځای کول: Place the plasma cutter on a stable, level surface with adequate ventilation. Ensure there is enough space around the unit for air circulation.
- د بریښنا پیوستون:
- For 220V operation, connect the power cord directly to a compatible 220V outlet.
- For 110V operation, use the provided 220V to 110V adapter to connect the power cord to a 110V outlet. Ensure the outlet can provide sufficient ampزمانه
- د هوا کمپرسور اتصال:
- Connect your air compressor to the air inlet on the rear of the plasma cutter. The unit has a built-in air pressure regulator.
- Adjust the air pressure using the regulator knob to the recommended operating pressure (typically 60-70 PSI for cutting). The gauge on the front panel will display the pressure.

شکل 4.1: شاته view of the S7 CUT50 Plasma Cutter showing the built-in air pressure regulator and air inlet connection. No additional installation is required for the regulator.
- د مشعل اتصال: Connect the plasma torch cable to the designated port on the front panel of the machine. Ensure it is securely fastened.
- د ځمکې Clamp پیوستون: د ځمکې سره نښلولamp cable to the appropriate terminal on the front panel. Securely clamp ځمکه clamp د کار ټوټې یا کاري میز ته، د ښه بریښنایی تماس ډاډمن کول.
- د مصرف وړ توکي نصب کړئ: Ensure the correct nozzle, electrode, swirl ring, and shield cup are properly installed in the plasma torch.
5. عملیاتي لارښوونې
Once the setup is complete, you can begin plasma cutting. Always wear appropriate personal protective equipment (PPE) including a welding helmet, gloves, and protective clothing.
- چالانول: Flip the power switch on the rear of the machine to the "ON" position. The digital display on the front panel will illuminate.
- سمون Ampزمانه: Use the current adjustment knob to set the desired cutting amperage. The digital display will show the selected amperage. Refer to the cutting chart (if available, or general guidelines) for recommended settings based on material type and thickness.
- د کار ټوټه چمتو کول: Ensure the workpiece is clean and free of rust, paint, or other contaminants for best results. Secure the ground clamp firmly to the workpiece or a conductive work surface.
- د قوس پیل کول: Position the torch nozzle approximately 1/8 inch to 1/4 inch above the starting point of the cut. Press the trigger on the torch to initiate the pilot arc. The non-touch pilot arc allows for easy starting without direct contact with the workpiece.
- پرې کول پیل کړئ: Once the pilot arc is established, slowly move the torch across the material along the desired cut line. Maintain a consistent speed and standoff distance for a clean cut. Observe the molten metal exiting the bottom of the cut (dross) to ensure full penetration.
- Cutting Capabilities: The S7 CUT50 is capable of cutting various materials, including:
- د کاربن فولاد
- اوسپنه
- د الماس فولاد
- مسو
- المونیم
- سټینلیس سټیل
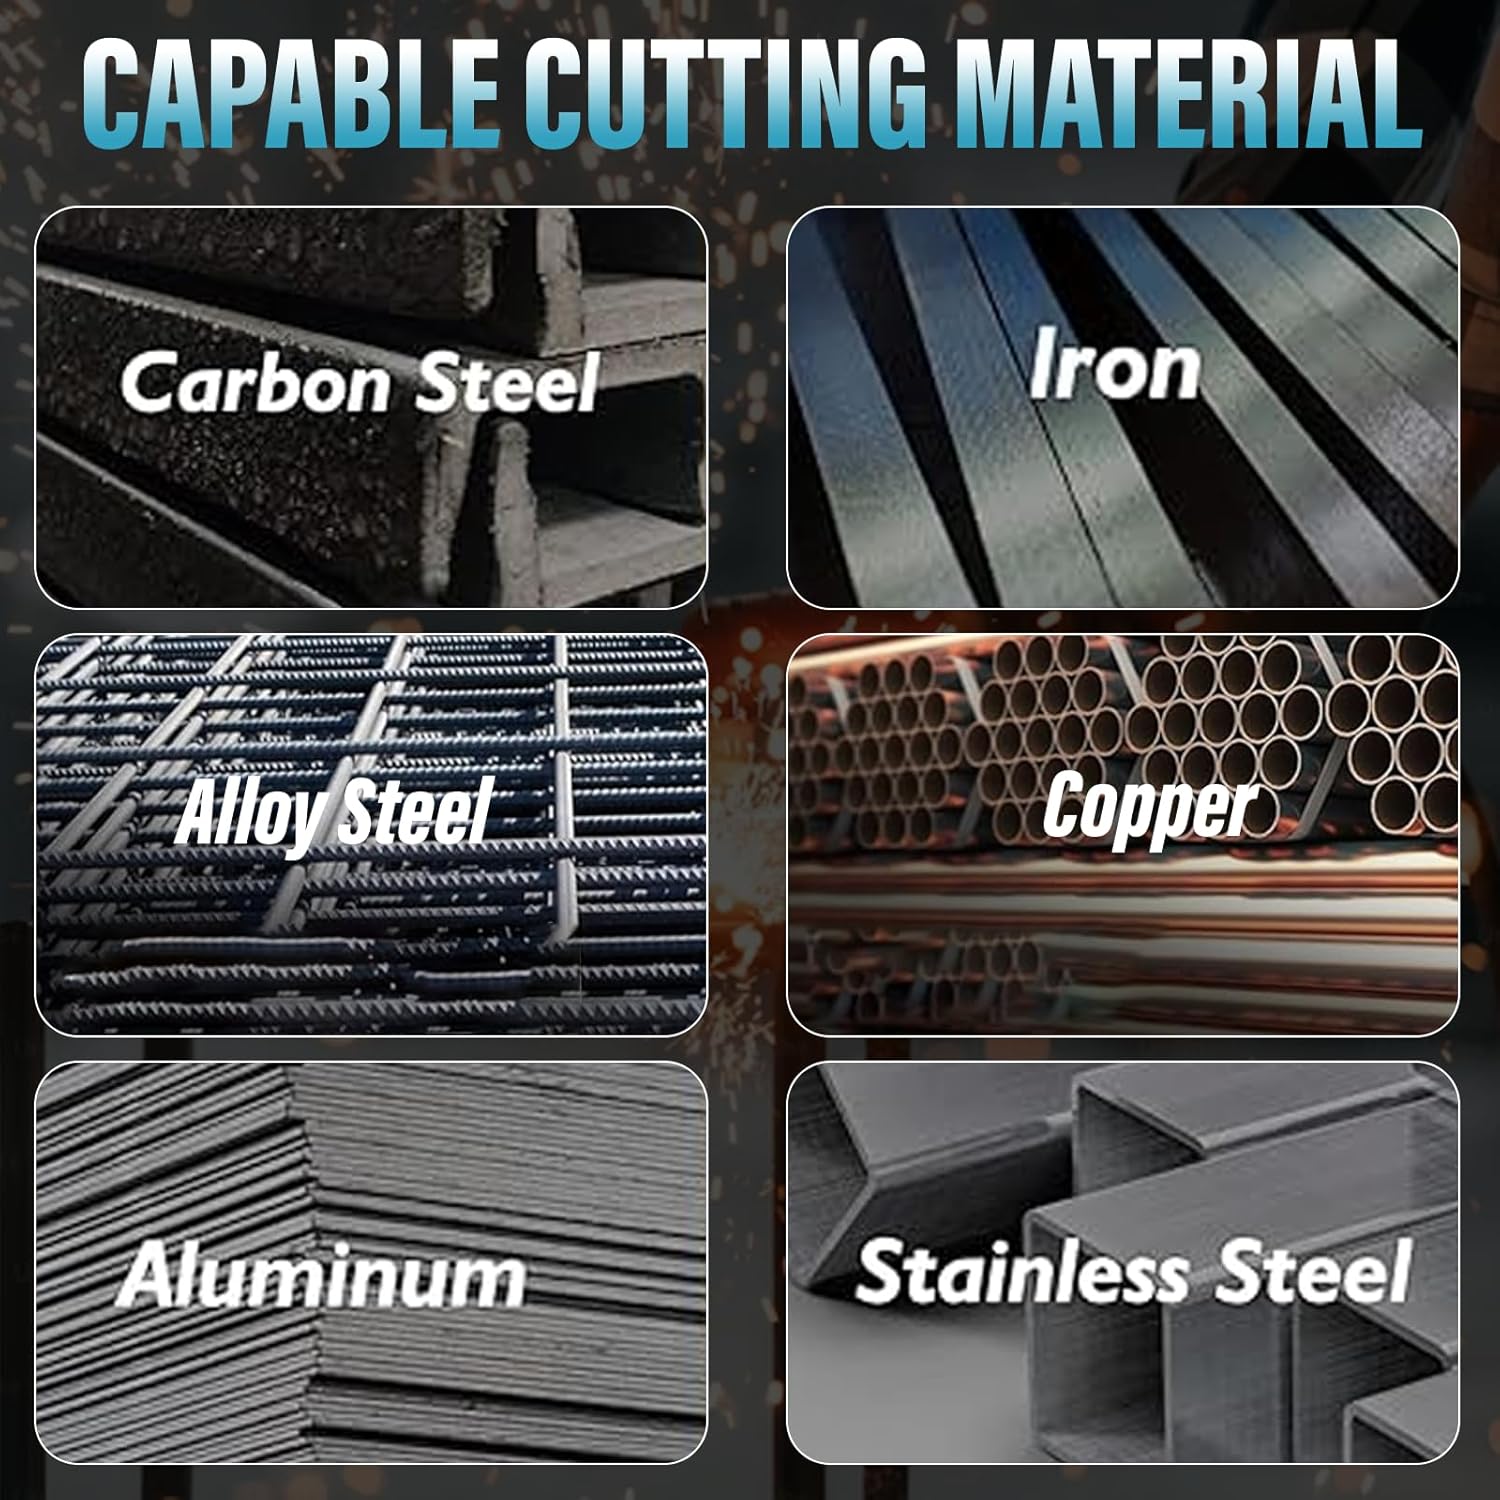
شکل 5.1: مثالamples of materials that can be cut with the S7 CUT50 Plasma Cutter, including Carbon Steel, Iron, Alloy Steel, Copper, Aluminum, and Stainless Steel.
The machine can achieve a 1/2 inch clean cut and a 3/4 inch maximum cut on suitable materials.
- وروسته جریان: د ریلي وروستهasing the trigger, the machine will continue to flow air for a short period (post-flow) to cool the torch and extend consumable life. Do not disconnect the torch during post-flow.
- بندول: When finished, turn off the machine using the power switch. Disconnect the power cord and air supply.
6. ساتنه
Regular maintenance ensures the longevity and optimal performance of your plasma cutter. Always disconnect power before performing maintenance.
- د مصرف وړ بدیل:
- Inspect the nozzle and electrode regularly for wear. Replace them when the orifice becomes enlarged or the electrode tip is significantly pitted.
- Ensure the swirl ring is clean and not damaged, as it is crucial for proper gas flow.
- Replace the shield cup if it is cracked or excessively worn.
- Air Filter/Regulator Maintenance:
- Periodically check the water trap on the air pressure regulator. Drain any accumulated moisture by opening the drain valve.
- Clean or replace the air filter element if it becomes clogged or dirty to ensure a clean and dry air supply to the torch.
- عمومي پاکول:
- Keep the machine clean and free of dust and metal particles. Use compressed air to blow out internal components periodically, ensuring the machine is unplugged.
- Inspect all cables and connections for damage. Replace any worn or damaged parts immediately.
7. ستونزه حل کول
دا برخه د هغو عامو ستونزو حلونه وړاندې کوي چې تاسو ورسره مخ کیدی شئ.
| ستونزه | احتمالي لامل | د حل لاره |
|---|---|---|
| ماشین نه چالانېږي. | No power supply; Power switch off; Blown fuse/tripped breaker. | Check power cord connection; Ensure power switch is ON; Check building's circuit breaker or machine's internal fuse. |
| قوس یا کمزوری قوس نشته. | Poor ground connection; Worn consumables; Insufficient air pressure; Torch not connected properly. | د ځمکې کلکوالی ډاډمن کړئamp has good contact; Replace nozzle/electrode; Adjust air pressure to recommended PSI; Re-seat torch connection. |
| Poor cut quality (rough, wide kerf, dross). | غلط amperage setting; Incorrect cutting speed; Worn consumables; Incorrect standoff distance; Contaminated air supply. | سمون amperage for material thickness; Adjust cutting speed; Replace consumables; Maintain consistent standoff; Drain water trap/check air filter. |
| د ډیر تودوخې شاخص فعال دی. | Exceeded duty cycle; Insufficient ventilation. | Allow machine to cool down; Ensure adequate airflow around the unit. |
8. مشخصات
| فیچر | تفصیل |
|---|---|
| د ماډل شمیره | CUT50 |
| ننوتۍ جلدtage | 110V/220V AC |
| د محصول اوسنی | 20A - 65A |
| Clean Cut Thickness | Up to 1/2 inch (12mm) |
| Max Cut Thickness | Up to 3/4 inch (19mm) |
| د محصول ابعاد | 16 x 6 x 10 انچه |
| د توکي وزن | 22.2 پونډه |
| Arc Starting | Pilot Arc (Non-Touch) |
| ټیکنالوژي | د IGBT انورټر |
| جوړونکی | win-win |
9. تضمین او ملاتړ
For warranty information, technical support, or service inquiries, please contact S7 customer service. Keep your purchase receipt as proof of purchase.
Please note: This manual does not contain specific video embedding instructions as no relevant seller-created video content was identified in the provided product data that met the embedding criteria.