Vetroo AL800
Vetroo AL800 Mid Tower ATX PC Computer Case
د لارښوونې لارښود
پیژندنه
This manual provides detailed instructions for the assembly, operation, and maintenance of your Vetroo AL800 Mid Tower ATX PC Computer Case. Please read this manual thoroughly before beginning installation to ensure proper setup and optimal performance.

Figure 1: Vetroo AL800 Mid Tower ATX PC Computer Case (Black)
د خوندیتوب معلومات
- تل د هر ډول اجزاو نصبولو یا لرې کولو دمخه د دیوال له سایټ څخه د بریښنا رسولو قطع کړئ.
- د الکتروسټاتیک خارجیدو څخه د زیان څخه د مخنیوي لپاره اجزاو ته په احتیاط سره لاس ورکړئ. د جامد ضد لاسي تسمې کارولو په اړه فکر وکړئ.
- Keep the case and components away from liquids and excessive humidity.
- د ډیر تودوخې مخنیوي لپاره مناسب هوا ورکول ډاډمن کړئ.
- د قضیې یا د هغې اجزاو د بدلولو هڅه مه کوئ، ځکه چې دا ممکن ستاسو تضمین باطل کړي او د خوندیتوب خطرونه رامینځته کړي.
د بسته محتويات
ډاډ ترلاسه کړئ چې ټول توکي په کڅوړه کې شتون لري:
- Vetroo AL800 Mid Tower ATX PC Computer Case
- Accessory Box (screws, standoffs, cable ties)
- Pre-installed 1x 120mm PWM/ARGB Fan (rear)
- د کارونکي لارښود (دا لاسوند)
کلیدي ځانګړتیاوې
- ARGB LED Strip: Integrated LED lighting and ARGB case fans can be synchronized with compatible motherboards via a 5V 3-pin interface.
- Door Opening Design: Features a 4mm thick tempered glass side panel with a convenient door-opening mechanism for easy access to internal components.
- High Performance Airflow: A mesh front panel and strategically placed dust filters ensure optimal airflow and system cooling.
- پراخه مطابقت: د ATX، M-ATX، او ITX مدر بورډونو ملاتړ کوي. د 340 ملي میتر پورې اوږدوالی لرونکي GPUs او د 165 ملي میتر پورې لوړوالي لرونکي CPU کولرونه ځای په ځای کوي.
- د مایع یخولو ملاتړ: Front panel supports up to a 360mm liquid cooling radiator.
- د فین ملاتړ: تر ۳ x ۱۲۰ ملي میتره پورې مینه وال ملاتړ کوي.
- ساده کیبل مدیریت: Includes two soft silicone cord grommets for organized cable routing.
- Powerful I/O Panel: Features 1x USB 3.2 Type-C port, 2x USB 3.0 ports, and a combined microphone/headphone jack.
تنظیم او نصب کول
1. General Preparation
- قضیه په یوه فلیټ او مستحکم سطحه کېږدئ.
- Open the tempered glass side panel by gently pulling it open. It is hinged for easy access.
- Remove the tempered glass panel if necessary for easier installation by lifting it off its hinges once open.

Figure 2: Tempered Glass Door Opening Design
2. د مور بورډ نصب کول
- د I/O شیلډ (که چیرې د تطبیق وړ وي) د قضیې په شا پرانیستلو کې نصب کړئ.
- Align your ATX, M-ATX, or ITX motherboard with the pre-installed standoffs.
- Secure the motherboard using the provided screws from the accessory box.
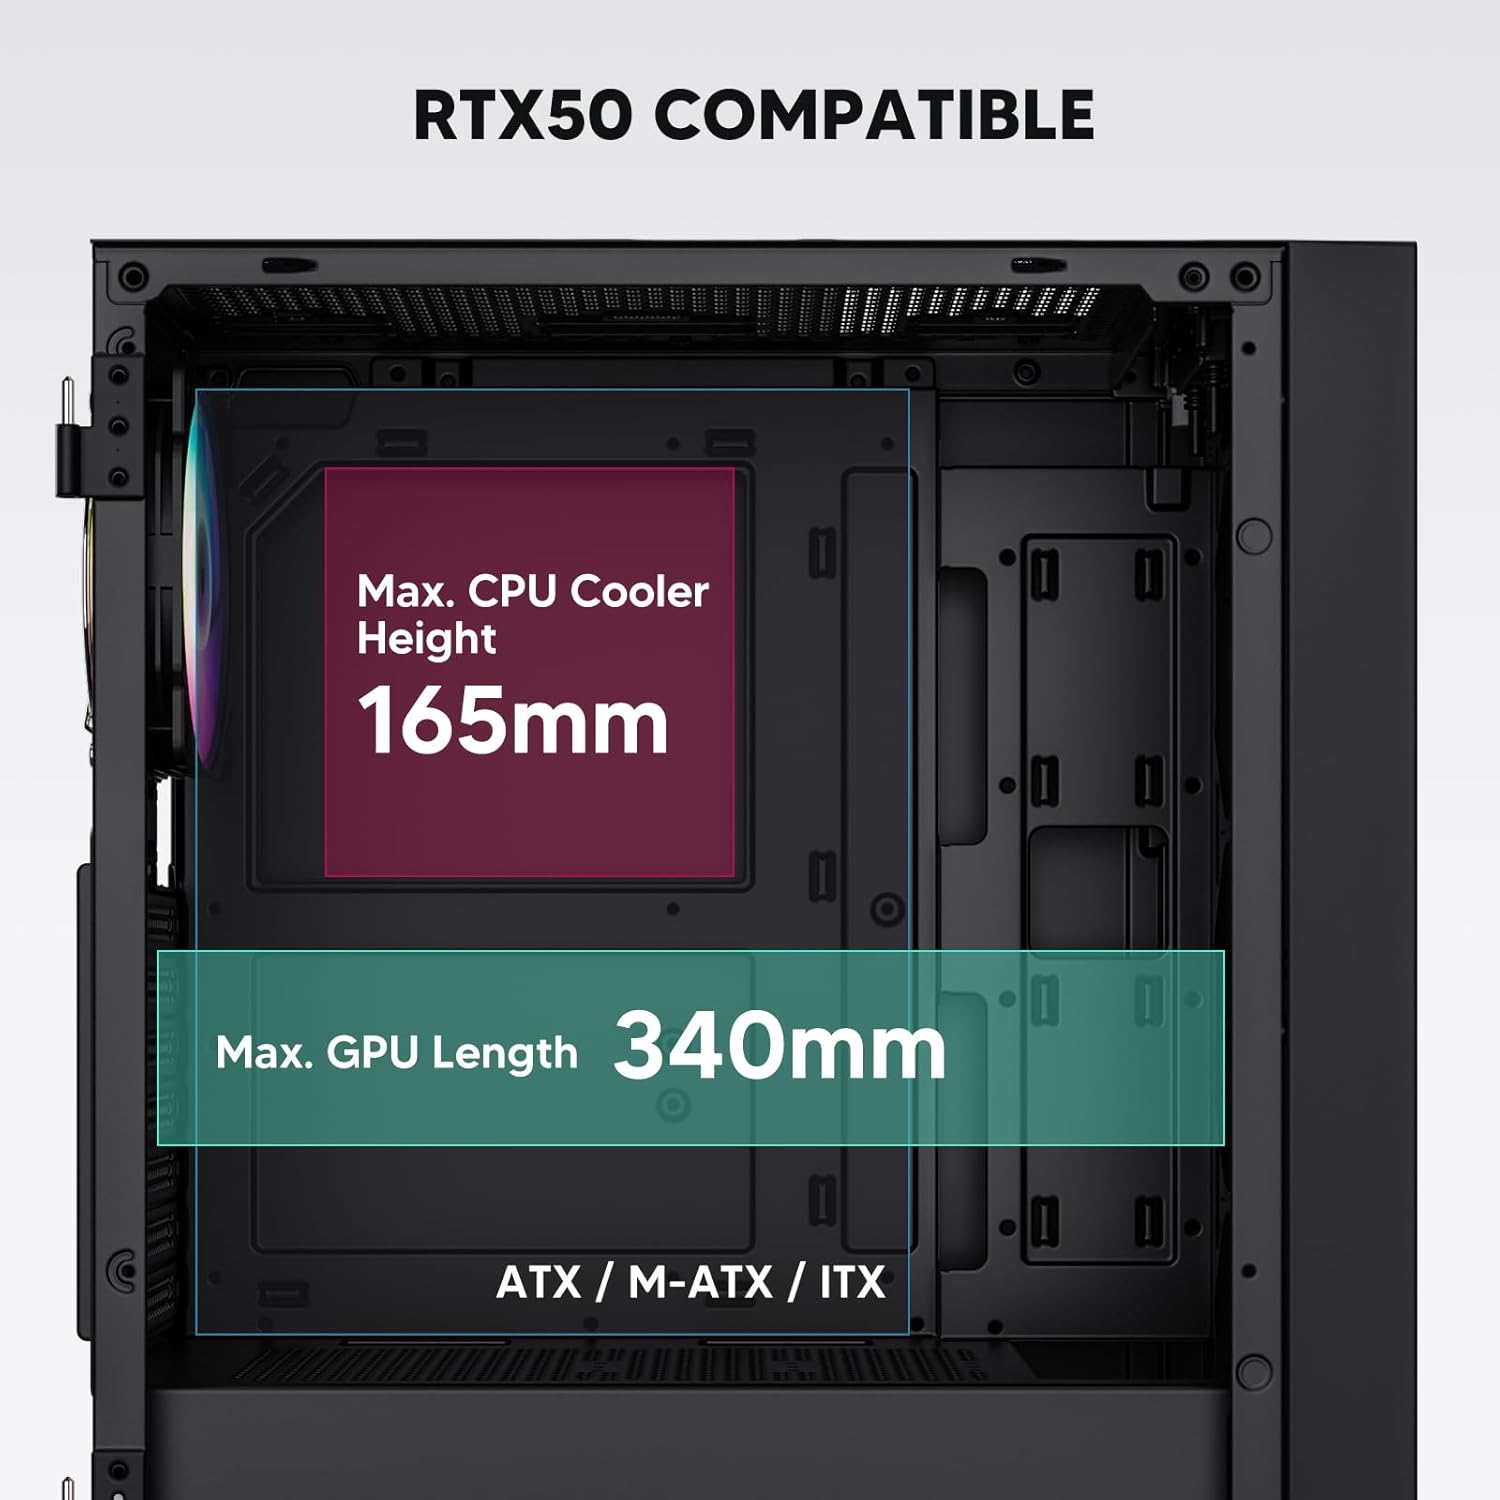
Figure 3: Motherboard and Component Clearance (Max CPU Cooler Height 165mm, Max GPU Length 340mm)
3. Storage Device Installation (HDD/SSD)
- Locate the dedicated mounting points for SSDs and HDDs.
- Install 2.5" SSDs onto the SSD trays or mounting brackets.
- Install 3.5" HDDs into the drive cage located at the bottom of the case.
- ټول ډرایوونه د مناسبو پیچونو سره خوندي کړئ.

Figure 4: Internal Layout with Drive Bay Locations (SSD, HDD, Power Supply)
4. د بریښنا رسولو نصب کول
- Mount your power supply unit (PSU) in the dedicated compartment at the bottom rear of the case.
- Ensure the PSU fan faces downwards (if the case has a bottom vent) or upwards, depending on your cooling preference.
- Secure the PSU with screws from the rear of the case. The case supports PSUs up to 200mm in length.
5. Expansion Card (GPU) Installation
- د کیس له شا څخه اړین PCI-E سلاټ پوښونه لرې کړئ.
- Insert your graphics card or other expansion cards into the motherboard's PCI-E slots.
- کارتونه د پیچونو سره خوندي کړئ. قضیه تر 340 ملي میتر پورې اوږدوالي لرونکي GPUs ملاتړ کوي.
6. Cooling System Installation (Fans/Radiators)
- The case comes with one pre-installed 120mm PWM/ARGB fan at the rear.
- Additional fans (120mm or 140mm) can be installed at the front, top, and bottom.
- Liquid cooling radiators up to 360mm can be installed at the front, and up to 240mm at the top.
- Refer to the diagram for supported fan and radiator configurations.

Figure 5: Fan and Liquid Radiator Support Diagram
۵.۸. د مخکینۍ تختې اړیکې
- Connect the front panel cables (Power, Reset, USB 3.0, USB Type-C, HD Audio) to the corresponding headers on your motherboard.
- Consult your motherboard manual for the exact pin layout of these headers.
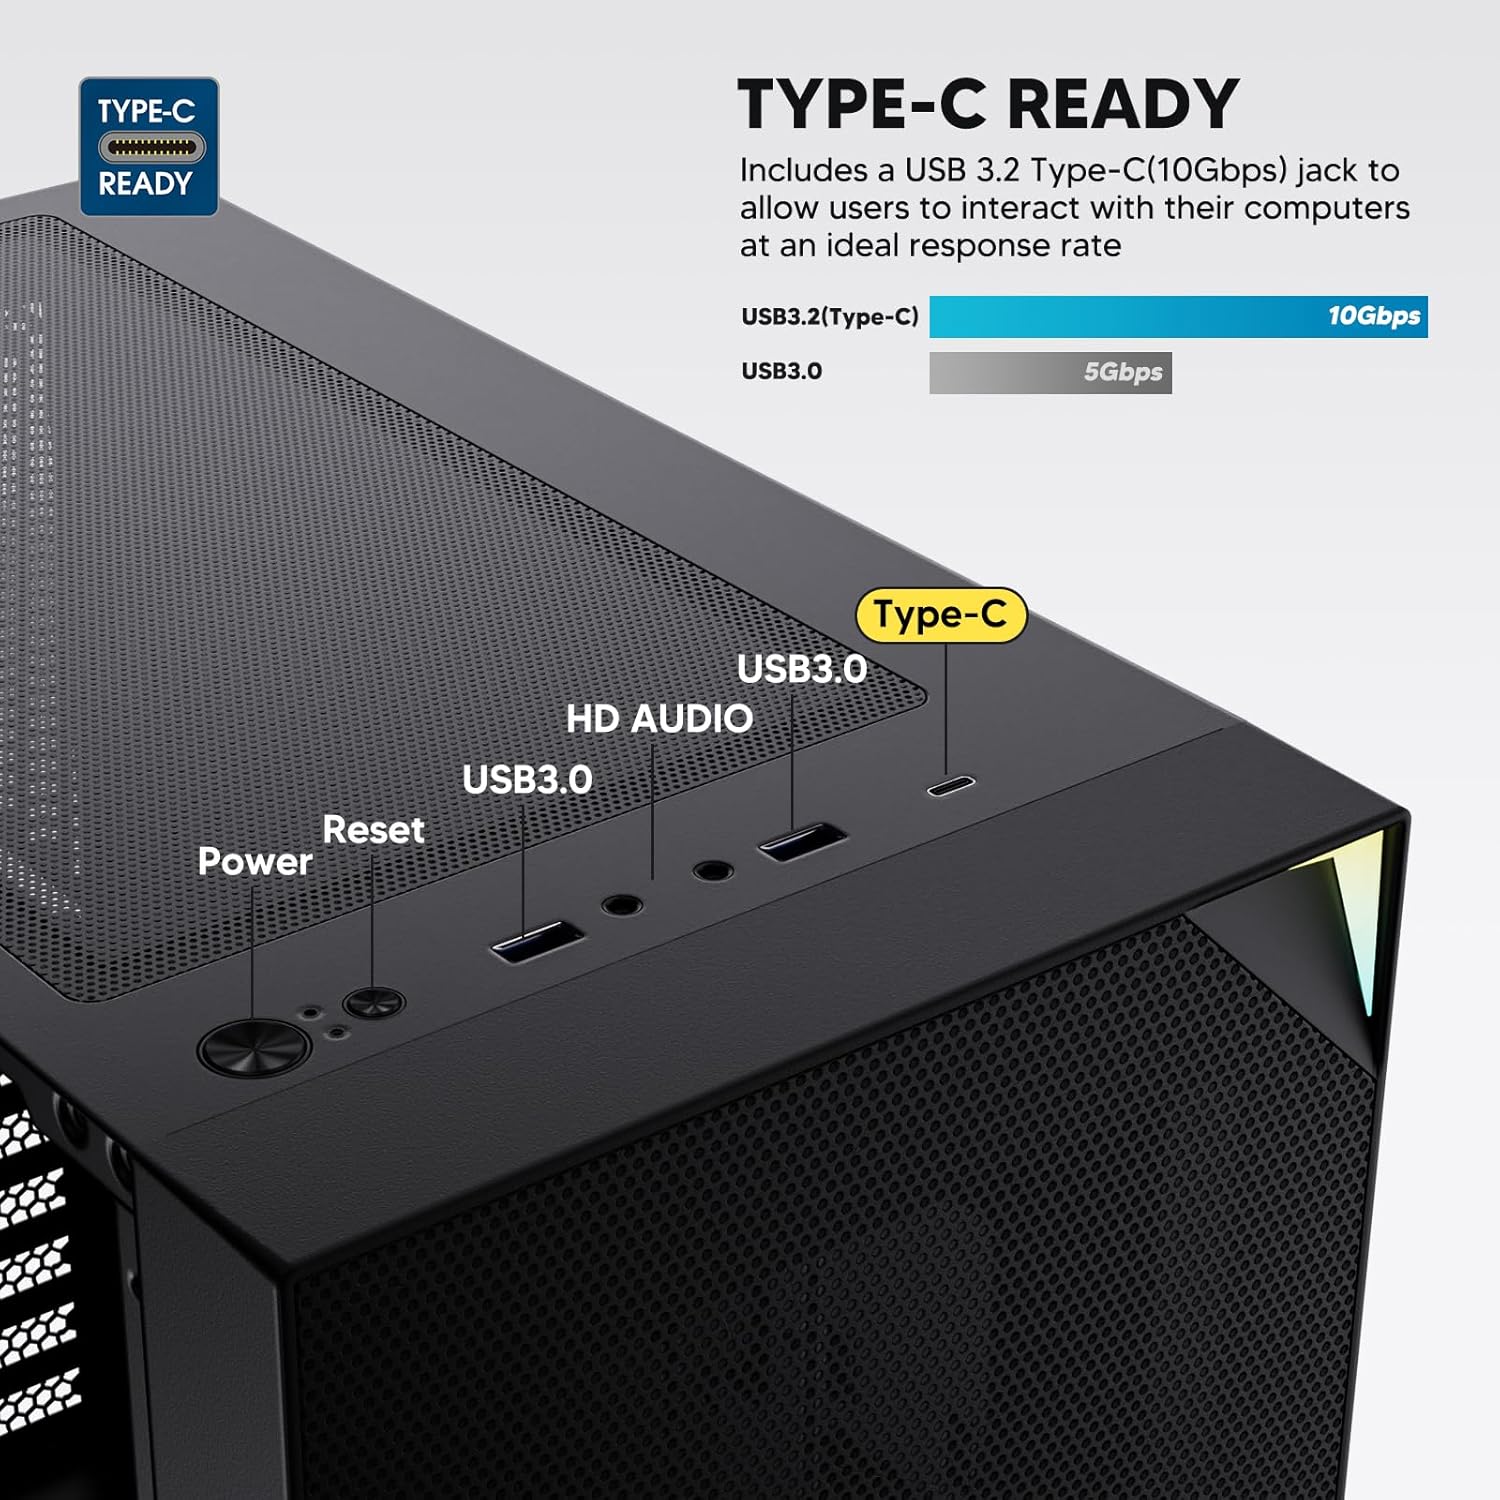
Figure 6: Top I/O Panel Connections
8. ARGB and PWM Connections
- The pre-installed fan and ARGB LED strip require connection to your motherboard.
- Connect the 4-pin PWM connector from the fan to a compatible fan header on your motherboard for speed control.
- Connect the 3-pin ARGB connector from the fan and LED strip to a 5V 3-pin ARGB header on your motherboard for lighting synchronization. د 12V RGB سرلیک سره مه وصل کیږئ، ځکه چې دا به LEDs ته زیان ورسوي.
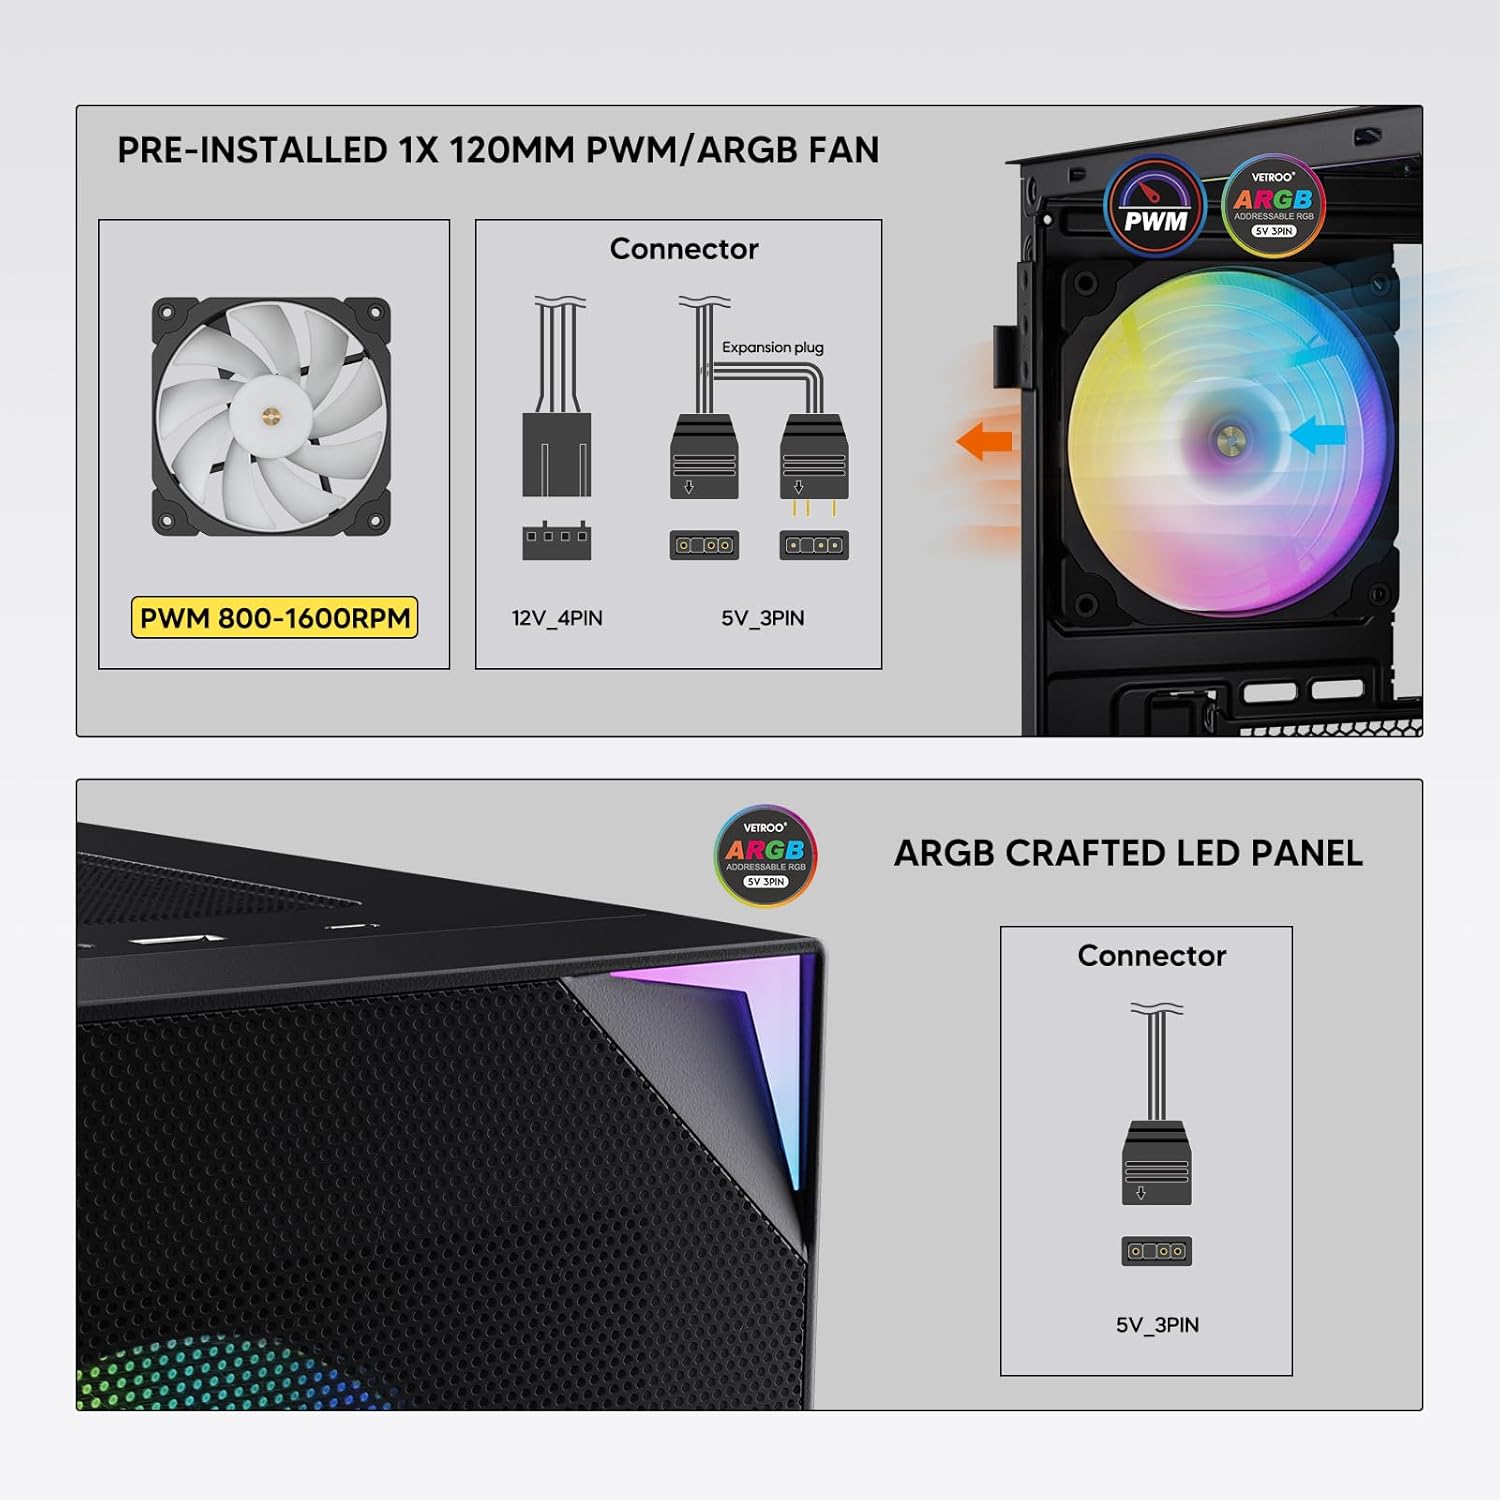
Figure 7: PWM and ARGB Connector Details
9. د کیبل مدیریت
- Utilize the cable routing cutouts and tie-down points behind the motherboard tray to organize cables.
- The soft silicone grommets help protect cables and provide a clean look.
- د کیبل مناسب مدیریت د هوا جریان او جمالیات ښه کوي.
عملیات
۳. لومړنی بریښنا فعالول
- After all components are securely installed and cables connected, close the tempered glass side panel.
- Connect your monitor, keyboard, mouse, and power cable to the PC.
- Flip the power switch on your PSU to the 'ON' position.
- Press the power button on the top I/O panel of the case to start your system.
۵.۲. د ARGB رڼا کنټرول
- If connected to a compatible motherboard's 5V 3-pin ARGB header, the lighting of the pre-installed fan and LED strip can be controlled via your motherboard's RGB software (e.g., ASUS Aura Sync, MSI Mystic Light Sync, Gigabyte RGB Fusion, ASRock Polychrome Sync).
- Refer to your motherboard's manual for specific instructions on using its ARGB control software.
3. Airflow Management
- The mesh front panel is designed for optimal air intake.
- Ensure that intake fans (typically front and bottom) and exhaust fans (typically rear and top) are configured to create positive or neutral air pressure for efficient cooling and dust prevention.

Figure 8: Airflow Diagram with Dust Filters
ساتنه
۵.۱. د دوړو فلټر پاکول
- The case is equipped with dust filters on the top and bottom panels.
- Regularly check and clean these filters to maintain optimal airflow and prevent dust buildup inside the system.
- Gently remove the magnetic dust filters and clean them with compressed air or by rinsing with water (ensure they are completely dry before re-installation).
2. Tempered Glass Panel Care
- Clean the tempered glass panel with a soft, lint-free cloth and a non-abrasive glass cleaner.
- Avoid harsh chemicals or abrasive materials that could scratch or damage the glass.
د ستونزو حل کول
- سیسټم نه فعالیږي:
- ډاډ ترلاسه کړئ چې د بریښنا کیبل په خوندي ډول د PSU او دیوال آوټ لیټ دواړو سره وصل دی.
- ډاډ ترلاسه کړئ چې د PSU سویچ په 'آن' حالت کې دی.
- وګورئ چې د مخکینۍ پینل د بریښنا تڼۍ کیبل په سمه توګه د مور بورډ سرلیک سره وصل دی.
- Confirm all power cables (24-pin ATX, CPU, GPU) are properly seated in the motherboard and components.
- پنکه نه ګرځېږي / ARGB نه روښانه کېږي:
- Check that the fan's PWM connector is securely plugged into a motherboard fan header.
- Verify the ARGB 3-pin connector is correctly attached to a 5V 3-pin ARGB header on the motherboard (not 12V RGB).
- ډاډ ترلاسه کړئ چې ستاسو د مور بورډ ARGB سافټویر په سمه توګه نصب او تنظیم شوی دی.
- د USB پورټونه کار نه کوي:
- Confirm the USB 3.0 and USB Type-C front panel cables are correctly connected to their respective motherboard headers.
- د سم سرلیک ځایونو لپاره د خپل مور بورډ لارښود وګورئ.
- For other component-specific issues, refer to the instruction manuals for your motherboard, CPU, GPU, and other installed hardware.
مشخصات
| برانډ | ویټرو |
| د ماډل نوم | AL800 |
| د توکي ماډل شمیره | VT-CASE-AL800-BK (FBA) |
| د قضیې ډول | منځنی برج |
| د مور بورډ مطابقت | ATX، M-ATX، ITX |
| رنګ | تور |
| مواد | فلزي، توده شیشه |
| د توکي وزن | ۱.۹ پونډه (تقریبا ۰.۸۶ کیلوګرامه) |
| د محصول ابعاد (LxWxH) | ۲.۶۴ x ۲.۳۲ x ۲.۷۶ انچه (تقریبا ۶.۷ x ۵.۹ x ۷ سانتي متره) |
| اعظمي GPU اوږدوالی | 340 ملي متره |
| د اعظمي CPU کولر لوړوالی | 165 ملي متره |
| د PSU اعظمي اوږدوالی | 200 ملي متره |
| سامنے I / O بندرونه | 1x USB 3.2 Type-C, 2x USB 3.0, HD Audio (Mic/Headphone), Power, Reset |
| د فین ملاتړ | Front: 3x 120mm or 2x 140mm; Top: 2x 120mm or 2x 140mm; Rear: 1x 120mm; Bottom: 2x 120mm |
| د ریډیټر ملاتړ | Front: 120/140/240/280/360mm; Top: 120/140/240mm; Rear: 120mm |
| مخکې نصب شوي فین | 1x 120mm PWM/ARGB (Rear) |
تضمین او ملاتړ
For warranty information, technical support, or to inquire about replacement parts, please visit the official Vetroo webسایټ ته مراجعه وکړئ یا مستقیم د دوی د پیرودونکو خدماتو سره اړیکه ونیسئ. د تضمین ادعاوو لپاره د پیرود ثبوت وساتئ.
Official Vetroo Store: Vetroo Amazon Store