1. محصول ختم شوview
The VEVOR ALK-T3 Fiber Fusion Splicer is a high-precision optical fiber splicing machine designed for efficient and reliable fiber optic connections. It features 4 high-precision motors, clad alignment technology, and a 5-inch color touch screen for clear operation. This device is compatible with various fiber types including SM, MM, DS, NZDS, UI, BUI, and EDF, utilizing a versatile 3-in-1 fiber holder. Its robust design ensures durability in diverse environmental conditions.

۲. تنظیم او ابتدايي چمتووالی
Before operating the VEVOR ALK-T3 Fiber Fusion Splicer, ensure all components are present and the device is properly prepared for use.
2.1 پیک کول او تفتیش کول
- Carefully unpack the fusion splicer and all accessories from the portable case.
- Verify that all items listed in the 'Professional All-in-One Kit' are present.
- Inspect the splicer for any visible damage that may have occurred during transit.

2.2 د بیټرۍ چارج کول
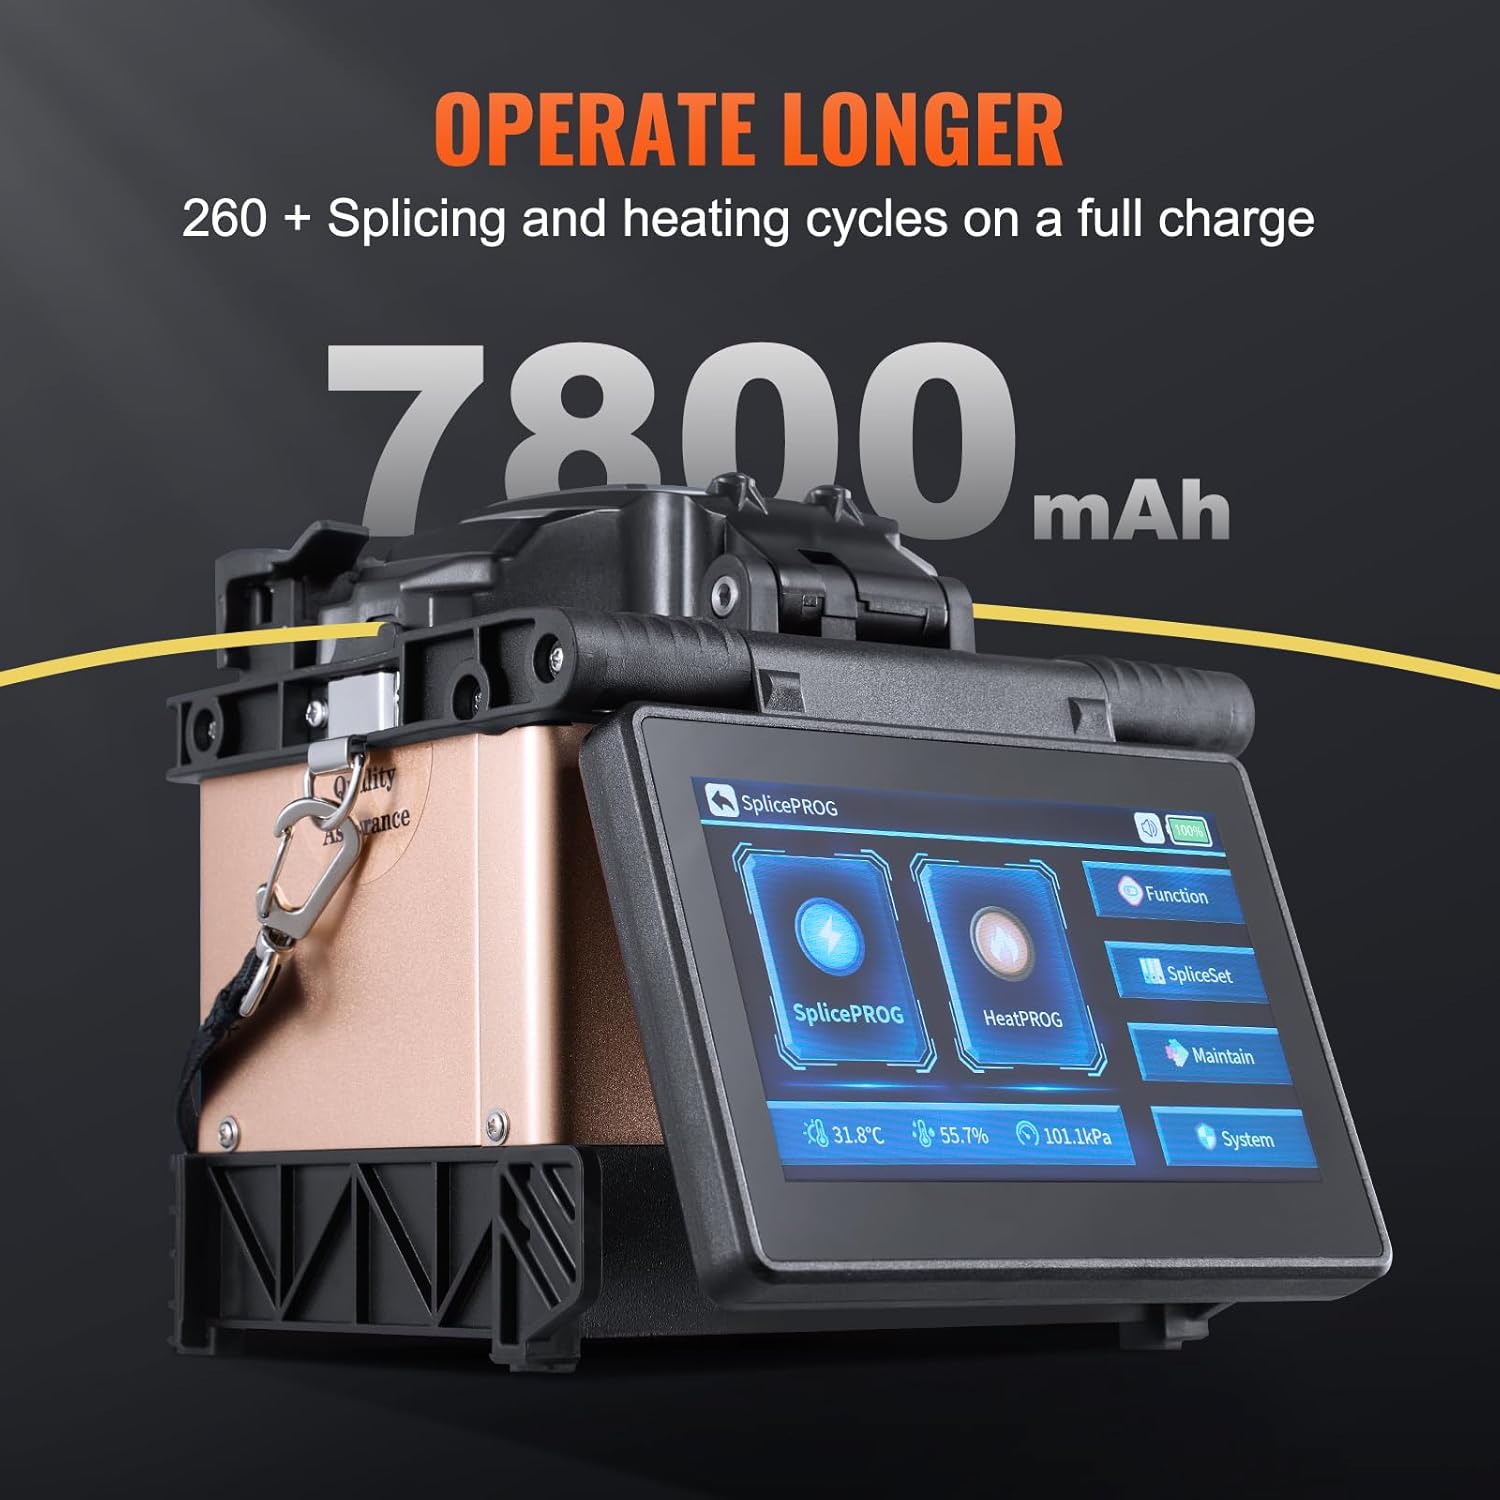
The splicer is equipped with a 7800mAh high-capacity rechargeable battery. For optimal performance, ensure the battery is fully charged before extended use.
- Connect the provided power adapter to the splicer's charging port.
- اډاپټر په مناسب بریښنا پلورنځي کې ولګوئ.
- The charging indicator on the device will show the charging status. A full charge allows for over 260 continuous fusion splicing and heating cycles.
3. عملیاتي لارښوونې
Follow these steps for effective fiber fusion splicing.
۵.۱ د فایبر چمتووالی
- Strip the Fiber: Use the fiber stripper to remove the protective coating from the fiber optic cable, exposing the bare fiber.
- Clean the Fiber: Apply alcohol to a lint-free wipe and carefully clean the stripped fiber to remove any contaminants.
- Cleave the Fiber: Place the cleaned fiber into the fiber cleaver and perform a precise cleave to ensure a clean, perpendicular end face.
3.2 Placing Fiber in the Holder
The splicer features a 3-in-1 fiber holder compatible with various fiber types.
- Open the fiber holder clamps.
- Carefully place the prepared fiber into the appropriate groove of the 3-in-1 holder. Ensure the fiber end is positioned correctly for splicing.
- cl وتړئamps to secure the fiber.

3.3 Performing the Fusion Splice
- پاور آن: Turn on the splicer using the power button. The 5-inch color touch screen will display the interface.
- Select Splicing Mode: On the touch screen, select the appropriate splicing program (SplicePROG) for your fiber type.
- Initiate Splicing: Press the 'Run' button on the screen or the physical button to start the automatic splicing process. The splicer will perform clad alignment, fusion, and loss estimation.
- Monitor Splicing: Observe the splicing process on the 5-inch display. The screen offers independent 330x X or Y magnification and simultaneous 200x X/Y display for clear viewing of fiber cores and splicing status.
- ګرمول: After successful splicing, move the spliced fiber to the heating tray. Select the heating program (HeatPROG) and initiate heating to protect the splice with a heat shrink tube.


4. ساتنه
Regular maintenance ensures the longevity and optimal performance of your VEVOR ALK-T3 Fiber Fusion Splicer.
4.1 پاکول
- Use the provided brush and cotton swabs with alcohol to clean the V-grooves, electrodes, and objective lenses regularly.
- Ensure no dust or fiber debris accumulates on the splicing area or display screen.
- The device is designed to be dustproof; however, keeping it clean will prevent operational issues.
۸.۳ د الکترود بدلول
Electrodes are consumable parts and require replacement after a certain number of splices or if splicing performance degrades. Refer to the 'Abundant Accessories' image for spare electrodes.
- Power off the splicer and disconnect it from the power source.
- Carefully remove the old electrodes following the instructions in the full user manual.
- Install new electrodes, ensuring they are correctly seated.
- Perform an arc calibration after electrode replacement.
4.3 Light Source Calibration
Periodic calibration of the light source ensures accurate splicing results.
5. ستونزه حل کول
This section addresses common issues you might encounter with your VEVOR ALK-T3 Fiber Fusion Splicer.
| ستونزه | احتمالي لامل | د حل لاره |
|---|---|---|
| High Splicing Loss | Dirty fiber ends, poor cleave, worn electrodes, incorrect splicing parameters. | Clean fiber thoroughly, re-cleave fiber, replace electrodes, verify splicing settings. |
| Splicer Fails to Start | Low battery, power adapter issue, device malfunction. | Charge battery, check power connections, contact support if issue persists. |
| ښودنه ځواب نه ورکوي | Software glitch, touch screen issue. | Restart the device. If unresponsive, contact customer support. |
| Fiber Not Aligned | Dirty V-grooves, fiber not seated correctly, motor issue. | Clean V-grooves, re-seat fiber, perform arc calibration. |
6. مشخصات
Key technical specifications for the VEVOR ALK-T3 Fiber Fusion Splicer.
| فیچر | تفصیل |
|---|---|
| ماډل | د ALK-T3 معرفي کول |
| د سمون طریقه | Clad Alignment |
| د موټرو شمیر | 4 |
| د سکرین ډول | د 5 انچ رنګ ټچ سکرین |
| د ویشلو وخت | 6s (Fast), 9s (Standard) |
| د تودوخې وخت | 13s |
| د بیټرۍ ظرفیت | 7800mAh (260+ cycles) |
| فایبر لرونکی | 3-in-1 (SM, MM, DS, NZDS, UI, BUI, EDF) |
| غټوالی | 330x (X or Y), 1100x (Zoom), 200x (X & Y Simultaneous) |
| د توکي وزن | 11.24 lbs / 5.1 kg (including accessories) |
| ابعاد | 5.75 x 5.16 x 5.98 انچه (146 x 131 x 152 mm) |
| د چاپیریال مناسبیت | Dustproof, shatterproof, shockproof; suitable for dry climates, snowstorms, high altitudes, and high-temperature environments. |

7. تضمین او ملاتړ
د تضمین معلوماتو، تخنیکي ملاتړ، یا خدماتو پوښتنو لپاره، مهرباني وکړئ هغه اسنادو ته مراجعه وکړئ چې ستاسو د محصول سره شامل دي یا رسمي VEVOR ته مراجعه وکړئ. website. Ensure you have your product model number (ALK-T3) and purchase details available when contacting support.