KITCHENARM 851011
KITCHENARM 19-in-1 HANDY Bread Machine User Manual
ماډل: 851011
پیژندنه
This manual provides comprehensive instructions for the safe and efficient operation, maintenance, and troubleshooting of your KITCHENARM 19-in-1 HANDY Bread Machine, Model 851011. Please read this manual thoroughly before first use and retain it for future reference.

Figure 1: KITCHENARM 19-in-1 HANDY Bread Machine (Model 851011).
د بسته محتويات
Verify that all items are present and in good condition upon opening the package. If any items are missing or damaged, contact customer service.
- 1 x KITCHENARM Bread Machine (Model KA8510)
- 1 x User Manual & Recipe Book
- 2 x Kneading Paddles (one for use, one spare)
- 1 x Metal Hook for paddle removal
- 1 x US Three-Prong Plug (integrated)
- 1 x Non-Stick Bread Pan (2LB Vertical Pan)
- 2 x Cup-Spoon Sets (measuring cups and spoons)
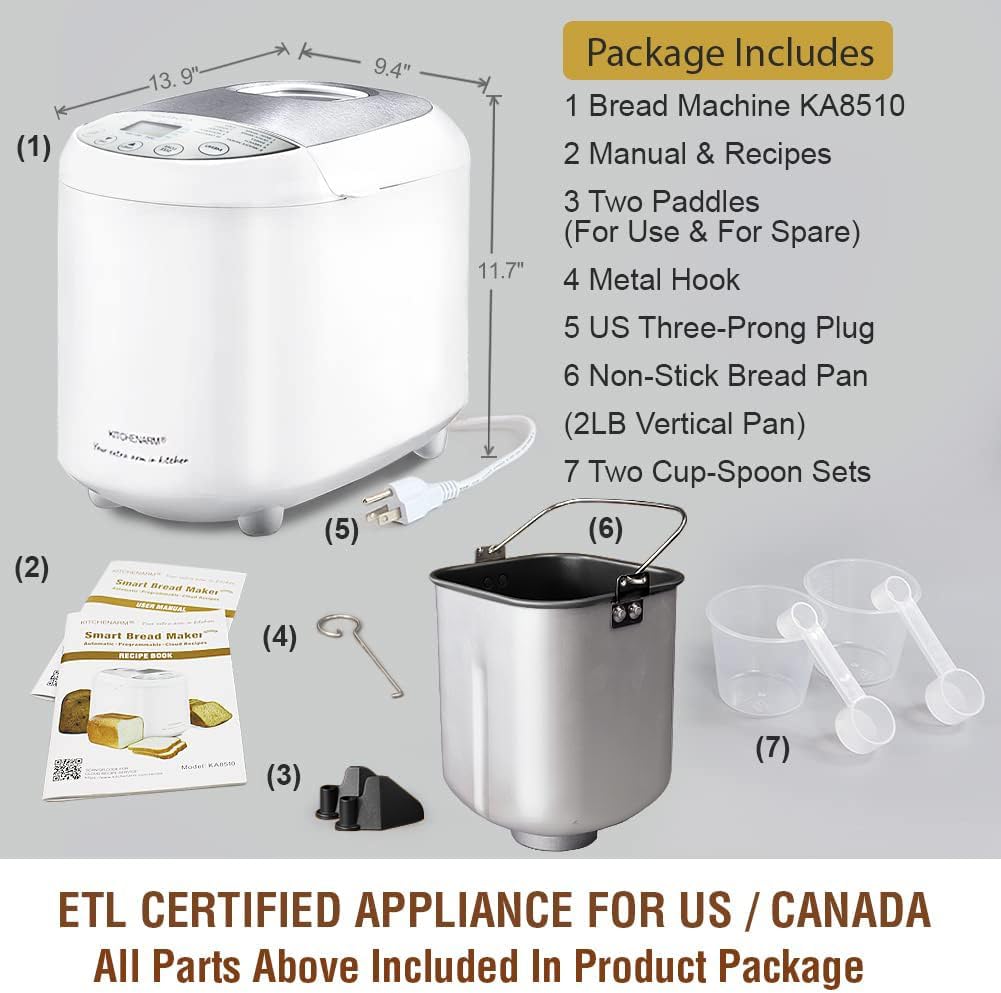
شکل ۲: شامل شوي لوازمات او برخې.
د خوندیتوب مهمې لارښوونې
کله چې د بریښنایی وسایلو کارول، د خوندیتوب لومړني احتیاطونه باید تل تعقیب شي، په شمول د الندې:
- ټول لارښوونې ولولئ.
- ګرمو سطحو ته لاس مه ورکوئ. لاسونه او غوټۍ وکاروئ.
- د برقی شاک څخه د ساتنې لپاره، تار، پلګونه، یا وسایل په اوبو یا نورو مایعاتو کې مه ډوب کړئ.
- نږدې څارنه اړینه ده کله چې کوم وسیله د ماشومانو لخوا یا نږدې کارول کیږي.
- کله چې په کارولو کې نه وي او د پاکولو دمخه د آوټ لیټ څخه خلاص کړئ. اجازه راکړئ چې د برخې ایښودلو یا لرې کولو دمخه یخ کړئ.
- هیڅ وسیله د خراب شوي تار یا پلګ سره مه چلوئ یا د وسیلې له خرابیدو وروسته یا په کوم ډول زیانمن شوي وي. د ازموینې، ترمیم، یا سمون لپاره نږدې مجاز خدماتو تاسیساتو ته وسایل بیرته راشئ.
- د لوازمو ضمیمو کارول چې د وسایلو جوړونکي لخوا وړاندیز شوي ندي ممکن د ټپي کیدو لامل شي.
- په بهر کې مه کاروئ.
- مه پریږدئ چې تار د میز یا کاونټر په څنډه کې ځړول شي، یا ګرمو سطحو ته لمس کړئ.
- د ګرم ګاز یا برقی برنر یا په ګرم تنور کې مه یا نږدې کیږدئ.
- ډیر احتیاط باید وکارول شي کله چې د وسیلې حرکت کول چې ګرم تیل یا نور ګرم مایعات لري.
- د منقطع کولو لپاره، هر کنټرول "بند" ته واړوئ، بیا د دیوال له ساکټ څخه پلګ لرې کړئ.
- د مطلوب کارونې پرته د نورو لپاره وسیله مه کاروئ.
- دا وسیله یو قطبي پلګ لري (یو تیغ د بل په پرتله پراخه دی). د برقی شاک د خطر کمولو لپاره، دا پلګ د دې لپاره دی چې یوازې په یوه لاره کې په قطبي ځای کې فټ شي. که چیرې پلګ په بشپړ ډول په آوټ لیټ کې مناسب نه وي، پلګ بیرته راوباسئ. که دا لاهم مناسب نه وي، د وړ برقیانو سره اړیکه ونیسئ. په هیڅ ډول د پلګ د ترمیم کولو هڅه مه کوئ.
دا لارښوونې خوندي کړئ.
تنظیم او لومړی کارول
Before First Use: Initial Burn-Off
Before using your bread machine for the first time, it is recommended to perform an initial burn-off cycle to eliminate any manufacturing odors or residues. This process takes approximately 10 minutes.
- Remove all packaging materials and accessories from the bread machine.
- Wipe the interior and exterior of the machine with a damp cloth. Ensure the bread pan and kneading paddle are clean and dry.
- Place the empty bread pan with the kneading paddle inserted into the machine. Close the lid.
- Plug the bread machine into a grounded electrical outlet.
- Select a short baking program (e.g., "Bake" or "Home Made" with a short duration if customizable, or simply run an empty cycle for 10 minutes).
- Allow the machine to run for approximately 10 minutes. A slight odor or smoke may be present; this is normal.
- Unplug the machine and allow it to cool completely for at least 2 hours before proceeding with actual bread making.
د اجزاوو پیژندنه

Figure 3: Key components of the bread machine.
- د بھاپ ویښتان: Release steam during baking. Do not block.
- لوی Viewکړکۍ Allows observation of the bread-making process.
- د سټینلیس سټیل پوښ: دوامداره او پاکول اسانه دي.
- د LCD نندارې سره د کنټرول پینل: For program selection, settings, and status display.
- د ډوډۍ لوښی: Non-stick pan where ingredients are mixed, kneaded, risen, and baked.
- د غوټۍ کولو پیډل: Mixes and kneads the dough.
عملیاتي لارښوونې
د ډوډۍ جوړولو اساسي ګامونه
Follow these general steps for most bread recipes. Refer to the included recipe book for specific ingredient quantities and program recommendations.
- د غوټۍ کولو پیډل دننه کړئ: د غوټۍ کولو پیډل د ډوډۍ پین دننه په شافټ کې ځای په ځای کړئ.
- اجزاء اضافه کړئ: Add ingredients to the bread pan in the order specified by your recipe (typically liquids first, then dry ingredients, with yeast added last, often in a small well on top of the flour).
- د ډوډۍ لوښی ځای په ځای کړئ: Insert the bread pan into the bread machine, ensuring it clicks securely into place. Close the lid.
- برنامه غوره کړئ: Plug in the machine. Use the "MENU" button to select the desired program (e.g., Basic White, French, Gluten Free).
- Select Loaf Size and Crust Color: Use the "LOAF SIZE" button to choose 1LB, 1.5LB, or 2LB. Use the "CRUST COLOR" button to select Light, Medium, or Dark.
- سایکل پیل کړئ: Press the "START/STOP" button to begin the bread-making cycle. The machine will automatically mix, knead, rise, and bake.
- ډوډۍ لرې کړئ: Once the cycle is complete (indicated by a beep), unplug the machine. Carefully remove the hot bread pan using oven mitts. Invert the pan to release the bread onto a wire rack to cool. Use the metal hook to remove the kneading paddle from the loaf if it remains embedded.

Figure 4: Unique 1-Press Bread Making process.
شته پروګرامونه
Your KITCHENARM bread machine features 19 pre-programmed menus, including 12 bread menus and 7 non-bread menus. Each program is optimized for specific recipes.
| نه. | د پروګرام نوم | Description / Typical Use |
|---|---|---|
| 1 | بنسټیز سپین | د سپینو او مخلوطو ډوډۍ لپاره. |
| 2 | Express White | Faster cycle for white bread. |
| 3 | خواږه | د هغو ډوډۍ لپاره چې بوره یې لوړه وي. |
| 4 | فرانسوي | د سپکو ډوډۍ لپاره چې کرکري قشر ولري. |
| 5 | ګلوټین وړیا | Specifically for gluten-free recipes. |
| 6 | ټول غنم | For whole wheat flour breads. |
| 7 | Dark Rye | For rye bread recipes. |
| 8 | ملټيګرین | For breads with various grains. |
| 9 | SD Starter | For preparing sourdough starter. |
| 10 | خرما | For baking sourdough bread. |
| 11 | دوړو | Prepares dough for manual shaping and baking. |
| 12 | کیټو | For low-carb, ketogenic bread recipes. |
| 13 | چټک ډوډۍ | For quick breads using baking powder/soda. |
| 14 | کیک | د کیک پخولو لپاره. |
| 15 | جام | د کور جوړ شوي جام جوړولو لپاره. |
| 16 | یوګر | For preparing yogurt. |
| 17 | غوټۍ | Only performs kneading cycle. |
| 18 | پخول | Only performs baking cycle. |
| 19 | Home Made | Customizable program for advanced users. |
The machine supports 3 loaf sizes (1LB, 1.5LB, 2LB) and 3 crust colors (Dark, Medium, Light). It also features a 15-Hour Delay Timer and an ADD-NUTS Alarm for adding ingredients at the appropriate time.

شکل 5: مثالamples of items that can be prepared with the 19 programs.
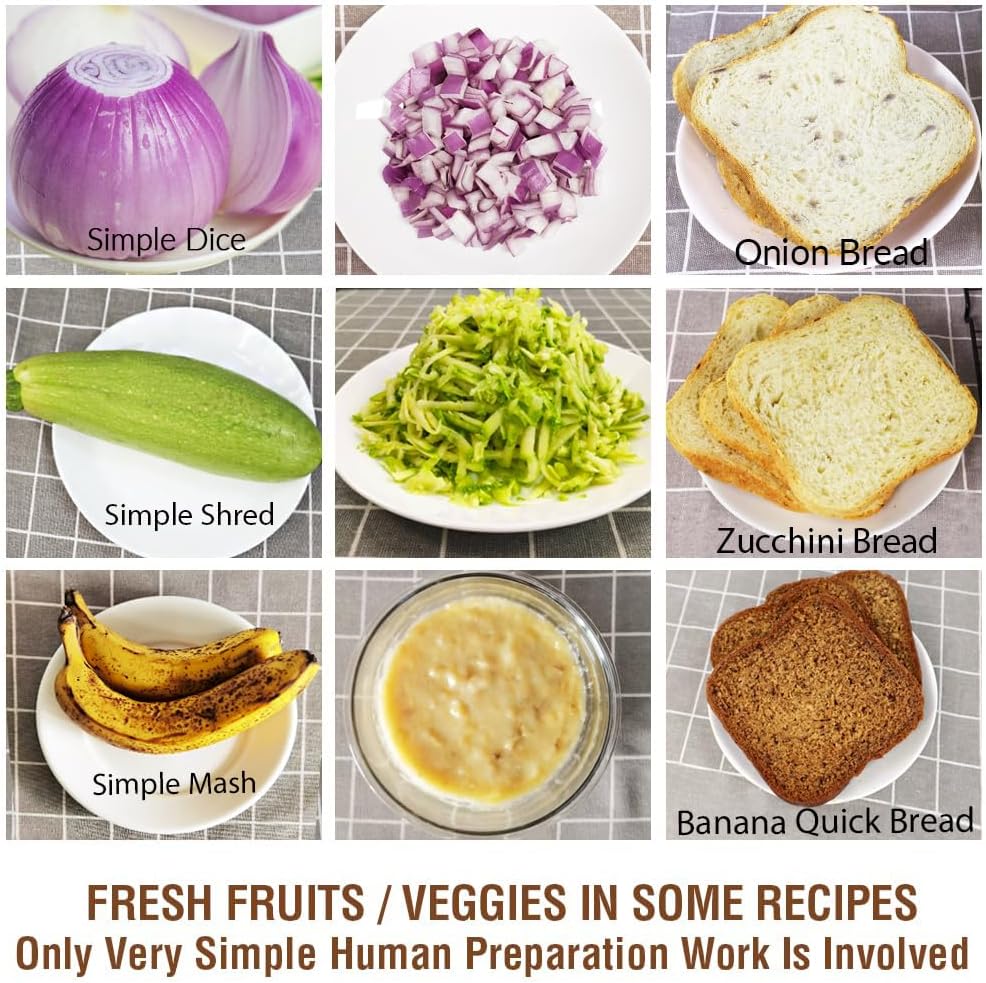
Figure 6: Preparation of fresh fruits and vegetables for recipes.
پاملرنه او ساتنه
پاکول
Proper cleaning ensures the longevity and performance of your bread machine. Always unplug the machine and allow it to cool completely before cleaning.
- د ډوډۍ لوښي او د غوټۍ کولو پیډل: The non-stick bread pan and kneading paddle should be hand washed only with warm, soapy water. Do not use abrasive cleaners or metal scouring pads, as this can damage the non-stick coating. Rinse thoroughly and dry completely.
- بهر: بهرنۍ برخه او کنټرول پینل د نرم، d سره پاک کړئamp ټوکر. اصلي واحد په اوبو یا بل کوم مایع کې مه ډوبوئ.
- داخلي: یو نرم استعمال کړئ، دamp د پخولو خونې داخلي برخې پاکولو لپاره ټوکر. هر ډول ټوټې یا پاتې شوني لرې کړئ.
- پوښ: The stainless steel lid can be wiped clean with a damp ټوکر. ډاډ ترلاسه کړئ چې viewing window is clear.
ذخیره کول
Store the bread machine in a cool, dry place when not in use. Ensure all components are clean and dry before storage.
د ستونزو حل کول
This section addresses common issues you might encounter. For problems not listed here, please contact customer service.
| ستونزه | احتمالي لامل | د حل لاره |
|---|---|---|
| ډوډۍ نه پورته کېږي او نه ډېره پورته کېږي. | Incorrect yeast amount, expired yeast, incorrect water temperature, incorrect flour type, too much or too little liquid. | Ensure yeast is fresh and active. Use correct water temperature (lukewarm for active dry yeast). Measure ingredients precisely, preferably by weight. Refer to recipe book for correct flour type. |
| ډوډۍ ډېره غټه یا درنه ده. | Too much flour, too little liquid, old yeast, incorrect program. | Reduce flour slightly or increase liquid. Check yeast freshness. Ensure correct program is selected for the recipe. |
| Bread has a large hole at the bottom. | Kneading paddle left in bread during baking. | Some programs allow for removal of the kneading paddle before the final rise. Consult your recipe book or manual for specific program timings. Use the metal hook to remove the paddle after baking. |
| ماشین نه پیل کیږي یا ځواب نه ورکوي. | نه دی ولګول شوی، بریښنا بنده دهtage, pan not properly seated, lid not closed. | Ensure the machine is securely plugged into a working outlet. Check circuit breaker. Ensure bread pan is fully inserted and lid is closed. |
| د عملیاتو پرمهال لوړ غږ. | Bread pan not seated correctly, foreign object in pan, machine on uneven surface. | Ensure bread pan is securely locked in place. Check for any foreign objects. Place machine on a stable, flat surface. |
د محصول مشخصات
- نښه: KITCHENARM
- د ماډل شمیره: 851011
- رنګ: White Body - Stainless Steel Lid & Chamber
- د محصول ابعاد (D x W x H): ۸۳.۸" x ۵۵.۷" x ۴۴.۱"
- د توکي وزن: ۲.۴۵ پونډه
- واټtage: ۴۵ واټه
- د پروګرامونو شمیر: 19
- د ډوډو اندازه: ۱ پونډه، ۱.۵ پونډه، ۲ پونډه
- د قشر رنګونه: رڼا، منځنی، تیاره
- د ځنډ وخت تر 15 ساعتونو پورې
- تصدیقونه: ETL Certified for US / Canada
- جوړونکی: Kitchenarm LLC
- د محصول پاملرنه: Hand Wash Only (for bread pan and paddle)
تضمین او د پیرودونکي ملاتړ
KITCHENARM is committed to providing high-quality products and excellent customer service.
- د محصول تضمین: This product comes with a 2-YEAR Product Warranty.
- د پیرودونکو خدمت: LIFETIME Customer Service is provided, including access to Cloud Recipes and Recipe Customization assistance.
- د ځای پرځای کولو برخې: Original replacement parts are available.
For warranty claims, technical support, or to inquire about replacement parts, please contact Kitchenarm LLC customer service through their official channels. Refer to the contact information provided in your product registration or on the official KITCHENARM webسایټ

Figure 7: KITCHENARM commitment to warranty and customer service.
Ask a question about this manual
Ask about setup, troubleshooting, compatibility, parts, safety, or missing instructions. Manuals+ will review the question and use this page’s manual context to help answer it.