د خوندیتوب مهم معلومات
Please read all safety instructions before using this product to ensure proper and safe operation.
- د غوږ بډونه یا د چارج کولو قضیه خورا تودوخې ته مه ښکاره کوئ.
- په وسیله باندې د ډیر ځواک غورځولو یا پلي کولو څخه ډډه وکړئ.
- د ماشومانو او څارویو د لاسرسي څخه لرې وساتئ.
- Use only a 5V adapter to charge the charging case to prevent battery damage.
- Do not use the earbuds in the bath or while swimming.
د بسته محتويات
ډاډ ترلاسه کړئ چې ټول توکي ستاسو په کڅوړه کې شتون لري:
- ZIUTY A1 Wireless Earbuds (x1 pair)
- Portable Charging Case (x1)
- د USB-C چارج کیبل (x1)
- Eartips (pre-installed size M, plus 2 extra pairs in sizes S & L)
- د کارونکي لارښود (دا لاسوند)
محصول پای ته ورسیدview
Familiarize yourself with the components of your ZIUTY A1 Wireless Earbuds.
د ایربډز او چارج کولو قضیه
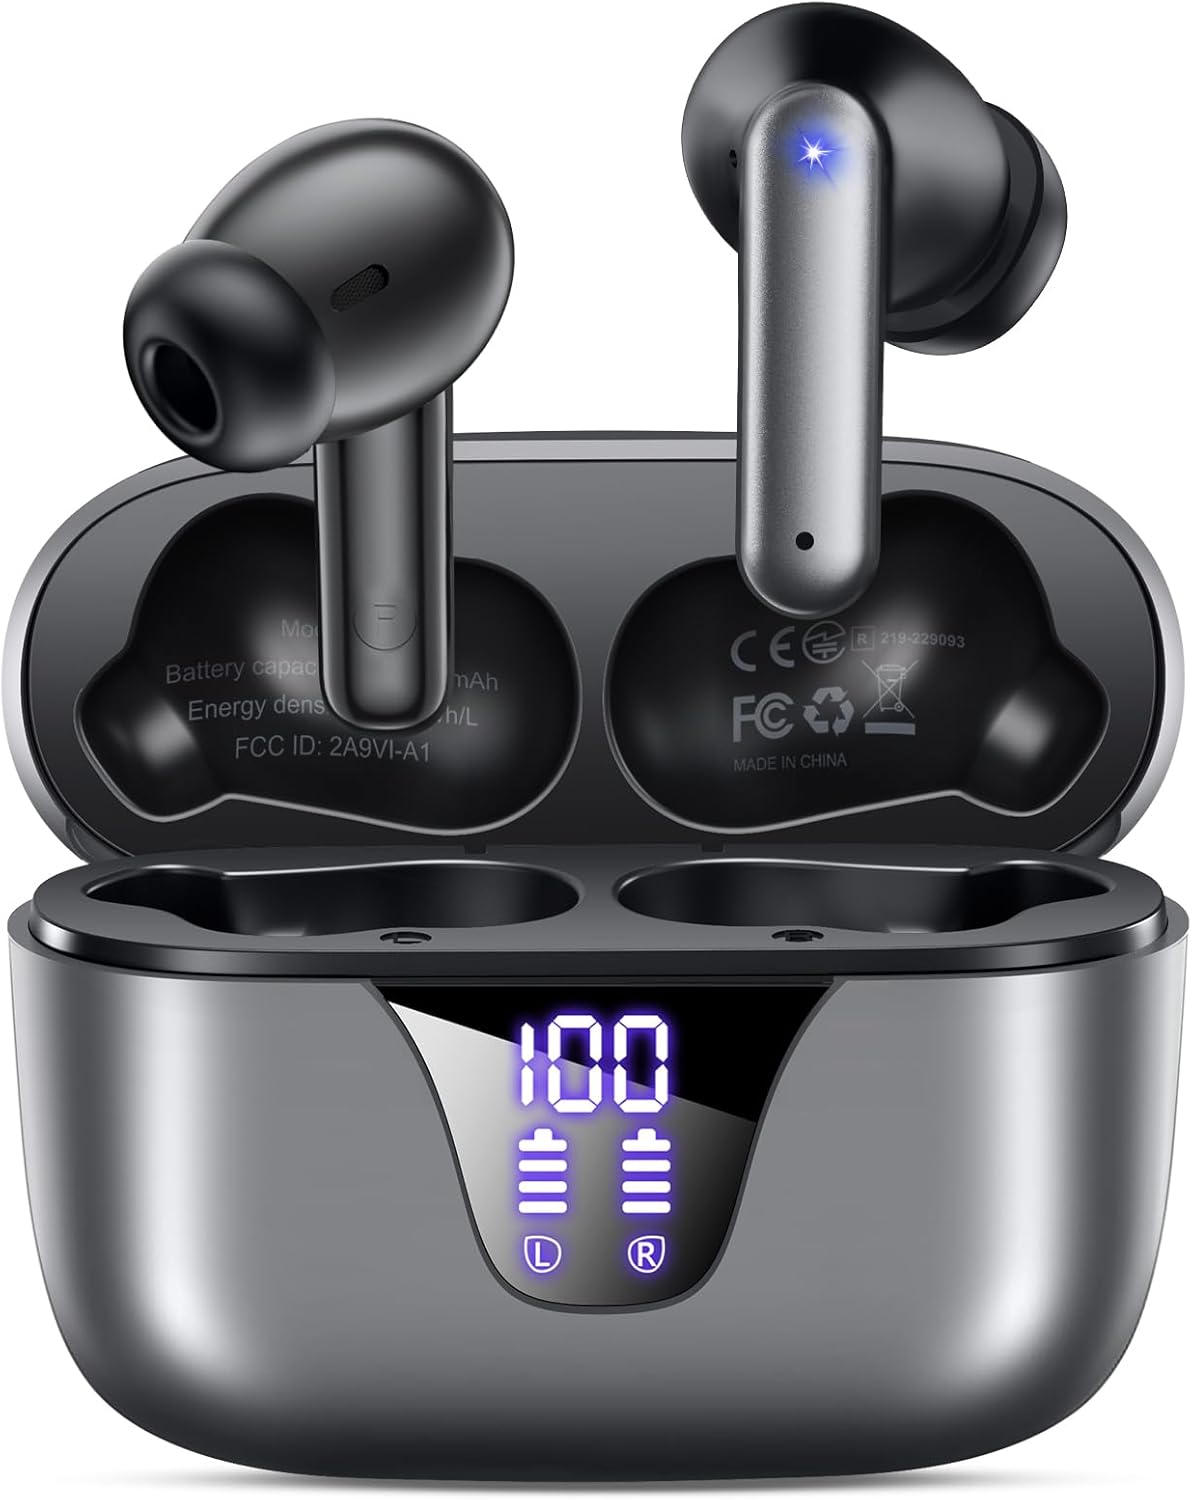
Image: ZIUTY A1 Wireless Earbuds shown inside their open charging case. The case features an LED digital display indicating battery levels for both the case and individual earbuds.
د LED بریښنا ښودنه

Image: Close-up of the ZIUTY A1 charging case's LED display, showing '100' for the case battery and individual battery icons for the left (L) and right (R) earbuds.
The charging case features an LED digital display that shows the exact remaining power percentage (0-100%) for the case and individual battery levels for each earbud.
چمتو کول
۴.۱. د غوږۍ او کیس چارج کول
د لومړي ځل کارولو دمخه، د غوږ بډونه او د چارج کولو قضیه په بشپړه توګه چارج کړئ.
- د چارج کولو په بکس کې د غوږ بډونه ځای په ځای کړئ. ډاډ ترلاسه کړئ چې دوی په خپلو اړوندو سلاټونو کې په سمه توګه ځای پر ځای شوي دي (L د کیڼ لپاره، R د ښي لپاره).
- Connect the USB-C charging cable to the charging port on the case and the other end to a 5V USB power adapter (not included).
- The LED display on the case will show the charging status. A full charge typically takes approximately 2 hours.

Image: ZIUTY A1 earbuds resting in their charging case, with the LED display showing battery levels.

Image: Diagram illustrating how to connect the USB-C cable to the charging case and a 5V power adapter for charging.
۳. د غوږونو اییربډونه اغوستل
د غوره غږ کیفیت او آرامۍ لپاره، د غوږ د سر سمه اندازه غوره کړئ او خوندي فټ ډاډمن کړئ.
- Choose the ear tips (S, M, L) that provide the best seal and comfort for your ears.
- Insert the earbuds into your ears, gently twisting them to find a snug and stable position.
- The ergonomic semi-in-ear design is intended for a comfortable fit during various activities.

Image: Diagram showing the ergonomic design of the earbuds and the three available ear tip sizes (S, M, L) for a customized fit.

Image: Step-by-step visual guide on how to correctly insert and adjust the earbuds for a secure fit.
3. د بلوتوت وسیلې سره جوړه کول
کله چې د چارج کولو قضیې څخه لرې شي، ایربډونه به په اتوماتيک ډول د جوړه کولو حالت ته ننوځي.
- د چارج کولو قضیه پرانیزئ او دواړه ایربډونه لرې کړئ. دوی به په اتوماتيک ډول فعال شي او هڅه به وکړي چې یو بل سره جوړه شي.
- په خپل وسیله (سمارټ فون، ټابلیټ، لیپ ټاپ) کې، بلوتوث فعال کړئ او د شته وسایلو لټون وکړئ.
- Select "A1" from the list of found devices.
- یوځل چې وصل شو، تاسو به د اوریدلو وړ تایید واورئ، او د غوږ بډونه به د کارولو لپاره چمتو وي.
- The earbuds will automatically reconnect to the last paired device when removed from the case.

Image: Illustration showing the ZIUTY A1 earbuds connecting via Bluetooth 5.3 to a smartphone, indicating a stable and fast connection.

Image: Diagram demonstrating the one-step auto-pairing process when the earbuds are removed from the charging case.
عملیاتي لارښوونې
ټچ کنټرولونه
The ZIUTY A1 earbuds feature intuitive touch controls for managing audio playback and calls.

Image: Diagram illustrating the touch control area on the earbuds and various functions like Play/Pause, Voice Assistant, Answer/Hang up, Previous/Next Track, and Volume adjustment.

Image: A more detailed visual guide to the touch controls, showing specific tap and hold gestures for different commands.
| عمل | فعالیت |
|---|---|
| یو ځل نل (L/R) | موسیقي غږول/بندول، ځواب ورکول/زنګ ختمول |
| دوه ځله ټایپ (L) | مخکینی ټریک |
| دوه ځله ټایپ (R) | بله لار |
| درې ځله نل (L/R) | د غږ معاون فعاله کړئ (سري ، د ګوګل معاون) |
| Press and Hold (L) | حجم ښکته |
| Press and Hold (R) | حجم پورته |
| Press and Hold (L/R) during incoming call | زنګ رد کړئ |
تلیفونونه کول او ترلاسه کول
Use the touch controls to manage your phone calls:
- ځواب / پای کال: په هر غوږۍ کې یو ځل ټایپ وکړئ.
- زنګ رد کړئ: د راتلوونکي زنګ په جریان کې هر یو ایربډ فشار ورکړئ او ونیسئ.

Image: Illustration showing a user interacting with a voice assistant (Siri) via the earbuds for clear call support.
د غږ معاون
Activate your device's voice assistant by triple-tapping either earbud. This allows you to issue commands such as making calls or checking information hands-free.
ساتنه
پاکول
منظم پاکول د غوره فعالیت او حفظ الصحې ساتلو کې مرسته کوي.
- Clean the charging contacts on both the earbuds and inside the charging case with a dry cotton swab or alcohol pad.
- Gently clean the mesh of the ear tips to remove any dust or earwax that might affect sound volume.
- Wipe the exterior of the earbuds and case with a soft, dry cloth.

Image: Visual guide demonstrating how to clean the earbud charging contacts and ear tip mesh to resolve potential volume or charging issues.
ذخیره کول
کله چې په کارولو کې نه وي، د غوږ بډونه د چارج کولو په قضیه کې وساتئ ترڅو دوی خوندي شي او ډاډ ترلاسه شي چې دوی چارج پاتې کیږي.
د ستونزو حل کول
If you encounter issues with your ZIUTY A1 earbuds, refer to the following common solutions:
- د غوږۍ غوږۍ یو بل سره نه جوړېږي: Place both earbuds back into the charging case, close the lid, wait a few seconds, then open the lid and remove them again. They should automatically pair.
- ایربډونه چې له وسیلې سره نه وصل کیږي: Ensure Bluetooth is enabled on your device and the earbuds are in pairing mode. Forget the device from your Bluetooth list and attempt to re-pair.
- بې غږه یا ټیټ غږ: Check the volume levels on both your device and the earbuds. Ensure the ear tips are clean and properly seated in your ears. Refer to the cleaning instructions in the Maintenance section.
- د چارج کولو مسلې: Ensure the charging cable is securely connected and the power adapter is 5V. Clean the charging contacts on both the earbuds and the case.
- Accidental touch control activation: When adjusting the earbuds in your ear, grasp them by the sides to avoid touching the control area.
مشخصات
Key technical specifications for the ZIUTY A1 Wireless Earbuds:
| فیچر | مشخصات |
|---|---|
| د ماډل نوم | A1 |
| د ارتباط ټیکنالوژي | بېسیم (بلوتوث ۵.۳) |
| د بلوتوټ رینج | تر 15 مترو پورې (49 فوټ) |
| د ایربډ بیټرۍ ژوند | تر 8 ساعتونو پورې |
| د لوبې ټول وخت (د قضیې سره) | تر 50 ساعتونو پورې |
| د چارج کولو قضیه بیټرۍ ظرفیت | 500 mAh |
| د چارج کولو وخت | تقریبا 2 ساعته |
| د آډیو ډرایور اندازه | 14.5 ملي متر متحرک ډرایور |
| د فریکونسی رینج | ۲۰ هرټز - ۲۰،۰۰۰ هرټز |
| د اوبو د مقاومت کچه | IPX7 (د اوبو مقاومت) |
| د کنټرول ډول | ټچ کنټرول |
| د ایربود وزن | Approximately 0.14 oz (3.9g) per earbud |
| شاملې برخې | Earbuds, Charging Case, USB-C Cable, Eartips, User Manual |
تضمین او ملاتړ
د تضمین معلومات
ZIUTY provides an 18-month battery promise for this product. This warranty covers defects in materials and workmanship under normal use.
د پیرودونکي ملاتړ
For any questions, technical assistance, or warranty claims, please contact ZIUTY customer service. Refer to the product packaging or the official ZIUTY webد اوسني اړیکو توضیحاتو لپاره سایټ.