1. پیژندنه
The Montech AX120 PRO is a high-performance 120mm cooling fan designed for efficient thermal management in computer systems. This 3-pack includes fans with a glowing ARGB rim and illuminated fan blades, providing both cooling capability and visual effects. The fans feature a precision-engineered 9-blade design for optimal airflow and static pressure, along with integrated anti-vibration pads for reduced noise. A durable rifle bearing ensures smooth operation and an extended lifespan. This manual provides instructions for installation, operation, maintenance, and troubleshooting.

انځور 1.1: اوورview of MONTECH AX120 PRO ARGB Fans and their features.
۲. په بکس کې څه دي؟
د نصبولو دمخه ډاډ ترلاسه کړئ چې ټولې برخې شتون لري:
- 3 x MONTECH AX120 PRO ARGB PWM 120mm Fans
- 1 x ARGB Fan Hub
- د سکرو نصب کول

Image 2.1: Packaging and contents of the AX120 PRO 3-pack.
3. ترتیب او نصب کول
Follow these steps to properly install your MONTECH AX120 PRO fans:
- خپل سیسټم چمتو کړئ: ډاډ ترلاسه کړئ چې ستاسو کمپیوټر بند دی او د دیوال له ساکټ څخه خلاص شوی دی. د فین نصبولو ځایونو ته د لاسرسي لپاره د خپل کمپیوټر کیس خلاص کړئ.
- پنکه نصب کړئ: Position each AX120 PRO fan in your desired location (e.g., front intake, rear exhaust, top exhaust). Use the included mounting screws to secure the fans to the case. Ensure the fan's airflow direction is correct for your cooling strategy. The AX series fans typically blow air from the RGB end to the non-RGB end.
- Connect to Fan Hub: Connect the 4-pin PWM cable from each fan to an available 4-pin fan header on the included ARGB Fan Hub.
- د ARGB کیبلونه وصل کړئ: Connect the 3-pin ARGB cable from each fan to an available 3-pin ARGB header on the fan hub. Ensure correct orientation to avoid damage.
- Connect Fan Hub to Motherboard:
- Connect the 4-pin PWM cable from the fan hub to a 4-pin PWM fan header on your motherboard (e.g., CPU_FAN, SYS_FAN). This allows for fan speed control.
- Connect the 3-pin ARGB cable from the fan hub to a 3-pin 5V ARGB header on your motherboard. This enables software control of the fan lighting. Do not connect to a 4-pin 12V RGB header, as this will damage the LEDs.
- Connect Fan Hub Power: Connect the SATA power connector from your power supply unit (PSU) to the ARGB Fan Hub. This provides power to both the fans and the ARGB lighting.
- د کیبل مدیریت: Route all cables neatly to ensure proper airflow within the case and a clean aesthetic.
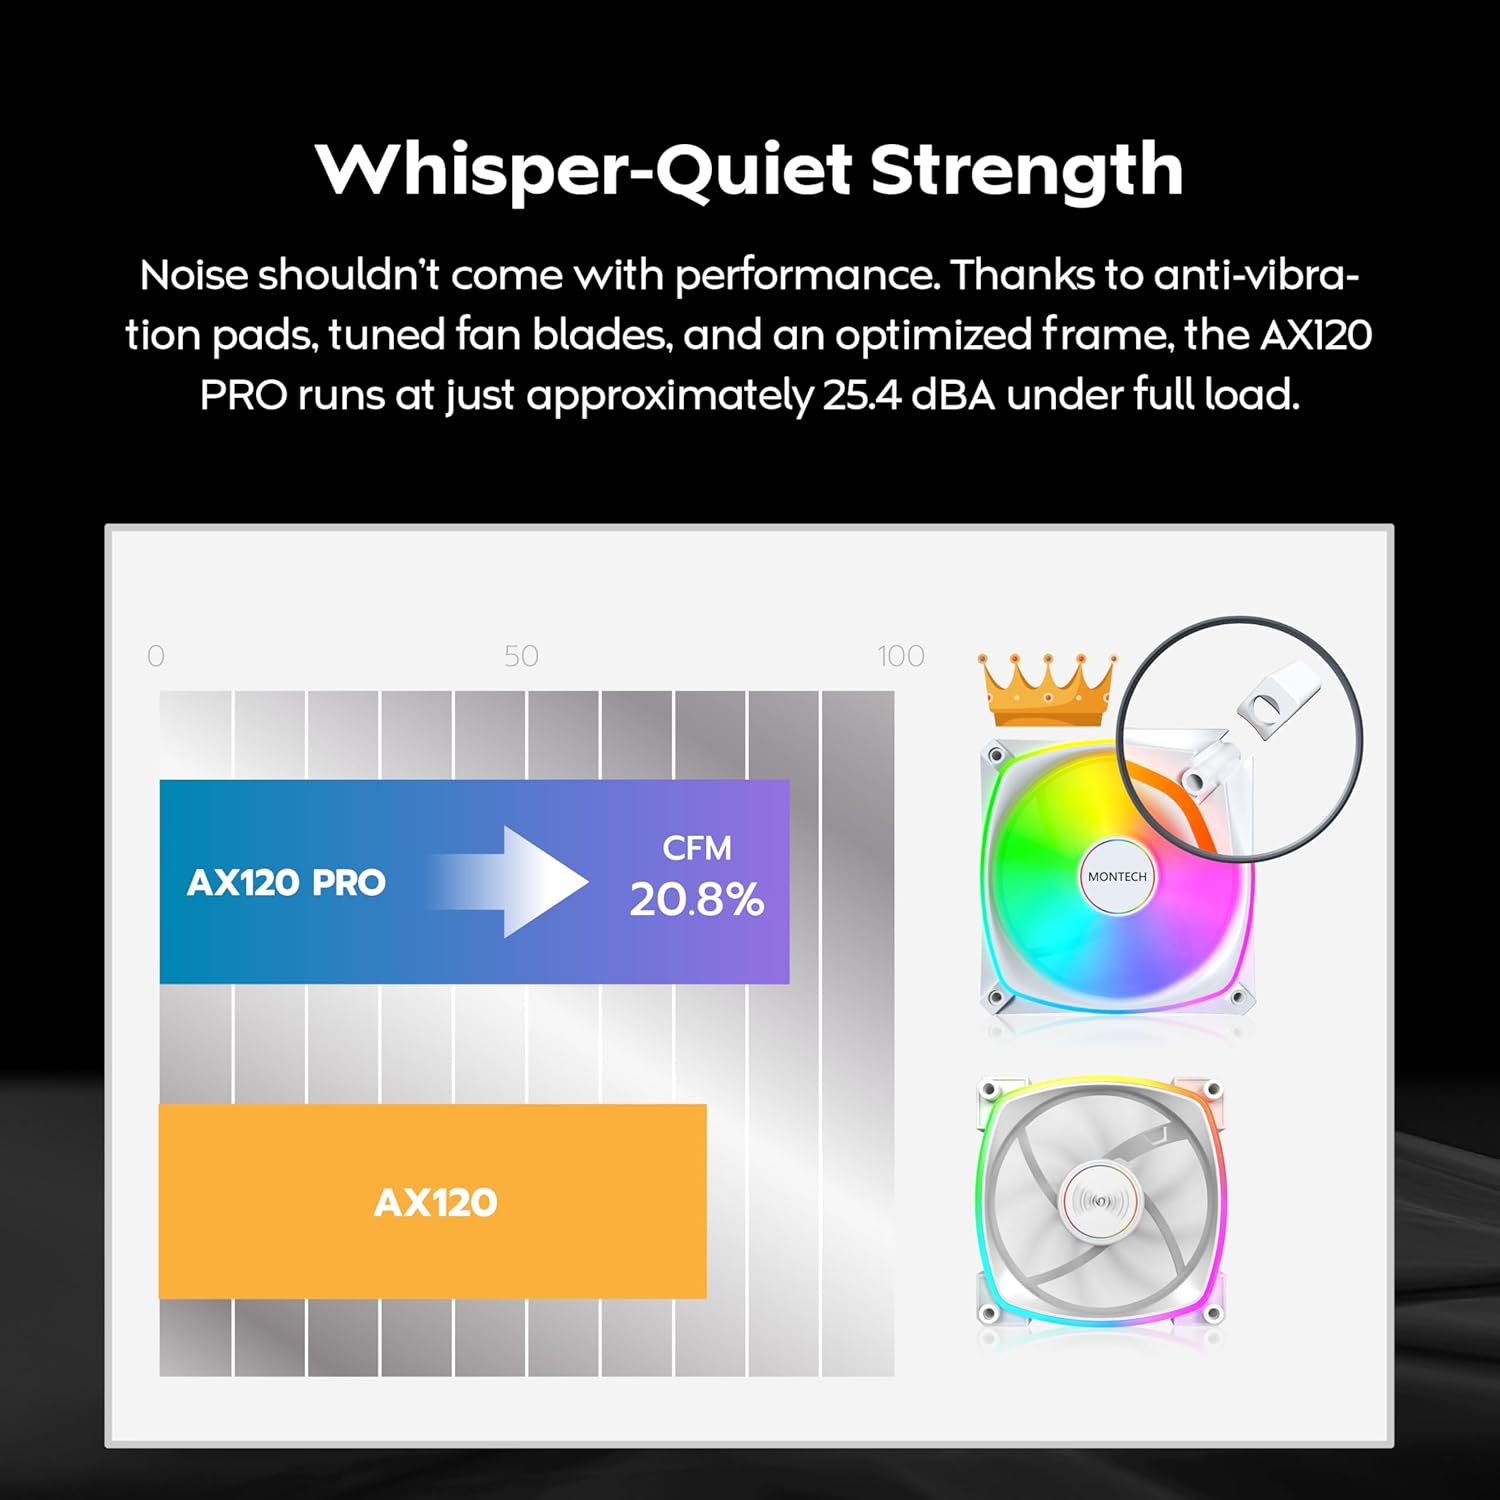
Image 3.1: The included ARGB Fan Hub for connecting multiple fans.

Image 3.2: Illustration of fan placement and airflow for optimal cooling.
4. عملیاتي لارښوونې
4.1. PWM Fan Speed Control
The AX120 PRO fans utilize Pulse Width Modulation (PWM) technology, allowing your motherboard to dynamically adjust fan speeds based on system temperature. This provides an optimal balance between cooling performance and noise levels. Fan speeds can range from 600 to 1600 RPM.
- اتوماتیک کنټرول: Once connected to a 4-pin PWM header on your motherboard, the fan speed will be automatically regulated by your motherboard's BIOS/UEFI settings or operating system software.
- لاسي سمون: تاسو کولی شئ معمولا د فین منحني تنظیم کړئ او د ګمرک سرعت پرو تنظیم کړئfiles through your motherboard's BIOS/UEFI or dedicated fan control software provided by your motherboard manufacturer.

Image 4.1: PWM control mechanism for intelligent cooling.
۵.۲. د ARGB رڼا کنټرول
The AX120 PRO fans feature Addressable RGB (ARGB) lighting, allowing for customizable lighting effects. The lighting is controlled via your motherboard's ARGB software.
- د سافټویر همغږي کول: Connect the fan hub's ARGB cable to a compatible 3-pin 5V ARGB header on your motherboard. Use your motherboard's RGB control software (e.g., ASUS Aura Sync, GIGABYTE RGB Fusion 2.0, MSI Mystic Light Sync, ASRock Polychrome Sync) to customize lighting patterns, colors, and effects.
- خپلواک کنټرول: If your motherboard does not have an ARGB header, or if you prefer, a separate ARGB controller (not included) can be used to manage the lighting.

Image 4.2: ARGB lighting synchronization with major motherboard brands.
5. ساتنه
منظم ساتنه ستاسو د مینه والو د غوره فعالیت او اوږد عمر ډاډمن کولو کې مرسته کوي.
- پاکول: Periodically clean the fan blades and frame to remove dust buildup. Use compressed air or a soft brush. Ensure the fan is powered off and unplugged before cleaning. Do not use liquid cleaners directly on the fan.
- معاینه: Check fan cables for any signs of wear or damage. Ensure all connections to the fan hub and motherboard are secure.
- د پاملرنې پاملرنه: The rifle bearing is designed for long-term, maintenance-free operation. No lubrication is required.

انځور ۲: داخلي view of the rifle bearing, designed for durability.
6. ستونزه حل کول
If you encounter issues with your MONTECH AX120 PRO fans, refer to the following common problems and solutions:
- مينه وال چې نه ګرځېږي:
- Ensure the fan hub is correctly connected to the PSU via the SATA power cable.
- Verify that the 4-pin PWM cables from the fans are securely connected to the fan hub, and the fan hub's PWM cable is connected to a motherboard fan header.
- Check your motherboard's BIOS/UEFI settings to ensure fan headers are enabled and configured correctly.
- د ARGB رڼا نشته:
- Confirm the 3-pin ARGB cables from the fans are connected to the fan hub, and the fan hub's ARGB cable is connected to a 3-pin 5V ARGB header on your motherboard.
- مهم: Do not connect to a 4-pin 12V RGB header.
- Ensure the fan hub is receiving power from the PSU via SATA.
- Check your motherboard's ARGB software for lighting control and ensure it is running and configured.
- ډیر شور:
- Verify that the fans are securely mounted and not vibrating against the case. The fans include anti-vibration pads.
- Check for any cables or obstructions interfering with the fan blades.
- Adjust fan speed settings in your motherboard's BIOS/UEFI or software to a lower RPM if noise is a concern at idle.
- په فین تیغونو کې هر ډول دوړو راټول شوی ځای پاک کړئ.
7. مشخصات
| فیچر | مشخصات |
|---|---|
| د ماډل شمیره | AX120PW3in1 |
| د فین شکلونه | ۱۴۵ ملي متره x ۱۴۵ ملي متره x ۷۴.۵ ملي متره (۵.۷"L x ۵.۷"W x ۲.۹"H) |
| د فین سرعت | ۶۵۰ - ۱۷۵۰ RPM (PWM کنټرول شوی) |
| د هوا جریان ظرفیت | 72.3 CFM (په یوه دقیقه کیوبیک فوټ) |
| د شور کچه | 25.4 dBA ( اعظمي ) |
| جامد فشار | 1.85 mmH2O |
| د بیرنگ ډول | رائفل برداشت کول |
| د بریښنا نښلونکی | 4-Pin PWM |
| د ARGB نښلونکی | ۳-پن ۵V ARGB |
| مطابقت لرونکې وسیلې | ډیسټاپ کمپیوټرونه |
| د توکو شمیر | 3 Fans + 1 Hub |
8. تضمین او ملاتړ
8.1. د تضمین معلومات
The MONTECH AX120 PRO ARGB PWM 120mm Fan 3-Pack comes with a 3 کلن تضمین د پیرود نیټې څخه. دا تضمین د تولید نیمګړتیاوې پوښي او ډاډ ورکوي چې محصول د عادي استعمال لاندې د خپل ټاکل شوي فعالیت معیارونه پوره کوي. مهرباني وکړئ د تضمین ادعاوو لپاره د پیرود ثبوت وساتئ.
8.2. تخنیکي ملاتړ
For technical assistance, troubleshooting beyond this manual, or warranty inquiries, please contact MONTECH customer support through their official website or the retailer where the product was purchased. Provide your product model number (AX120PW3in1) and a detailed description of the issue to expedite support.