1. پیژندنه
This manual provides comprehensive instructions for the installation, operation, and maintenance of the Supermicro X10SLM+-LN4F motherboard. Designed for server applications, this motherboard features an LGA1150 socket, Intel C224 PCH, DDR3 memory support, and multiple Gigabit Ethernet ports. Please read this manual thoroughly before proceeding with installation to ensure proper setup and optimal performance.
2. محصول ختم شوview
The Supermicro X10SLM+-LN4F is a microATX server motherboard built for reliability and performance. Key features include:
- LGA1150 Socket for Intel Xeon E3-1200 v3/v4 and 4th Gen Core i3 processors.
- Intel C224 PCH chipset.
- Four DDR3 DIMM slots supporting up to 64GB ECC/non-ECC UDIMM.
- Multiple SATA3 (6Gbps) ports.
- Integrated quad Gigabit Ethernet ports.
- USB 3.0 and USB 2.0 support.
- VGA output for integrated graphics.
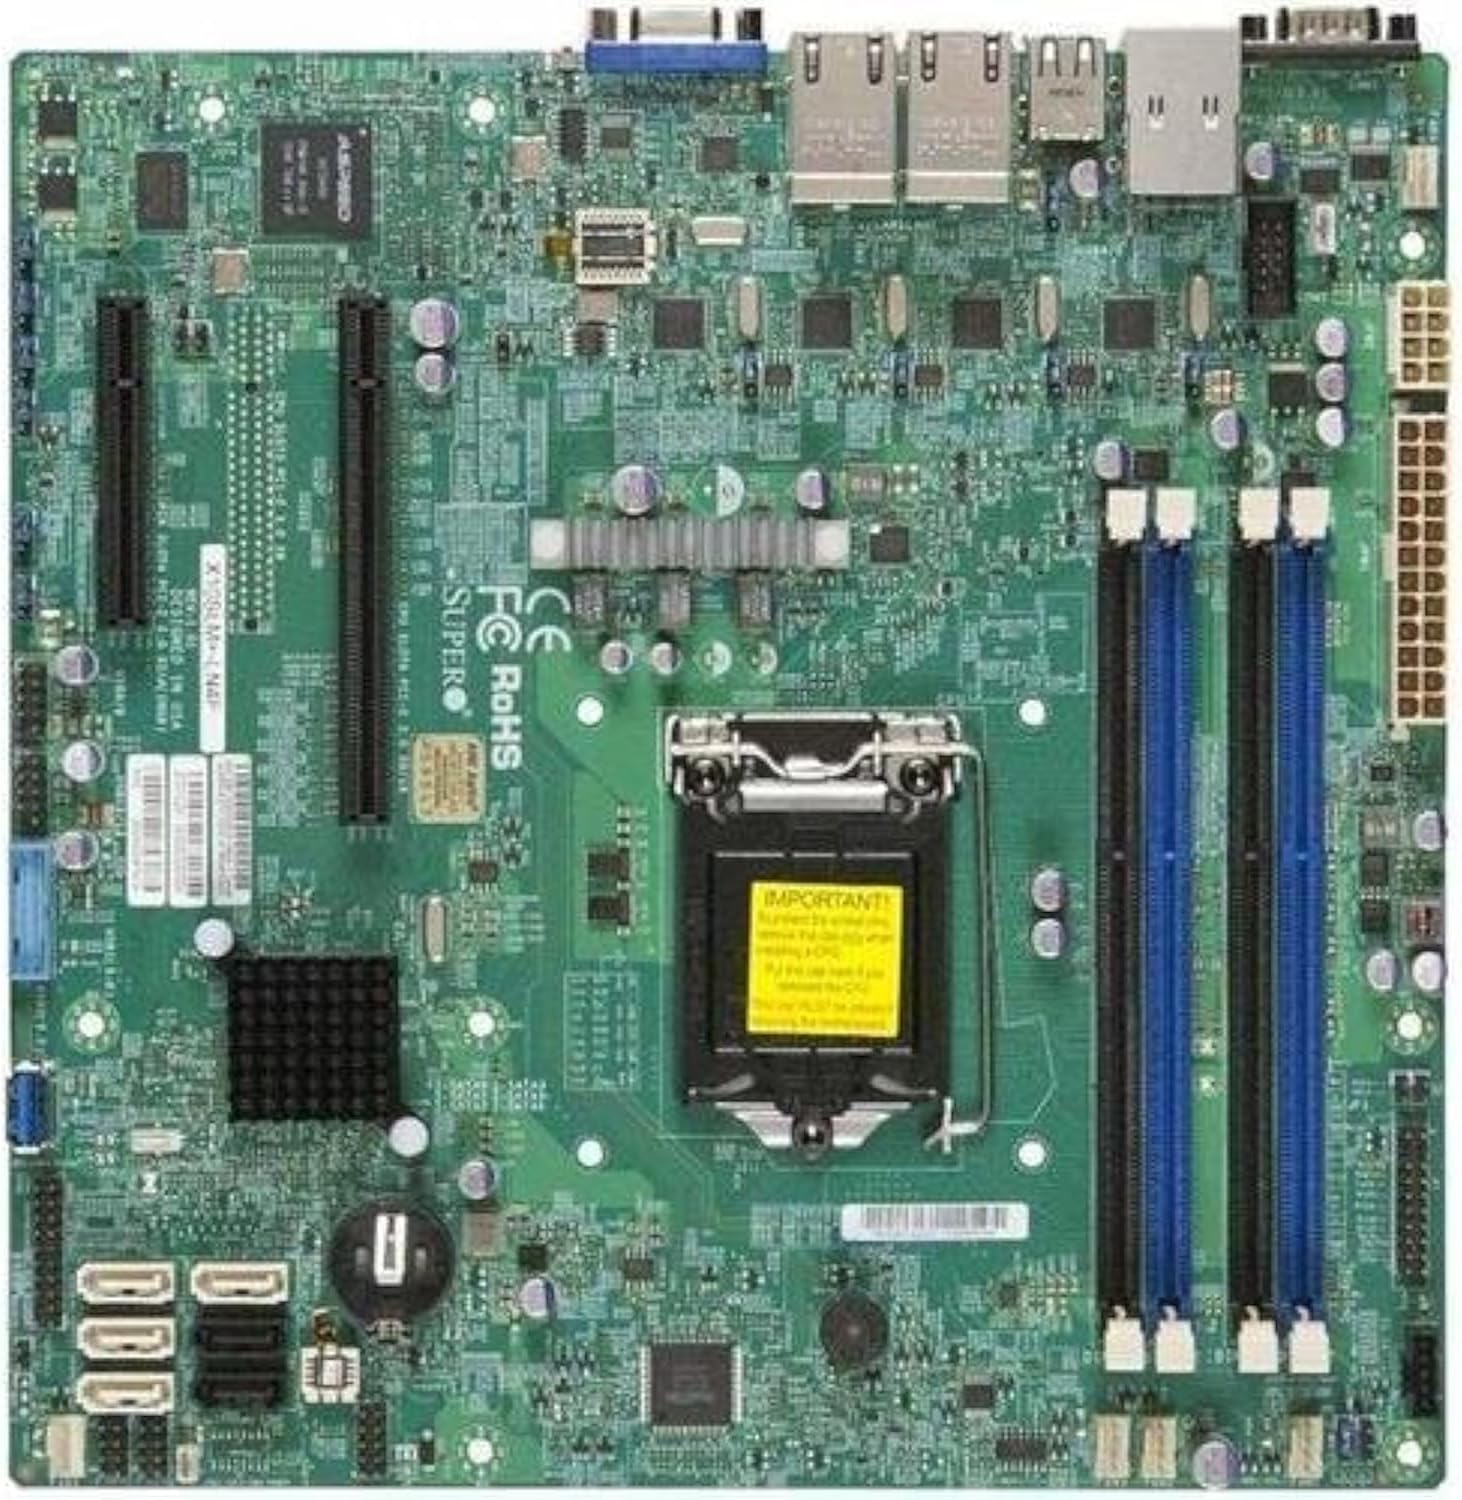
شکل 2.1: پورته- ښکته view of the Supermicro X10SLM+-LN4F motherboard, showing the CPU socket, DIMM slots, PCIe slots, and various connectors.

شکل 2.2: زاویه view of the motherboard, highlighting the layout of components and expansion slots.
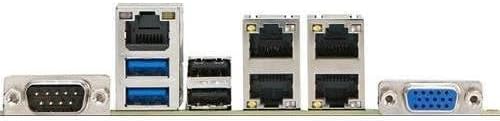
شکل 2.3: Rear I/O panel of the Supermicro X10SLM+-LN4F motherboard, featuring multiple LAN ports, USB ports, and serial ports.
3. ترتیب او نصب کول
Before beginning installation, ensure your system is powered off and disconnected from the power source. Wear an anti-static wrist strap to prevent electrostatic discharge (ESD) damage to components.
۴.۱. د CPU نصبول
- د LGA1150 CPU ساکټ په مور بورډ کې ومومئ.
- په نرمۍ سره د بار لیور ښکته کړئ او اړخ ته یې کش کړئ ترڅو د CPU ساکټ ساتلو چوکاټ خلاص شي.
- په CPU کې د مثلث نښه په احتیاط سره د ساکټ اړوند نښه سره تنظیم کړئ.
- Place the CPU into the socket without forcing it.
- Close the retention frame and secure it with the load lever.
- د CPU مدغم تودوخې خپریدونکي (IHS) ته د تودوخې پیسټ یو پتلی، مساوي طبقه واچوئ.
- د CPU کولر د هغه د جوړونکي لارښوونو سره سم نصب کړئ.
۳.۴. د حافظې (RAM) نصبول
- Locate the four DDR3 DIMM slots. For optimal performance, refer to the motherboard's specific memory population guidelines, typically starting with slots closest to the CPU or specific colored slots for dual-channel configurations.
- د DIMM سلاټ په دواړو سرونو کې د ساتلو کلپونه خلاص کړئ.
- د DDR3 حافظې ماډل کې نوچ د DIMM سلاټ کې کیلي سره سم کړئ.
- د حافظې ماډل په کلکه په سلاټ کې دننه کړئ تر هغه چې د ساتلو کلپونه په خپل ځای کې راشي.
- Ensure both clips are fully closed and the module is seated correctly.
۲.۴. د ذخیره کولو وسایلو نصبول
Connect SATA storage devices (HDDs/SSDs) to the SATA ports on the motherboard using SATA data cables. Connect the power cables from your power supply unit (PSU) to the storage devices.
۲.۵. د توسعې کارت نصبول
This motherboard features PCI Express (PCIe) slots. To install an expansion card:
- Remove the corresponding slot cover from your chassis.
- د توسیع کارت د PCIe سلاټ سره سم کړئ.
- Press down firmly until the card is fully seated in the slot.
- کارت د خپل چیسس څخه د سکرو یا ساتلو کلپ سره خوندي کړئ.
3.5. د بریښنا پيوستون
- د ۲۴ پن ATX بریښنا نښلونکی: Connect the main 24-pin power cable from your PSU to the ATX power connector on the motherboard.
- 8-pin EPS/CPU Power Connector: Connect the 8-pin (or 4+4 pin) CPU power cable from your PSU to the EPS connector near the CPU socket.
۷. د مخکینۍ پینل او شاته I/O اتصالونه
- د مخکینۍ پینل نښلونکي: Connect the power switch, reset switch, power LED, and HDD activity LED cables from your chassis to the corresponding pins on the motherboard's front panel header. Refer to the motherboard's silkscreen labels for correct orientation.
- د USB سرلیکونه: Connect front panel USB ports to the onboard USB headers.
- د غږ سرلیکونه: Connect front panel audio jacks to the onboard audio header.
- شاته I/O پینل: Connect peripherals such as keyboard, mouse, monitor (via VGA), and network cables (to the Gigabit Ethernet ports) to the rear I/O panel.
4. عملیاتي لارښوونې
4.1. Initial Power On and BIOS/UEFI Setup
- After all components are installed and connected, connect the power cord to the PSU and turn on the power switch on the PSU.
- په خپل چیسس کې د بریښنا تڼۍ فشار ورکړئ.
- د پاور آن سیلف ټیسټ (POST) په جریان کې، په مکرر ډول فشار ورکړئ DEL or F2 د BIOS/UEFI تنظیم کولو اسانتیا ته د ننوتلو لپاره کیلي (یا لکه څنګه چې په سکرین کې ښودل شوي).
- In the BIOS/UEFI, configure essential settings such as date and time, boot order, and enable/disable specific features as required for your operating system and hardware.
- بدلونونه خوندي کړئ او د BIOS/UEFI څخه ووځئ. سیسټم به بیا پیل شي.
4.2. د عملیاتي سیسټم نصب کول
To install an operating system (e.g., Windows, Linux, VMware ESXi):
- Insert the operating system installation media (USB drive or DVD) into the system.
- Boot from the installation media (you may need to adjust the boot order in BIOS/UEFI).
- Follow the on-screen prompts to install the operating system on your chosen storage device.
- After installation, install all necessary drivers for the motherboard components (chipset, LAN, VGA, etc.) from the Supermicro webسایټ یا ورکړل شوی ډرایور ډیسک.
5. ساتنه
منظم ساتنه ستاسو د مور بورډ او سیسټم د اوږد عمر او باثباته فعالیت ډاډمن کولو کې مرسته کوي.
5.1. پاکول
- Periodically clean dust from the motherboard and system components using compressed air. Ensure the system is powered off and unplugged before cleaning.
- په مستقیم ډول په اجزاو باندې د مایع پاکوونکو کارولو څخه ډډه وکړئ.
- Ensure proper airflow within the chassis by keeping fan vents clear.
5.2. Firmware and Driver Updates
- سوپر مایکرو چیک کړئ website periodically for updated BIOS/UEFI firmware and drivers for your motherboard model.
- Follow the provided instructions carefully when updating firmware to avoid system instability.
5.3. د چاپیریال په اړه نظرونه
- د زیان مخنیوي لپاره د مور بورډ د سپارښت شوي تودوخې او رطوبت حدودو کې کار وکړئ.
- Ensure adequate ventilation in the server chassis.
6. ستونزه حل کول
دا برخه د هغو عامو ستونزو حلونه وړاندې کوي چې تاسو ورسره مخ کیدی شئ.
۷.۱. هیڅ بریښنا نشته / هیڅ پوسټ نشته (د بریښنا پر ځان ازموینه)
- Verify that the power supply unit (PSU) is connected correctly to the motherboard (24-pin ATX and 8-pin EPS connectors).
- Ensure the PSU is switched on and receiving power from the wall outlet.
- وګورئ چې د مخکینۍ پینل بریښنا سویچ کیبل په سمه توګه د مور بورډ سرلیک سره وصل دی.
- Reseat the CPU, RAM modules, and any expansion cards.
- Try booting with only essential components (CPU, one RAM stick, CPU cooler) to isolate the issue.
- Listen for beep codes from the system speaker, which can indicate specific hardware failures. Refer to the Supermicro webد بیپ کوډ تشریحاتو لپاره سایټ.
6.2. د ښودلو مسلې
- Ensure the monitor is properly connected to the motherboard's VGA port.
- ډاډ ترلاسه کړئ چې مانیټر فعال دی او سم ان پټ سرچینې ته تنظیم شوی دی.
- If using a discrete graphics card, ensure it is properly seated and connected to power (if required).
۶.۳. عملیاتي سیسټم نه بوټ کیږي
- Check the boot order in the BIOS/UEFI to ensure the correct storage device is prioritized.
- Verify that the operating system is installed correctly on the storage device.
- Ensure SATA data and power cables are securely connected to the storage device and motherboard.
7. مشخصات
Below are the technical specifications for the Supermicro X10SLM+-LN4F motherboard:
| فیچر | تفصیل |
|---|---|
| برانډ | سوپر مایکرو |
| د ماډل نوم | X10SLM+-LN4F-B |
| د CPU ساکټ | LGA1150 |
| د چپسیټ ډول | Intel C224 |
| د RAM حافظې ټیکنالوژي | DDR3 SDRAM |
| د حافظې سرعت | 1600 MHz |
| د حافظې د ذخیره کولو ظرفیت | تر 64 GB پورې |
| د USB 2.0 پورټونو شمیر | ۶ (شاته I/O) |
| د ګرافیک کارت انٹرفیس | Integrated, PCI |
| مطابقت لرونکې وسیلې | سرور |
| پلیټ فارم | وینډوز ۱۱ |
| د توکي وزن | ۲.۴۵ پونډه |
| د محصول ابعاد (LxWxH) | 10 x 10 x 2 انچه |
| نیټه لومړی شتون لري | د ۲۰۲۳ کال د جون ۱۹ |
Note: Specifications are subject to change without notice. For the most current information, please refer to the official Supermicro product page.
8. تضمین او ملاتړ
For detailed warranty information, please refer to the warranty card included with your product or visit the official Supermicro website. Technical support is available through Supermicro's customer service channels, including their support portal, email, and phone. Please have your product model number (X10SLM+-LN4F) and serial number ready when contacting support.
For the latest drivers, BIOS updates, and additional documentation, please visit: www.supermicro.com


