1. پیژندنه
This manual provides essential instructions for the safe and effective operation of your Mastech MY61 Digital Multimeter. The MY61 is a portable, battery-powered digital multimeter designed for measuring DC and AC voltage, DC and AC current, resistance, capacitance, diode, and transistor (hFE) parameters. It features a 2000-count display, data hold function, and auto power-off for energy conservation. Please read this manual thoroughly before use to ensure proper operation and to prevent potential hazards.

انځور 1.1: مخکی view of the Mastech MY61 Digital Multimeter, showing the display, rotary switch, and input jacks.
2. د خوندیتوب معلومات
د میټر خوندي عملیات او خدمت ډاډ ترلاسه کولو لپاره ، دا لارښوونې تعقیب کړئ. د دې اخطارونو په نه لیدو کې پاتې راتلل د سخت ټپ یا مرګ لامل کیدی شي.
- Always read the manual: Before using the multimeter, carefully read and understand all safety warnings and operating instructions.
- د بریښنایی شاک خطر: Be extremely cautious when working with voltagد 30V AC RMS، 42V چوکۍ، یا 60V DC څخه پورته. دا حجمونهtagد شاک خطر رامنځته کوي.
- د ازموینې لیډونه معاینه کړئ: د هرې کارونې دمخه، د خراب شوي موصلیت یا افشا شوي فلزاتو لپاره د ازموینې لیډونه معاینه کړئ. زیانمن شوي لیډونه سمدلاسه بدل کړئ.
- Do Not Operate if Damaged: که چیرې میټر خراب ښکاري یا قضیه خلاصه وي نو مه یې کاروئ.
- Correct Input Terminals: Always connect the test leads to the correct input terminals for the measurement function selected.
- Select Correct Function and Range: Ensure the rotary switch is set to the appropriate function and range before making any measurement.
- د اوورلوډ محافظت: The meter is equipped with full function overload protection. However, avoid exceeding the maximum input values specified in the specifications section.
- د بیټرۍ بدلول: To avoid electrical shock, remove all inputs before opening the battery compartment or case. Replace the battery when the low battery indicator appears.
- کاري چاپیریال: میټر په چاودیدونکو ګازو، بخاراتو یا دوړو چاپیریال کې مه چلوئ.

انځور 2.1: شاته view of the Mastech MY61 Digital Multimeter, showing the kickstand and a warning label regarding electrical shock and the need to read the manual for safety.
3. د بسته محتويات
د بسته بندۍ د پرانیستلو پر مهال، مهرباني وکړئ تصدیق کړئ چې لاندې لیست شوي ټول توکي شتون لري او زیانمن شوي نه دي:
- 1 x Mastech MY61 Digital Multimeter
- د ټیسټ لیډونو 1 x جوړه (سور او تور)
- 1 د انګلیسي لارښود لارښود

Image 3.1: Contents of the Mastech MY61 package, including the multimeter, test leads, and instruction manual.
4. محصول ختم شوview
The Mastech MY61 Digital Multimeter features a robust design with clear markings for ease of use. Key components include:
- د LCD نندارې: 2000-count digital display for clear readings.
- روټري سویچ: Used to select measurement functions and ranges.
- د فعالیت تڼۍ: Includes 'HOLD' for data retention and 'ON/OFF' for power control.
- داخله جیکونه:
- COM جیک: د ټولو اندازه کولو لپاره عام ټرمینل (تور ټیسټ لیډ).
- VΩmA Jack: د حجم لپاره داخلولtage, resistance, capacitance, diode, hFE, and current measurements up to 200mA (red test lead).
- ۱۰ الف جک: Input for high current measurements up to 20A (red test lead).
- د hFE ساکټ: For transistor testing.
- کیک سټینډ: Integrated stand on the back for convenient viewزاویه.

انځور ۳: زاویه لرونکی مخ view of the Mastech MY61, highlighting the display and control layout.

Image 4.2: Close-up of the Mastech MY61's rotary switch, function buttons, and LCD display.

انځور ۵.۱: اړخ view of the Mastech MY61 with its integrated kickstand extended for desktop use.
5. ترتیب کول
5.1 د بیټرۍ نصب کول
The Mastech MY61 requires one 9V (6F22) battery for operation. The battery is not included in the package.
- Ensure the multimeter is powered off and disconnect all test leads from the input jacks.
- د میټر په شا کې د بیټرۍ د برخې پوښ ومومئ.
- Use a screwdriver to loosen the screw securing the battery cover, then remove the cover.
- د بیټرۍ کلپ سره یو نوی 9V بیټرۍ وصل کړئ، سم قطبي حالت وګورئ.
- بیټرۍ په کڅوړه کې واچوئ او پوښ یې بدل کړئ، د سکرو سره یې خوندي کړئ.
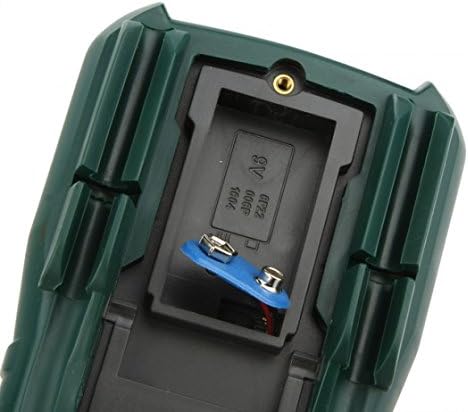
انځور 5.1: View of the battery compartment on the Mastech MY61, showing where the 9V battery is installed.
۶.۲ د ټیسټ لیډونو نښلول
Always connect the black test lead to the COM (Common) jack. The red test lead connection depends on the measurement function:
- د والی لپارهtage, Resistance, Capacitance, Diode, hFE, and current up to 200mA, connect the red test lead to the د VΩmA جیک
- For current measurements between 200mA and 20A, connect the red test lead to the 20A جیک

Image 5.2: Test leads properly connected to the Mastech MY61 Digital Multimeter's input jacks.
6. عملیاتي لارښوونې
6.1 Power ON/OFF and Data Hold
- روښانه کول: Press the red 'ON/OFF' button to turn the meter on.
- بندول: Press the red 'ON/OFF' button again to turn the meter off. The meter also features an auto power-off function to conserve battery life.
- د معلوماتو ساتل: Press the yellow 'HOLD' button to freeze the current reading on the display. Press it again to release the hold function.
6.2 DC Voltage اندازه کول
- Connect the black test lead to the COM jack and the red test lead to the VΩmA jack.
- د روټري سویچ مطلوب DC حجم ته تنظیم کړئtage range (V—). If the voltage is unknown, start with the highest range (1000V) and decrease as needed.
- د ازموینې پروبونه د ازموینې لاندې سرکټ یا برخې سره موازي سره وصل کړئ.
- ټوک ولولئtagد LCD نندارې ارزښت.
6.3 AC Voltage اندازه کول
- Connect the black test lead to the COM jack and the red test lead to the VΩmA jack.
- د روټري سویچ مطلوب AC حجم ته تنظیم کړئtage range (V∼). If the voltage is unknown, start with the highest range (750V) and decrease as needed.
- د ازموینې پروبونه د ازموینې لاندې سرکټ یا برخې سره موازي سره وصل کړئ.
- ټوک ولولئtagد LCD نندارې ارزښت.
۳.۷ د ډي سي اوسني اندازه کول
- مهم: Current measurements require the meter to be connected in series with the circuit. Ensure the circuit is de-energized before connecting the meter.
- Connect the black test lead to the COM jack. For currents up to 200mA, connect the red test lead to the VΩmA jack. For currents up to 20A, connect the red test lead to the 20A jack.
- Set the rotary switch to the desired DC Current range (A— or mA—). Start with the highest range if the current is unknown.
- Open the circuit where the current is to be measured and connect the test probes in series.
- په سرکټ کې بریښنا واچوئ او اوسنی ارزښت په LCD ډسپلې کې ولولئ.
۴.۲ د AC جریان اندازه کول
- مهم: Current measurements require the meter to be connected in series with the circuit. Ensure the circuit is de-energized before connecting the meter.
- Connect the black test lead to the COM jack. For currents up to 200mA, connect the red test lead to the VΩmA jack. For currents up to 20A, connect the red test lead to the 20A jack.
- Set the rotary switch to the desired AC Current range (A∼ or mA∼). Start with the highest range if the current is unknown.
- Open the circuit where the current is to be measured and connect the test probes in series.
- په سرکټ کې بریښنا واچوئ او اوسنی ارزښت په LCD ډسپلې کې ولولئ.
6.6 د مقاومت اندازه کول
- د مقاومت اندازه کولو دمخه ډاډ ترلاسه کړئ چې سرکټ یا برخه غیر انرژي شوې ده.
- Connect the black test lead to the COM jack and the red test lead to the VΩmA jack.
- Set the rotary switch to the desired Resistance range (Ω). Start with a higher range if the resistance is unknown.
- د ازموینې پروبونه د اندازه کولو لپاره د برخې په اوږدو کې وصل کړئ.
- په LCD ډسپلې کې د مقاومت ارزښت ولولئ.
6.7 د ظرفیت اندازه کول
- ډاډ ترلاسه کړئ چې د اندازه کولو دمخه کپیسیټر په بشپړ ډول خارج شوی ترڅو میټر ته زیان ونه رسوي.
- Connect the black test lead to the COM jack and the red test lead to the VΩmA jack.
- Set the rotary switch to the desired Capacitance range (F).
- د کیپسیټر په اوږدو کې د ازموینې تحقیقات وصل کړئ.
- په LCD نندارې کې د ظرفیت ارزښت ولولئ.
6.8 د ډایډ ټیسټ
- ډاډ ترلاسه کړئ چې ډایډ له سرکټ څخه جلا شوی دی.
- Connect the black test lead to the COM jack and the red test lead to the VΩmA jack.
- Set the rotary switch to the Diode Test position (→|).
- سور پروب د انود سره او تور پروب د ډایډ کیتوډ سره وصل کړئ. ښودنه به د مخکینۍ حجم وښييtage غورځول.
- پروبونه برعکس کړئ. ښودنه باید د ښه ډایډ لپاره 'OL' (خلاص لوپ) وښيي.
۷.۶ ټرانزیسټر (hFE) ازموینه
- روټری سویچ د HFE موقعیت ته تنظیم کړئ.
- معلومه کړئ چې ټرانزیسټر NPN دی که PNP.
- Insert the transistor leads (Emitter, Base, Collector) into the corresponding holes in the hFE socket on the meter, ensuring correct type (NPN/PNP) and pinout.
- Read the hFE value (DC current gain) on the LCD display.
6.10 د دوام ازموینه
- ډاډ ترلاسه کړئ چې سرکټ یا برخه غیر انرژي شوې ده.
- Connect the black test lead to the COM jack and the red test lead to the VΩmA jack.
- Set the rotary switch to the Continuity Test position (♫).
- Connect the test probes across the component or circuit path.
- If continuity exists (resistance below approximately 50Ω), the built-in buzzer will sound. The display will show the resistance value.
7. ساتنه
7.1 پاکول
میټر د اعلان سره پاک کړئamp ټوکر او نرم صابون. د کثافاتو یا محلولونو څخه کار مه اخلئ. ډاډ ترلاسه کړئ چې میټر د کارولو دمخه په بشپړه توګه وچ دی.
7.2 د بیټرۍ بدلول
When the low battery indicator appears on the display, replace the 9V battery as described in Section 5.1. Always use a fresh 9V (6F22) battery.
7.3 د فیوز بدلول
The MY61 multimeter is equipped with internal fuses to protect against overcurrent. If the current measurement function fails, the fuse may need replacement. Fuse replacement should only be performed by qualified personnel. Refer to the specifications for fuse ratings. To access the fuse, the entire back case of the meter must be opened, which requires removing the battery compartment cover and additional screws. Always disconnect test leads and power before opening the case.
8. ستونزه حل کول
If your Mastech MY61 Digital Multimeter is not functioning as expected, refer to the following common issues and solutions:
- نه ښودنه یا کمزوری ښودنه:
- Check if the meter is powered on.
- که چیرې د 9V بیټرۍ ټیټه یا ختمه شوې وي، نو بدله یې کړئ.
- ناسم لوستل:
- Ensure the rotary switch is set to the correct function and range for the measurement.
- Verify that the test leads are connected to the correct input jacks.
- Check for proper contact between the test probes and the circuit/component.
- Ensure the circuit or component is de-energized for resistance and capacitance measurements.
- اوسنی اندازه کول کار نه کوي:
- Check if the test leads are connected to the correct current input jack (VΩmA for mA, 20A for A).
- The internal fuse for current measurement may be blown. Refer to Section 7.3 for fuse replacement information.
- 'OL' (Overload) Displayed:
- اندازه شوی ارزښت د ټاکل شوي حد څخه ډیر دی. لوړې حد ته لاړ شئ.
- For resistance, 'OL' can indicate an open circuit.
9. مشخصات
| فعالیت | رینج | دقت |
|---|---|---|
| DC Voltage | 200mV, 2V, 20V, 200V | ±(0.5%+2) |
| 1000V | ±(0.8%+2) | |
| AC Voltage | 200mV | ±(1.2%+3) |
| 2V ، 20V ، 200V | ±(0.8%+3) | |
| 750V | ±(1.2%+3) | |
| DC اوسنی | ۴mA، ۲۰mA، ۲۲mA | ±(1.2%+3) |
| 20A | ±(2.0%+5) | |
| AC اوسنی | ۴mA، ۲۰mA، ۲۲mA | ±(1.8%+5) |
| 20A | ±(3.0%+5) | |
| مقاومت | 200Ω, 2kΩ, 20kΩ, 200kΩ, 2MΩ | ±(0.8%+3) |
| 20MΩ | ±(1.0%+2) | |
| 200MΩ | ±(6.0%+10) | |
| ظرفیت | 20nF, 200nF, 2µF, 20µF | ±(4.0%+3) |
| 200،XNUMXµF | ±(6.0%+10) |
عمومي ځانګړتیاوې:
- ښکاره کول: ۶۰۰۰ شمېرې LCD
- د معلوماتو ساتل: هو
- اتومات بریښنا بند: هو
- د ډایډ ټیسټ: هو
- Transistor (hFE) Test: هو
- د دوام ازموینه: هو
- د اوورلوډ محافظت: بشپړ فعالیت
- ځواک: ۱ x ۹ وولټ (۶ فېټ ۲۲) بیټرۍ (شامل نه ده)
- رنګ: تیاره شنه
- د حرارت درجه: له 0°C څخه تر 40°C (32°F څخه تر 104°F)
- د ذخیرې د حرارت درجه: -10°C ته 50°C (14°F ته 122°F)
- ابعاد: تقریبا ۱۲۶ ملي متره x ۱۲۶ ملي متره x ۴۱.۸ ملي متره (۴.۹ انچه x ۴.۹ انچه x ۱.۶ انچه)
- وزن: Approximately 200g (7.05 oz) without battery
10. تضمین او ملاتړ
For warranty information and technical support, please refer to the warranty card included with your product or contact Mastech customer service through their official webسایټ. د هر ډول تضمین ادعا لپاره د پیرود ثبوت په توګه د پیرود رسید وساتئ.


