پیژندنه
This manual provides essential information for the safe operation, maintenance, and care of your Hyper Tough 2.4A Orbit Sander, Model 2112. Please read and understand all instructions before using the product to ensure proper function and to prevent injury.
The Hyper Tough 2.4A Orbit Sander is designed for dry sanding on painted surfaces, wood, plastic, and metal. It is suitable for smoothing rough surfaces, removing old finishes, and preparing surfaces for new paint or other finishes.
د عمومي خوندیتوب معلومات
خبرداری: د دې بریښنا وسیلې سره چمتو شوي ټول خوندیتوب اخطارونه ، لارښوونې ، توضیحات او مشخصات ولولئ. د لاندې لست شوي ټولو لارښوونو په تعقیب کې پاتې راتلل ممکن د بریښنا شاک، اور، او/یا جدي ټپي کیدو پایله ولري.
د کاري ساحې خوندیتوب
- د کار ساحه پاکه او ښه رڼا وساتئ. تیاره یا تیاره سیمې حادثې ته بلنه ورکوي.
- په چاودیدونکي فضا کې د بریښنا وسیلې مه کاروئ، لکه د سوځیدونکي مایعاتو، ګازونو یا دوړو په شتون کې. د بریښنا وسیلې چنګکونه رامینځته کوي کوم چې ممکن دوړې یا دوړې سوځوي.
- د بریښنا وسیله چلولو پرمهال ماشومان او لیدونکي لرې وساتئ. ګډوډي کولی شي ستاسو د کنټرول له لاسه ورکولو لامل شي.
بریښنایی خوندیتوب
- د بریښنا وسیله پلګونه باید د آوټ لیټ سره سمون ولري. هیڅکله په هیڅ ډول پلګ مه بدلوئ.
- د ځمکې یا ځمکې لاندې سطحونو سره د بدن د تماس څخه ډډه وکړئ، لکه پایپونه، ریډیټرونه، رینجونه، او یخچالونه. که ستاسو بدن په ځمکه کې وي یا په ځمکه کې وي د بریښنا شاک ډیر خطر شتون لري.
- باران یا لوند شرایطو ته د بریښنا وسیلې مه اخلئ. د بریښنا وسیلې ته د اوبو ننوتل به د بریښنا شاک خطر ډیر کړي.
- د تار څخه ناوړه ګټه مه اخلئ. هېڅکله د برېښنا د وسیلې د لېږدولو، را ایستلو او یا هم د خلاصولو لپاره تار مه کاروئ. تار د تودوخې، تیلو، تیزو څنډو، یا خوځنده برخو څخه لرې وساتئ. زیانمن شوي یا تړل شوي تارونه د بریښنا شاک خطر زیاتوي.
شخصي خوندیتوب
- تل د سترګو محافظتي وسایل واغوندئ. د خوندیتوب عینکې یا عینکې وکاروئ.
- Wear appropriate personal protective equipment such as a dust mask, non-skid safety shoes, hard hat, or hearing protection for appropriate conditions.
- زیاتی مه کوه. هر وخت مناسب پښه او توازن وساتئ. دا په غیر متوقع حالتونو کې د بریښنا وسیلې غوره کنټرول وړوي.
- په سمه توګه جامې واغوندئ. نرمې جامې یا زیورات مه اغوستل. خپل ویښتان او جامې د حرکت برخو څخه لرې وساتئ. لوڅې جامې، زیورات یا اوږده ویښتان په حرکتي برخو کې نیول کیدی شي.
محصول پای ته ورسیدview
Familiarize yourself with the components of your Hyper Tough 2.4A Orbit Sander before operation.
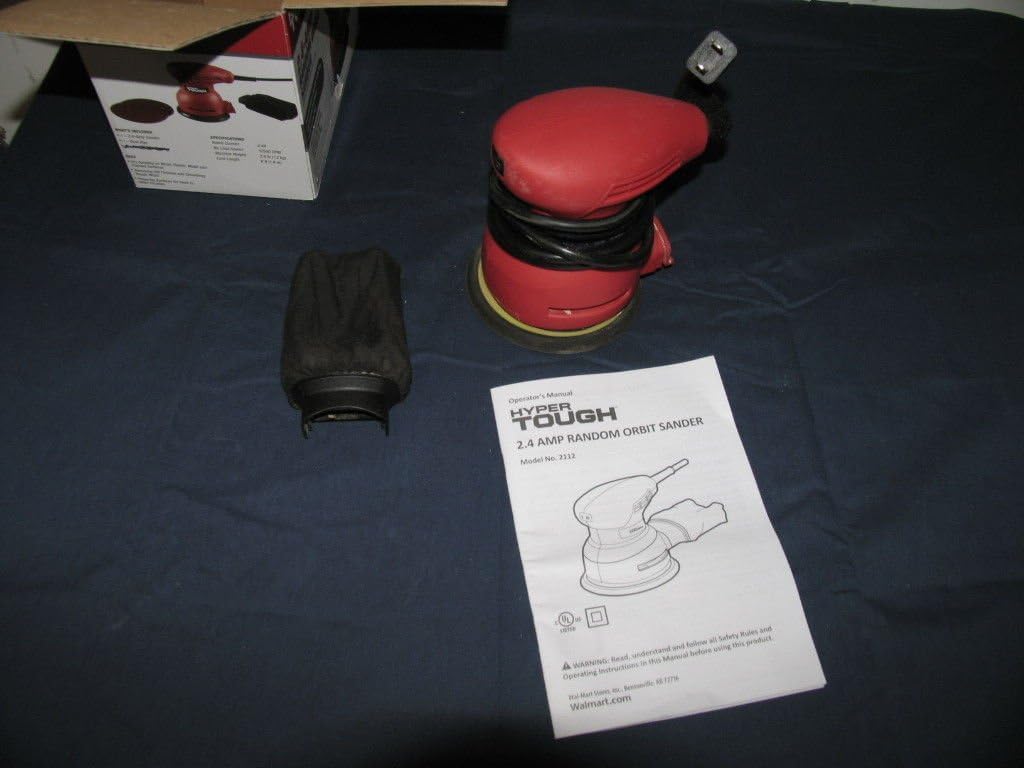
شکل 1: Hyper Tough 2.4A Orbit Sander with accessories and manual.

شکل 2: Underside of the sander with dust bag attached.
مهمې برخې:
- د شګو اچولو پیډ: Hook-and-loop system for quick sandpaper changes.
- د دوړو راټولولو کڅوړه: Attaches to the sander for dust extraction.
- آن/بند سویچ: Sealed to prevent dust ingress.
- د بریښنا تار: 6-foot length for extended reach.
چمتو کول
د شګو کاغذ سره نښلول
- ډاډ ترلاسه کړئ چې سینډر د بریښنا سرچینې څخه خلاص شوی دی.
- Select the appropriate grit sandpaper for your task. The sander uses hook-and-loop sandpaper.
- Align the holes on the sandpaper with the holes on the sanding pad to ensure proper dust extraction.
- Press the sandpaper firmly onto the sanding pad, ensuring it is securely attached across the entire surface.
د دوړو راټولولو کڅوړه ضمیمه کول
- ډاډ ترلاسه کړئ چې سینډر خلاص شوی دی.
- په سینډر کې د دوړو استخراج بندر ومومئ.
- Slide the dust collection bag onto the port until it is firmly seated. Ensure a tight fit to maximize dust collection efficiency.
عملیاتي لارښوونې
د عملیاتو دمخه
- Always wear safety glasses and a dust mask.
- ډاډ ترلاسه کړئ چې ورک پیس په خوندي ډول cl دیampد شګو اچولو پرمهال د حرکت مخنیوي لپاره ایډ یا ساتل کیږي.
- Check that the sandpaper is correctly attached and the dust bag is securely in place.
- سینڈر په یو مناسب بریښنا سایټ کې ولګوئ.
Sanding Procedure
- سینډر د دواړو لاسونو سره په کلکه ونیسئ.
- د وسیلې له چالانولو دمخه د شګو کولو پیډ په کاري ټوټه کې ځای په ځای کړئ.
- Press the On/Off switch to start the sander.
- Move the sander slowly and evenly over the surface in overlapping circular or linear patterns. Avoid applying excessive pressure; the weight of the tool is usually sufficient.
- Keep the sander moving to prevent gouging or creating swirl marks. The mechanical pad brake helps reduce free-spin to minimize gouging.
- کله چې کار بشپړ شي، نو د بندولو دمخه یې د کار ټوټې څخه سینډر پورته کړئ.
- Press the On/Off switch to turn the sander off.
- Unplug the sander from the power source after use.
یادونه: For best results, start with a coarser grit sandpaper to remove material quickly, then switch to finer grits for a smoother finish.
ساتنه
پاکول
- تل د پاکولو دمخه د سینډر خلاص کړئ.
- د وسیلې بهرنۍ برخه په پاکوونکي سره پاک کړئ،amp ټوکر د سختو کیمیاوي موادو یا خړوبولو پاکونکو څخه کار مه اخلئ.
- Periodically clean the ventilation openings to prevent overheating. Use compressed air if available.
د دوړو راټولولو کڅوړه
- Empty the dust collection bag frequently, especially when sanding fine dust. A full bag reduces dust extraction efficiency.
- To empty, remove the bag from the sander and shake out the dust.
- Clean the inside of the bag periodically to ensure optimal airflow.
د سنډینګ پیډ
- Inspect the sanding pad regularly for wear or damage. Replace if necessary to maintain sanding performance.
- Ensure the hook-and-loop surface is clean and free of debris for proper sandpaper adhesion.
د ستونزو حل کول
| ستونزه | احتمالي لامل | د حل لاره |
|---|---|---|
| سینډر نه پیل کیږي. | بریښنا نشته. غلط سویچ. | د بریښنا تار او ساکټ وګورئ. د سویچ بدلولو لپاره د پیرودونکو ملاتړ سره اړیکه ونیسئ. |
| ضعیف دوړو راټولول. | Dust bag full or improperly attached. Sandpaper holes not aligned. | Empty and reattach dust bag securely. Ensure sandpaper holes align with pad holes. |
| ډیر شور او شور. | خراب شوی د شګو کولو پیډ. Loose sandpaper. | که چیرې زیانمن شوی وي، د شګو کولو پیډ معاینه کړئ او بدل یې کړئ. Reattach sandpaper firmly. |
| Sander leaves swirl marks. | ډېر فشار ورکول. Not moving the sander evenly. اغوستل شوی شګه کاغذ. | فشار کم کړئ. Move sander smoothly and evenly. د شګو کاغذ بدل کړئ. |
مشخصات
- د ماډل شمیره: 2112
- نښه: ډېر سخت
- د بریښنا سرچینه: برقی
- د AC اډاپټر اوسنی: 2.4 Amps
- د ګریټ ډول: Medium (typically ships with 80 grit)
- د توکي وزن: ۰.۴۵ پونډه (تقریبا ۰.۴ کیلوګرامه)
- د محصول ابعاد: ۲.۶۴ x ۲.۳۲ x ۲.۷۶ انچه (تقریبا ۶.۷ x ۵.۹ x ۷ سانتي متره)
- د تار اوږدوالی: ۳۲ فوټه (نږدې ۱۰ متره)
- د شګو اچولو پیډ: د هک او لوپ سیسټم
تضمین او ملاتړ
This product is tested and certified to look and work like new. For specific warranty information or technical support, please refer to the documentation included with your purchase or contact the manufacturer directly. Keep your purchase receipt as proof of purchase.
For further assistance, please visit the Hyper Tough webسایټ یا د دوی د پیرودونکي خدماتو څانګې سره اړیکه ونیسئ.


