1. پیژندنه
This manual provides essential information for the safe and efficient operation of your Casio XJ-F10X LED XGA Projector. Please read this manual thoroughly before using the projector and retain it for future reference. Understanding the instructions will ensure optimal performance and extend the lifespan of your device.
2. د خوندیتوب مهمې لارښوونې
د پروجیکټر د زیان مخنیوي او د کارونکي خوندیتوب ډاډمن کولو لپاره لاندې خوندیتوب احتیاطي تدابیر په پام کې ونیسئ:
- د هوا د جریان لپاره د پروجیکټر شاوخوا کافي ځای ډاډمن کړئ.
- د اور یا بریښنا شاک خطر کمولو لپاره پروجیکټر باران یا رطوبت ته مه ښکاره کوئ.
- Use only the power cord supplied with the projector or an approved replacement.
- Avoid looking directly into the projector lens when the light source is active, as it can cause eye damage.
- د دې محصول پخپله خدمت کولو هڅه مه کوئ. ټول خدمتونه وړ خدماتي پرسونل ته راجع کړئ.
- پروجیکټر په یوه مستحکم او هواره سطحه کېږدئ ترڅو د رالوېدو مخه یې ونیول شي.
3. د بسته محتويات
ډاډ ترلاسه کړئ چې ټول توکي په کڅوړه کې شتون لري:
- Casio XJ-F10X Projector
- د بریښنا تار
- ریموټ کنټرول (د بیټرۍ سره)
- د VGA کیبل
- د کارونکي لارښود (دا لاسوند)
4. محصول ختم شوview
Familiarize yourself with the various parts and controls of your Casio XJ-F10X projector.
4.1 مخکښ پینل

The front panel features the projection lens, which emits the image. Ventilation grilles are located on the side to ensure proper cooling during operation. A small infrared receiver for the remote control may also be present.
۳.۲ شاته پینل او اړیکې

The rear panel houses all the necessary input and output ports for connecting external devices. These include:
- HDMI Type A x 2: For digital video and audio input (HDCP support).
- VGA (D-Sub 15-pin): For analog computer input.
- S- ویډیو: د انلاګ ویډیو ان پټ لپاره.
- جامع ویډیو (RCA): د معیاري تعریف ویډیو ان پټ لپاره.
- Audio In (RCA L/R, 3.5mm mini jack): د انلاګ آډیو ان پټ لپاره.
- Audio Out (3.5mm mini jack): د بهرني آډیو سیسټمونو سره د نښلولو لپاره.
- RS-232: د کمپیوټر یا کنټرول سیسټم له لارې د پروجیکټر کنټرول لپاره.
- USB (Type A, Type B): د خدماتو یا فرم ویئر تازه معلوماتو لپاره.
- د بریښنا داخلول: د AC بریښنا تار د نښلولو لپاره.
۴.۳ د پورتنۍ پینل کنټرولونه
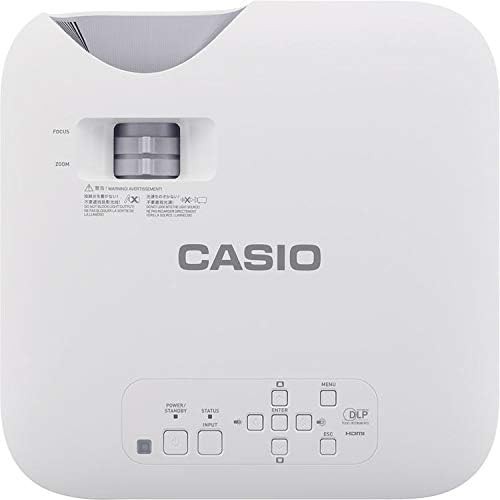
The top panel provides direct access to essential projector functions:
- د بریښنا تڼۍ: پروجیکټر چالان یا بند کړئ.
- د ننوتلو تڼۍ: Selects the input source (HDMI, VGA, etc.).
- د مینو تڼۍ: Opens the on-screen display (OSD) menu.
- د نیویګیشن تڼۍ (پورته/ښکته/کیڼ/ښي): د مینو انتخابونو له لارې د نیویګیټ کولو لپاره کارول کیږي.
- تڼۍ داخل کړئ: په مینو کې انتخابونه تاییدوي.
- د ESC تڼۍ: له اوسني مینو څخه وځي یا پخوانۍ سکرین ته راستنیږي.
- د زوم لیور: د عکس اندازه تنظیموي.
- د تمرکز زنګ: اټکل شوی انځور تېزوي.
5. د تنظیم کولو لارښود
۴.۱ د پروجیکټر ځای پرځای کول
Proper placement is crucial for optimal image quality.
- واټن: Position the projector at an appropriate distance from the screen to achieve the desired image size. Refer to the specifications for throw ratio details.
- زاویه: Ensure the projector is perpendicular to the screen for a rectangular image. Use the keystone correction function if the image appears trapezoidal.
- وینټیلیشن: Maintain clear space around the projector's ventilation openings to prevent overheating.
5.2 د نښلولو وسایل
Follow these steps to connect your source devices:
- Ensure the projector and all source devices are powered off before making connections.
- Connect the appropriate video cable (HDMI, VGA, S-Video, or Composite) from your source device to the corresponding input port on the projector's rear panel.
- If using an analog video input (VGA, S-Video, Composite), connect an audio cable from your source device's audio output to the projector's Audio In port. HDMI carries both video and audio.
- Connect the power cord to the projector's power inlet and then to a grounded electrical outlet.
6. عملیاتي لارښوونې
6.1 بریښنا کول او بندول
- پاور آن: Press the Power button on the projector's top panel or the remote control. The projector will reach full brightness in approximately 5 seconds due to its Direct On/Off function.
- بندول: Press the Power button again. The projector will shut down immediately without a cool-down period.
6.2 Basic Projection
- Turn on the projector and your source device.
- فشار ورکړئ داخلول button on the projector or remote control repeatedly to select the correct input source (e.g., HDMI 1, VGA).
- تنظیم کړئ زوم lever to achieve the desired image size on the screen.
- تنظیم کړئ تمرکز ring until the image appears sharp and clear.
- If the image is distorted (trapezoidal), use the keystone correction feature in the OSD menu to correct it.
7. ساتنه
۴.۱ د پروجیکټر پاکول
- لینز: لینز په نرمۍ سره د نرم، لینټ نه پاک ټوکر سره پاک کړئ چې په ځانګړي ډول د نظري سطحو لپاره ډیزاین شوی. د کثافاتو پاکونکو څخه کار مه اخلئ.
- Casing: پروجیکټر پاک کړئ casing with a soft, dry cloth. For stubborn dirt, slightly dampټوکر د اوبو او یو نرم صابون سره ومینځئ، بیا یې وچ کړئ.
- وینټیلیشن: Periodically check and clean the ventilation grilles to ensure they are free from dust and debris. Use a soft brush or compressed air.
۶.۴ د رڼا سرچینې اوږدوالی
The Casio XJ-F10X utilizes a mercury-free LED hybrid light source, offering exceptional durability and a long operational life of up to 20,000 hours without requiring lamp replacement. This significantly reduces maintenance needs and costs.
8. ستونزه حل کول
که تاسو د خپل پروجیکټر سره ستونزې سره مخ شئ، لاندې عامې ستونزې او حل لارې وګورئ:
- نه انځور:
- ډاډ ترلاسه کړئ چې پروجیکټر فعال دی او د بریښنا تار په خوندي ډول وصل دی.
- تایید کړئ چې د ننوتلو سمه سرچینه غوره شوې ده.
- د پروجیکټر او سرچینې وسیلې ترمنځ د اتصال کیبل وګورئ.
- ډاډ ترلاسه کړئ چې د سرچینې وسیله فعاله ده او سیګنال تولیدوي.
- تیاره انځور:
- Check the projector's brightness settings in the OSD menu.
- Ensure the room is sufficiently dark for projection.
- غږ نشته:
- If using an analog video input, ensure the audio cable is connected.
- په پروجیکټر او سرچینې وسیله دواړو کې د حجم ترتیبات وګورئ.
- Ensure the correct audio input is selected if applicable.
- انځور تیاره دی:
- د پروجکټور لینز کې د تمرکز حلقه تنظیم کړئ.
- ډاډ ترلاسه کړئ چې پروجیکټر د سکرین څخه په مناسب واټن کې ځای پر ځای شوی دی.
- انځور ټراپیزایډل دی:
- Use the keystone correction function in the OSD menu to adjust the image shape.
- Try to position the projector as perpendicular to the screen as possible.
9. تخنیکي مشخصات
| فیچر | مشخصات |
|---|---|
| د ماډل شمیره | XJ-F10X |
| اصلي حل | XGA (1024 x 768) |
| روښانتیا | 3,300 Lumens |
| د تناسب تناسب | 20,000:1 |
| چپ ننداره کړئ | 0.65" DLP Chip |
| د رڼا سرچینه | هایبرډ LED |
| د رڼا سرچینه ژوند | تر 20,000 ساعتونو پورې |
| د لینس ډول | 1.5x Manual Zoom & Focus |
| د اړخ نسبت | 4:3 اصلي |
| داخلونه | HDMI Type A x 2, S-Video, VGA, RS-232, Composite Video, RCA Audio In |
| د محصول ابعاد | 11.8 x 11.8 x 3.8 انچه |
| د توکي وزن | ۲.۴۵ پونډه |
۷. تضمین او د پیرودونکو ملاتړ
The Casio XJ-F10X Projector is covered by a 3-year parts and labor warranty. The LED hybrid light source is covered by a 5-year or 10,000-hour warranty, whichever comes first. For technical support, service, or warranty claims, please contact Casio customer support through their official webسایټ یا د اړیکې معلومات چې ستاسو د پیرود اسنادو سره چمتو شوي.
Please have your model number (XJ-F10X) and purchase date available when contacting support.


