1. پیژندنه
Thank you for choosing the ANENG Q1 9999 Counts True RMS Digital Multimeter. This device is designed for safe and accurate measurement of various electrical parameters. It features True RMS measurement, Non-Contact Voltage (NCV) detection, auto/manual ranging, and an EBTN black display with an analog bar graph for enhanced readability. Please read this manual thoroughly before use to ensure proper operation and safety.
2. د خوندیتوب معلومات
WARNING: To avoid possible electric shock, fire, or personal injury, please read all safety information before you use the product.
- Always ensure the multimeter is in the correct function and range for the measurement being performed.
- د هر فعالیت لپاره د اعظمي ان پټ ارزښتونو څخه ډیر مه کوئ.
- د کارولو دمخه د خراب شوي موصلیت یا افشا شوي فلزاتو لپاره د ازموینې لیډونه معاینه کړئ. که زیانمن شوی وي نو بدل یې کړئ.
- که ملټي میټر خراب ښکاري یا په سمه توګه کار نه کوي، نو مه یې کاروئ.
- محتاط اوسئ کله چې د حجم سره کار کوئtagد 30V AC RMS، 42V چوکۍ، یا 60V DC څخه پورته. دا حجمونهtagد شاک خطر رامنځته کوي.
- تل د دندو یا رینجونو بدلولو دمخه د ازموینې لیډونه له سرکټ څخه جلا کړئ.
- Replace batteries as soon as the low battery indicator appears to avoid incorrect readings.
- د محلي او ملي خوندیتوب کوډونو ته غاړه کیږدئ.
3. محصول ختم شوview
The ANENG Q1 multimeter is a versatile tool for electrical measurements. Below is an image illustrating the device and its included accessories.

Image 3.1: ANENG Q1 Digital Multimeter and included accessories, including test leads, temperature probe, and storage bag.
The device features a large EBTN display, function buttons, and input jacks for test leads.

انځور 3.2: مخکی view of the ANENG Q1 Multimeter, highlighting the display, function buttons, and input terminals.
4. ترتیب کول
4.1 د بیټرۍ نصب کول
The ANENG Q1 multimeter requires two 1.5V AA batteries (not included). To install or replace batteries:
- ډاډ ترلاسه کړئ چې ملټي میټر بند دی او د ازموینې ټولې لیډونه منقطع کړئ.
- د وسیلې په شا کې د بیټرۍ د برخې پوښ ومومئ.
- د پوښ د خوندي کولو لپاره د سکرو ډرایور څخه کار واخلئ.
- پوښ لرې کړئ او دوه AA بیټرۍ دننه کړئ، سم قطبي حالت وګورئ (+/-).
- د بیټرۍ کمپارټ پوښ بدل کړئ او پیچ کلک کړئ.
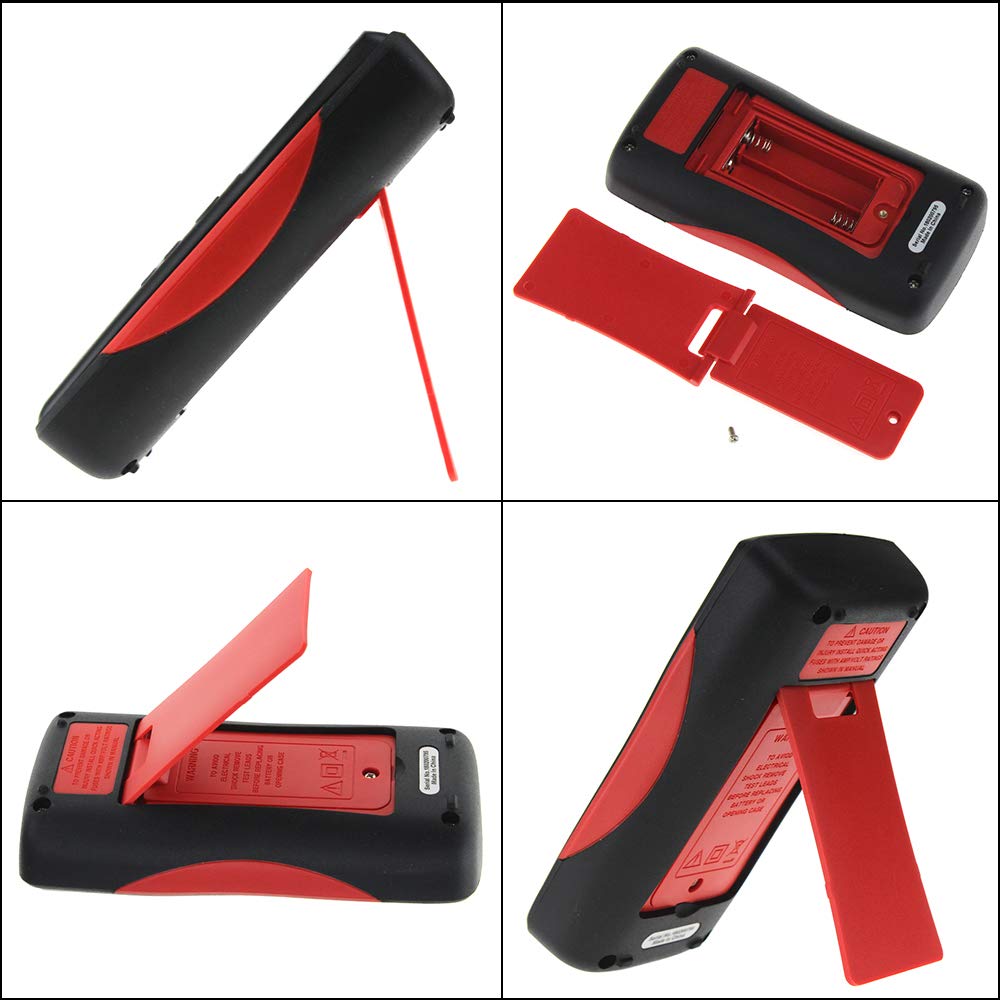
انځور 4.1: شاته view of the multimeter, illustrating the battery compartment and the integrated kickstand.
۶.۲ د ټیسټ لیډونو نښلول
The multimeter comes with two standard test probes and a 16-in-1 multifunctional test line set. Always connect the black test lead to the COM (Common) jack. Connect the red test lead to the appropriate input jack based on the measurement type:
- VΩHz-+ jack for Voltage, Resistance, Frequency, Diode, and Continuity measurements.
- mA jack for milliampد اوسني اندازه کولو دمخه.
- A jack for microampد اوسني اندازه کولو دمخه.
- 10A MAX jack for high current measurements (up to 10A).

Image 4.2: Included test leads and various accessories, such as alligator clips and fine-point probes.
5. عملیاتي لارښوونې
The ANENG Q1 features both auto-ranging and manual-ranging capabilities. Press the بدل کړئ button to switch between auto and manual modes. In manual mode, press بدل کړئ repeatedly to cycle through available ranges.
۸ پاور آن/بند
فشار ورکړئ او ونیسئ پاور button (red circle with line) for more than 2 seconds to turn the multimeter on or off. The device also features an Auto Power Off function to conserve battery life.
5.2 اندازه کول د AC/DC حجمtage
- د تور ټیسټ مشرتابه ته COM جیک او سور ټیسټ د VΩHz-+ جیک
- Turn on the multimeter. The device will typically default to auto-ranging voltage اندازه کول.
- د ازموینې پروبونه د سرکټ نقطو ته لمس کړئ چیرې چې حجمtage باید اندازه شي.
- ټوک ولولئtage value on the display. The multimeter automatically detects AC or DC voltage.
۵.۲ د AC/DC جریان اندازه کول
- مهم: Ensure the circuit is de-energized before connecting the multimeter in series.
- د تور ټیسټ مشرتابه ته COM جیک. سور ټیسټ لیډ د mA, A، یا 10A MAX jack depending on the expected current.
- Insert the multimeter in series with the circuit where current is to be measured.
- Re-energize the circuit.
- په ښودنه کې اوسنی ارزښت ولولئ.
5.4 د مقاومت اندازه کول
- د تور ټیسټ مشرتابه ته COM جیک او سور ټیسټ د VΩHz-+ جیک
- د مقاومت اندازه کولو دمخه ډاډ ترلاسه کړئ چې سرکټ یا برخه غیر انرژي شوې ده.
- Touch the test probes across the component to be measured.
- په ښودنه کې د مقاومت ارزښت ولولئ.
5.5 د ظرفیت اندازه کول
- د تور ټیسټ مشرتابه ته COM جیک او سور ټیسټ د VΩHz-+ جیک
- Ensure the capacitor is fully discharged before measurement to avoid damage to the multimeter.
- د کپیسیټر ټرمینلونو په اوږدو کې د ازموینې پروبونو ته لمس کړئ.
- په ښودنه کې د ظرفیت ارزښت ولولئ.
۵.۸ د تودوخې اندازه کول
- Connect the temperature sensor (thermocouple) to the VΩHz-+ او COM jacks, observing polarity if applicable.
- Place the tip of the temperature sensor on or near the object whose temperature is to be measured.
- Read the temperature value on the display. The unit can be switched between Celsius and Fahrenheit.
5.7 غیر اړیکه والیومtage (NCV) کشف
د NCV فعالیت د AC حجم کشف کولو ته اجازه ورکويtage د کنډکټرونو سره مستقیم تماس پرته.
- فشار ورکړئ NCV button to activate the NCV mode.
- د ملټي میټر پورتنۍ برخه د کنډکټر یا آوټ لیټ ته نږدې حرکت ورکړئ.
- The display will show an increasing number of bars and an audible beep will indicate the presence and strength of AC voltage.

Image 5.1: The multimeter performing a Non-Contact Voltage (NCV) test near a power strip, indicated by the signal icon on the display.
۵.۵ ډایډ ازموینه او دوام
These functions are typically accessed through the VΩHz-+ jack and a dedicated button or range selection.
- د ډایډ ټیسټ: Connect the red lead to the anode and the black lead to the cathode of the diode. The display will show the forward voltage غورځول. د خلاص سرکټ د چک کولو لپاره لیډونه برعکس کړئ.
- د دوام ازموینه: Touch the probes to the two points of the circuit. A continuous beep indicates a low resistance path (continuity).
6. ساتنه
6.1 پاکول
قضیه د اعلان سره پاک کړئamp ټوکر او نرم صابون. د کثافاتو یا محلولونو څخه کار مه اخلئ. د ننوتلو ټرمینلونه د خاورې او رطوبت څخه پاک وساتئ.
6.2 د بیټرۍ بدلول
Refer to Section 4.1 for battery replacement instructions. Replace batteries promptly when the low battery indicator appears on the display.
6.3 د فیوز بدلول
The multimeter is protected by internal fuses. If the current measurement function stops working, the fuse may need replacement. Fuse replacement should only be performed by qualified personnel. Refer to the specifications for fuse ratings.
7. ستونزه حل کول
- هیڅ ښودنه یا کمزوری ښودنه نشته: د بیټرۍ نصب او چارج وګورئ. که اړتیا وي نو بیټرۍ بدل کړئ.
- ناسم لوستل: Ensure test leads are properly connected, the correct function/range is selected, and the batteries are not low.
- اوسنی اندازه کول کار نه کوي: Check the fuse. If blown, replace with a fuse of the correct rating.
- "OL" or "OVER" on display: Indicates an overload or out-of-range measurement. Select a higher range or ensure the input is within the device's limits.
8. مشخصات
| پیرامیټر | حد / ارزښت |
|---|---|
| د ښودلو ډول | Digital Display, 9999 Counts, EBTN Black Display, Analog Bar Graph |
| ظرفیت | 9.99nF / 99.99nF / 999.9nF / 9.99µF / 99.99µF / 999.9µF / 9.999mF |
| والیtage (AC/DC) | 99.99mV / 999.9mV / 9.999V / 99.99V / 999.9V |
| اوسنی (AC/DC) | 99.99µA / 999.9µA / 99.99mA / 999.9mA / 9.999A |
| مقاومت | 99.99Ω / 999.9Ω / 9.999kΩ / 99.99kΩ / 999.9kΩ / 9.999MΩ / 99.99MΩ |
| فریکونسی | 99.99Hz / 999.9Hz / 9.999kHz / 99.99kHz / 999.9kHz / 5MHz |
| د حرارت درجه | -20°C ~ 1000°C / -4°F ~ 1832°F |
| د ډایډ ټیسټ | هو |
| دوام | هو |
| د دندې سایکل | ۴۰٪ - ۸۰٪ |
| Sampد نرخ کچه | په یوه ثانیه کې 3 ځله |
| ځواک | د 2 x 1.5V AA بیټرۍ |
| عملیاتي حالت | د ګا Autoو / لاسي لړۍ |
| د عملیاتي حرارت درجه | 0-40 درجې سانتي ګراد |
| عملیاتي رطوبت | ≤ 75% RH |
| د ذخیره کولو حالت | -20 ~ 60 °C |
| د ذخیره کولو رطوبت | ≤ 80% RH |
| د خوندیتوب درجه | 600V CAT III, 1000V CAT II (inferred) |
9. تضمین او ملاتړ
Specific warranty information is not provided in the product details. For warranty claims or technical support, please contact the retailer or manufacturer directly. Keep your purchase receipt as proof of purchase.


