1. پیژندنه او وروستهview
This manual provides detailed instructions for the installation, operation, maintenance, and troubleshooting of the ASRock 760GM-HDV Rev: 1.01 Desktop Motherboard. This motherboard is designed for AMD AM3/AM3+ processors and supports DDR3 memory, offering a reliable foundation for personal computer systems.
Key features include an AMD 760G/SB710 chipset, support for up to 32GB DDR3 RAM, and integrated graphics with HDMI, VGA, and DVI outputs. It also provides USB and SATA 3GB/s connectivity.
2. ترتیب او نصب کول
Before beginning installation, ensure your workspace is clean, well-lit, and static-free. Always handle the motherboard by its edges and use an anti-static wrist strap to prevent electrostatic discharge (ESD) damage.
2.1 د مور بورډ ترتیب
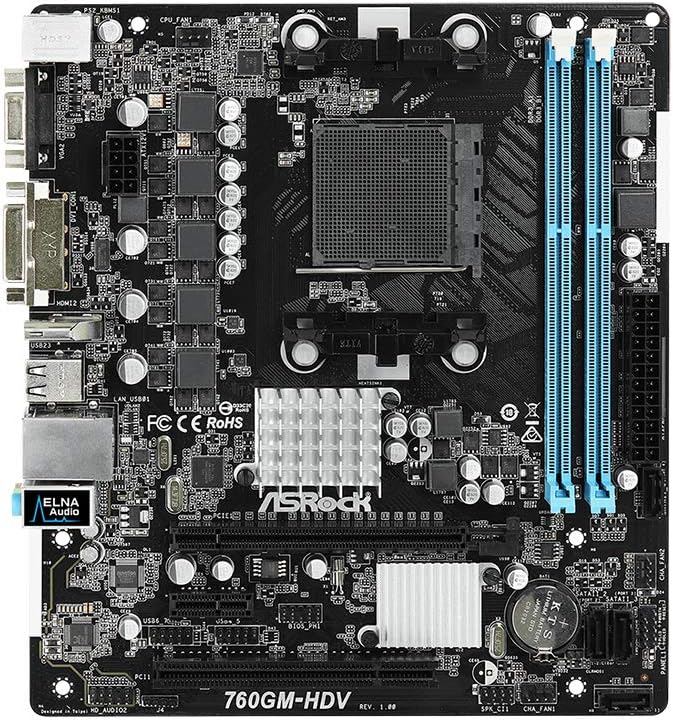
شکل 1: پورته view of the ASRock 760GM-HDV motherboard, showing the CPU socket, RAM slots, PCIe slots, and various connectors.
۳.۳ د اجزاو د نصبولو مرحلې
- قضیه چمتو کړئ: Install the I/O shield into the rear opening of your computer case. Ensure standoffs are correctly aligned and installed for the Micro ATX form factor.
- CPU نصب کړئ: Open the CPU socket lever. Carefully align your AMD AM3/AM3+ processor with the socket, ensuring the golden triangle on the CPU matches the triangle on the socket. Gently place the CPU into the socket without force. Close the lever to secure the CPU.
- د CPU کولر نصب کړئ: Apply thermal paste to the CPU (if not pre-applied on the cooler). Mount the CPU cooler according to its manufacturer's instructions, ensuring it is securely fastened and the fan cable is connected to the CPU_FAN header on the motherboard.
- رام نصب کړئ: Open the clips on both ends of the DDR3 DIMM slots. Align the memory module's notch with the slot's key. Press down firmly on both ends of the module until the clips snap into place. This motherboard supports dual-channel DDR3 memory.
- د مور بورډ نصبول: په احتیاط سره مور بورډ په کیس کې ځای په ځای کړئ، د سکرو سوري د سټینډ آف سره سم کړئ. مور بورډ د پیچونو سره خوندي کړئ.
- د بریښنا رسولو سره نښلول: د 24-pin ATX بریښنا نښلونکی او د 4-pin ATX 12V بریښنا نښلونکی د خپل بریښنا رسولو څخه د مدر بورډ اړوندو پورټونو سره وصل کړئ.
- د ذخیره کولو وسایل وصل کړئ: Connect SATA data cables from your hard drives or SSDs to the SATA 3GB/s ports on the motherboard. Connect power cables from the power supply to your storage devices.
- د مخکینۍ پینل کیبلونه وصل کړئ: Connect the power button, reset button, HDD LED, power LED, and front USB/audio headers from your case to the corresponding pins on the motherboard. Refer to the motherboard's silkscreen labels for correct orientation.
- د پراختیا کارتونه نصب کړئ: If using a dedicated graphics card or other PCIe expansion cards, insert them into the appropriate PCIe slots and secure them with the case's retention mechanism.
3. عملیاتي لارښوونې
3.1 Initial Power-On and BIOS Access
- After all components are installed and connected, connect your monitor, keyboard, and mouse to the appropriate ports.
- خپل سیسټم فعال کړئ. د بوټ پروسې په جریان کې، په مکرر ډول فشار ورکړئ DEL or F2 د BIOS/UEFI تنظیم کولو اسانتیا ته د ننوتلو لپاره کیلي.
- In the BIOS, you can configure boot order, system time, and various hardware settings. Save changes before exiting.
3.2 د پردیو سره نښلول
The ASRock 760GM-HDV motherboard offers a range of rear I/O ports for connecting external devices:

شکل 2: Rear I/O panel of the ASRock 760GM-HDV motherboard, showing PS/2, VGA, DVI, HDMI, USB, LAN, and audio ports.
- PS/2 پورټونه: For connecting legacy PS/2 keyboards and mice.
- VGA, DVI, HDMI Ports: For connecting displays. Use one port at a time for integrated graphics output.
- USB پورټونه: For connecting USB devices such as keyboards, mice, external drives, and printers.
- LAN پورټ: For connecting to a wired network using an Ethernet cable.
- آډیو جیکونه: د سپیکرو، هیډفونونو او مایکروفونونو د نښلولو لپاره.
3.3 د ډرایور نصب کول
After installing your operating system, install the necessary drivers for the motherboard's chipset, integrated graphics, audio, and LAN. These drivers are typically provided on a support CD or can be downloaded from the ASRock official webستاسو د ځانګړي ماډل لپاره سایټ.
4. ساتنه
- د دوړو پاکول: Regularly clean dust from inside your computer case, especially around the CPU cooler, chipset heatsink, and fan vents. Use compressed air and ensure the system is powered off and unplugged.
- د BIOS تازه معلومات: په دوره یي ډول ASRock وګورئ website for BIOS updates. BIOS updates can improve system stability, compatibility, and performance. Follow the update instructions carefully to avoid system damage.
- د اجزاو چکونه: Ensure all cables are securely connected and no components are loose. Check for any signs of physical damage or overheating.
5. ستونزه حل کول
- بریښنا نشته / پوسټ نشته:
- Verify all power cables (24-pin ATX, 4-pin 12V) are securely connected.
- Ensure the CPU and RAM are correctly seated.
- یوازې د اړینو برخو سره بوټ کولو هڅه وکړئ (CPU، یو RAM سټیک، GPU که مدغم ګرافیک نه وي).
- Clear CMOS by removing the CMOS battery for a few minutes or using the clear CMOS jumper.
- نه ښودنه:
- Ensure the monitor is connected to the correct video output (motherboard's integrated graphics or a dedicated graphics card).
- Check monitor power and input selection.
- If using a dedicated graphics card, ensure it is properly seated and has power.
- عملیاتي سیسټم نه بوټ کیږي:
- Check boot order in BIOS to ensure the correct drive is selected.
- Verify SATA data and power connections to the boot drive.
- د ذخیره کولو ډرایو کې تشخیصي چیک ترسره کړئ.
6. مشخصات
| فیچر | مشخصات |
|---|---|
| جوړونکی | ASRock |
| د ماډل شمیره | 760GM-HDV |
| د چپسیټ ډول | AMD 760G / SB710 |
| د CPU ساکټ | AM3 / AM3+ |
| مطابقت لرونکي پروسیسرونه | AMD Athlon, AMD Sempron (AM3/AM3+ series) |
| د RAM حافظې ټیکنالوژي | DDR3 |
| د RAM حافظې اعظمي اندازه | 32 جي بي |
| د حافظې ساعت سرعت | تر ۴۴۰۰ میګاهرتز (OC) پورې |
| مدغم ګرافیک | AMD Radeon HD 3000 (on 760G chipset) |
| د ویډیو تولید بندرونه | VGA، DVI، HDMI |
| SATA بندرونه | SATA 3GB/s |
| USB بندرونه | USB 2.0 (rear and internal headers) |
| LAN | ګیګابایټ LAN |
| د فارم فکتور | مایکرو ATX |
| د اصلي بریښنا نښلونکی | ۲۴-پن ATX |
| د CPU ځواک نښلونکی | 4-pin ATX 12V |
7. تضمین او ملاتړ
د تضمین په اړه د تفصيلي معلوماتو لپاره، مهرباني وکړئ د خپل محصول سره شامل شوي تضمین کارت ته مراجعه وکړئ یا رسمي ASRock ته مراجعه وکړئ. website. ASRock provides technical support for its products. For assistance, please visit the ASRock support page or contact their customer service department.
د ASRock رسمي Webسایټ: www.asrock.com


