پیژندنه
This manual provides instructions for the safe operation and maintenance of the Proster Digital Multimeter 3999 and its accompanying 8-piece test lead set. Please read this manual thoroughly before using the device to ensure proper and safe operation.
د خوندیتوب معلومات
د عمومي خوندیتوب مقررات
- تل د محلي او ملي خوندیتوب کوډونو ته غاړه کیږدئ.
- د هر فعالیت لپاره د اعظمي ان پټ ارزښتونو څخه ډیر مه کوئ.
- د حجم سره کار کولو پر مهال له احتیاط څخه کار واخلئtagد 30V AC RMS، 42V چوکۍ، یا 60V DC څخه پورته. دا حجمونهtagد شاک خطر رامنځته کوي.
- د جریان اندازه کولو دمخه، ډاډ ترلاسه کړئ چې سرکټ غیر فعال شوی او ملټي میټر په لړۍ کې وصل دی.
- Before measuring resistance or continuity, ensure the circuit is de-energized and all capacitors are discharged.
- کله چې د بیټرۍ ټیټ شاخص څرګند شي بیټرۍ بدل کړئ.
- که چیرې میټر خراب ښکاري یا کیس خلاص وي نو مه یې چلوئ.
- د اندازه کولو په وخت کې ګوتې د پروب خنډونو شاته وساتئ.
- ډاډ ترلاسه کړئ چې د اندازه کولو لپاره سم فعالیت او حد غوره شوی.
- Always use the correct input terminals for the selected function.
محصول پای ته ورسیدview
د ملټي میټر اجزا
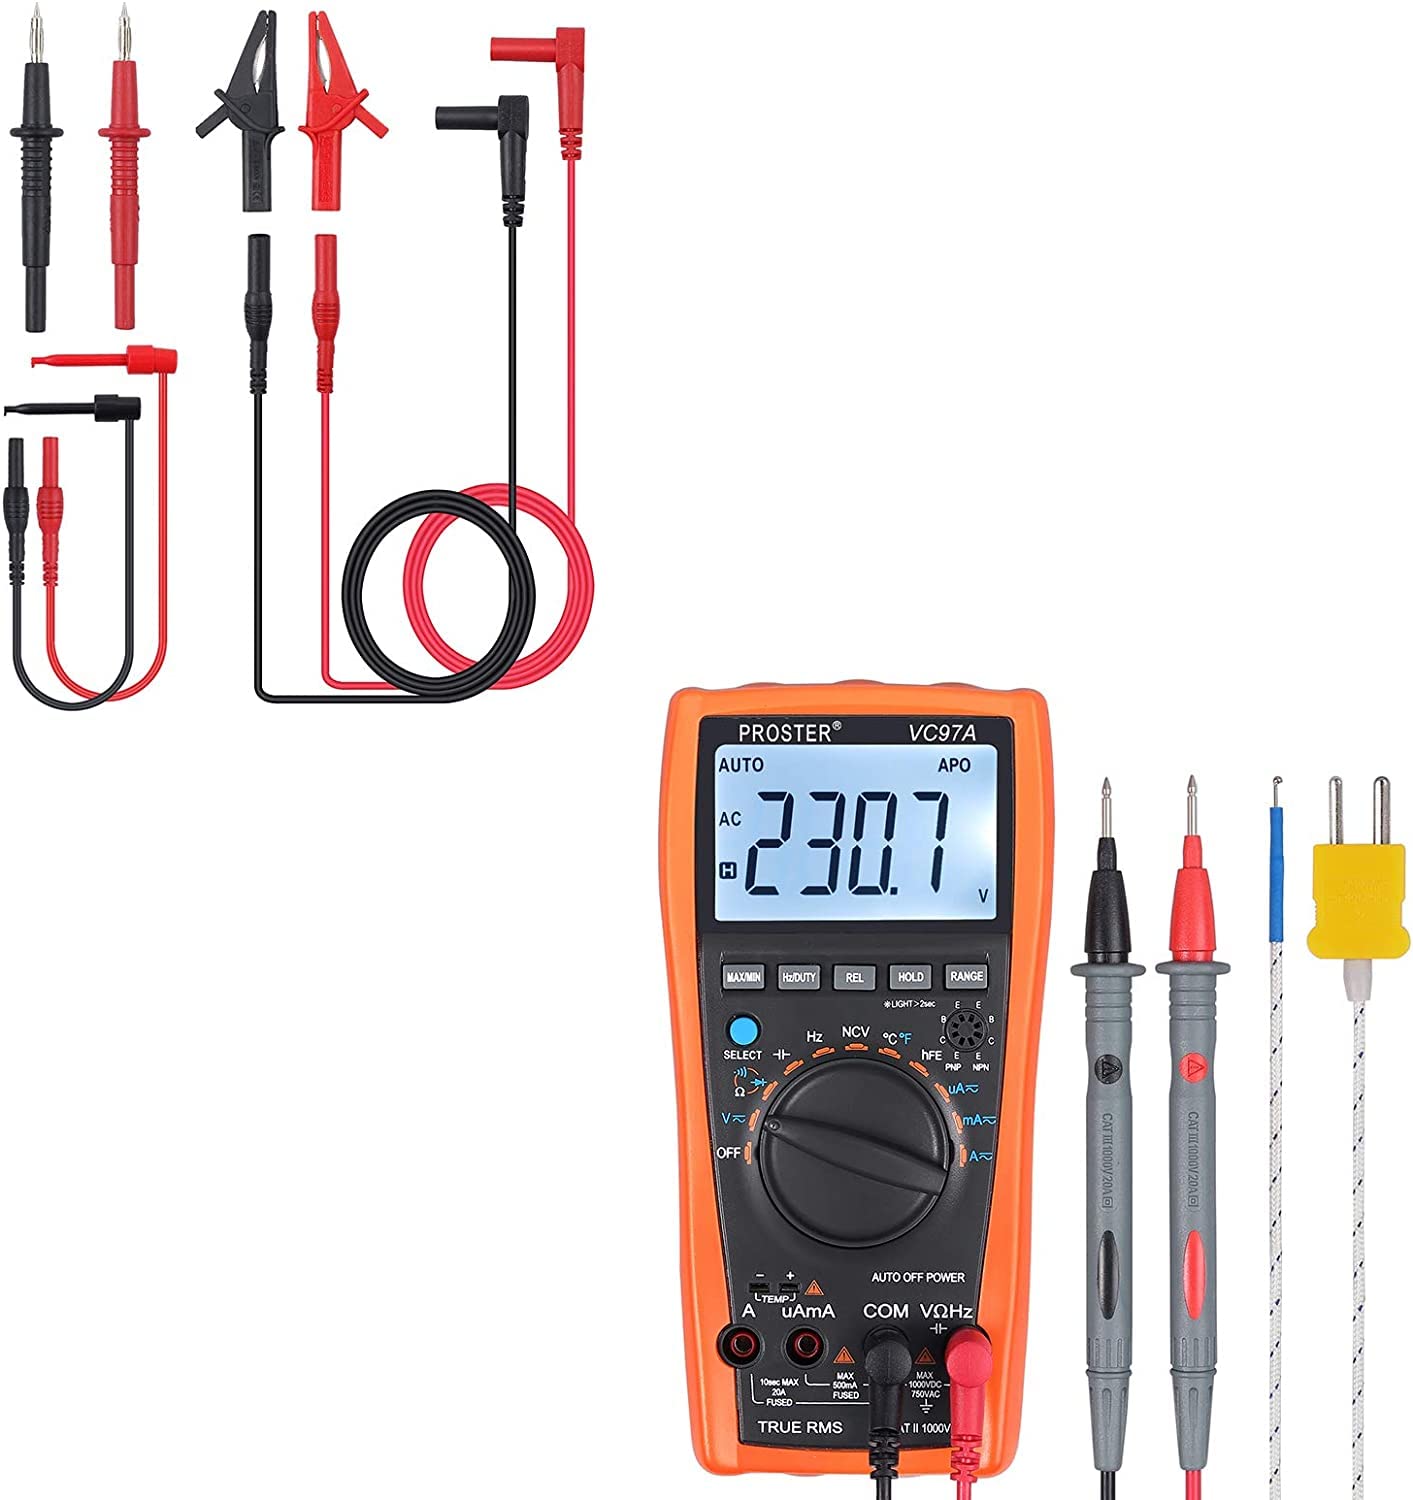
The Proster Digital Multimeter 3999 features an LCD display, function selector dial, and input terminals for various electrical measurements.
په ټوله کې view of the Proster Digital Multimeter 3999, showing its orange casing, LCD display, and rotary switch.
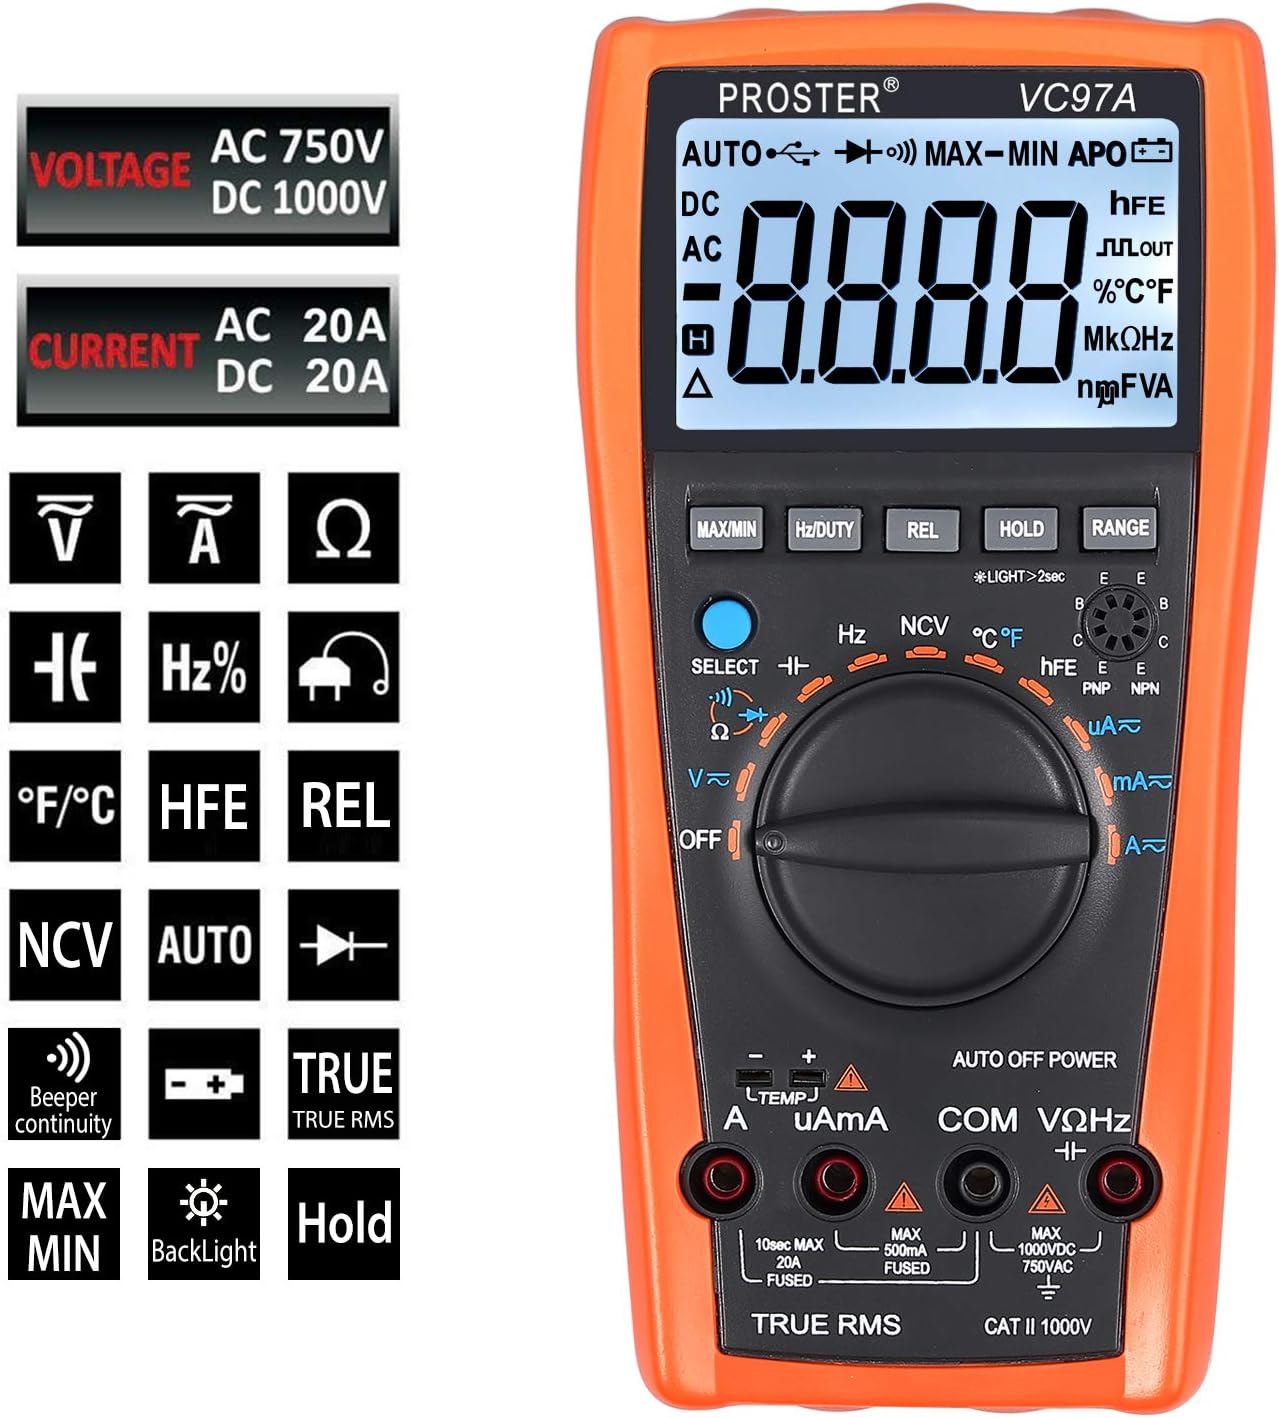
تفصيلي view of the multimeter's LCD display, function buttons (MAX/MIN, HZ/DUTY, REL, HOLD, RANGE), and rotary switch for selecting measurement modes.
Test Leads and Accessories
The included 8-piece test lead set provides versatility for various electrical measurements. All leads feature brass construction for durability and corrosion resistance.
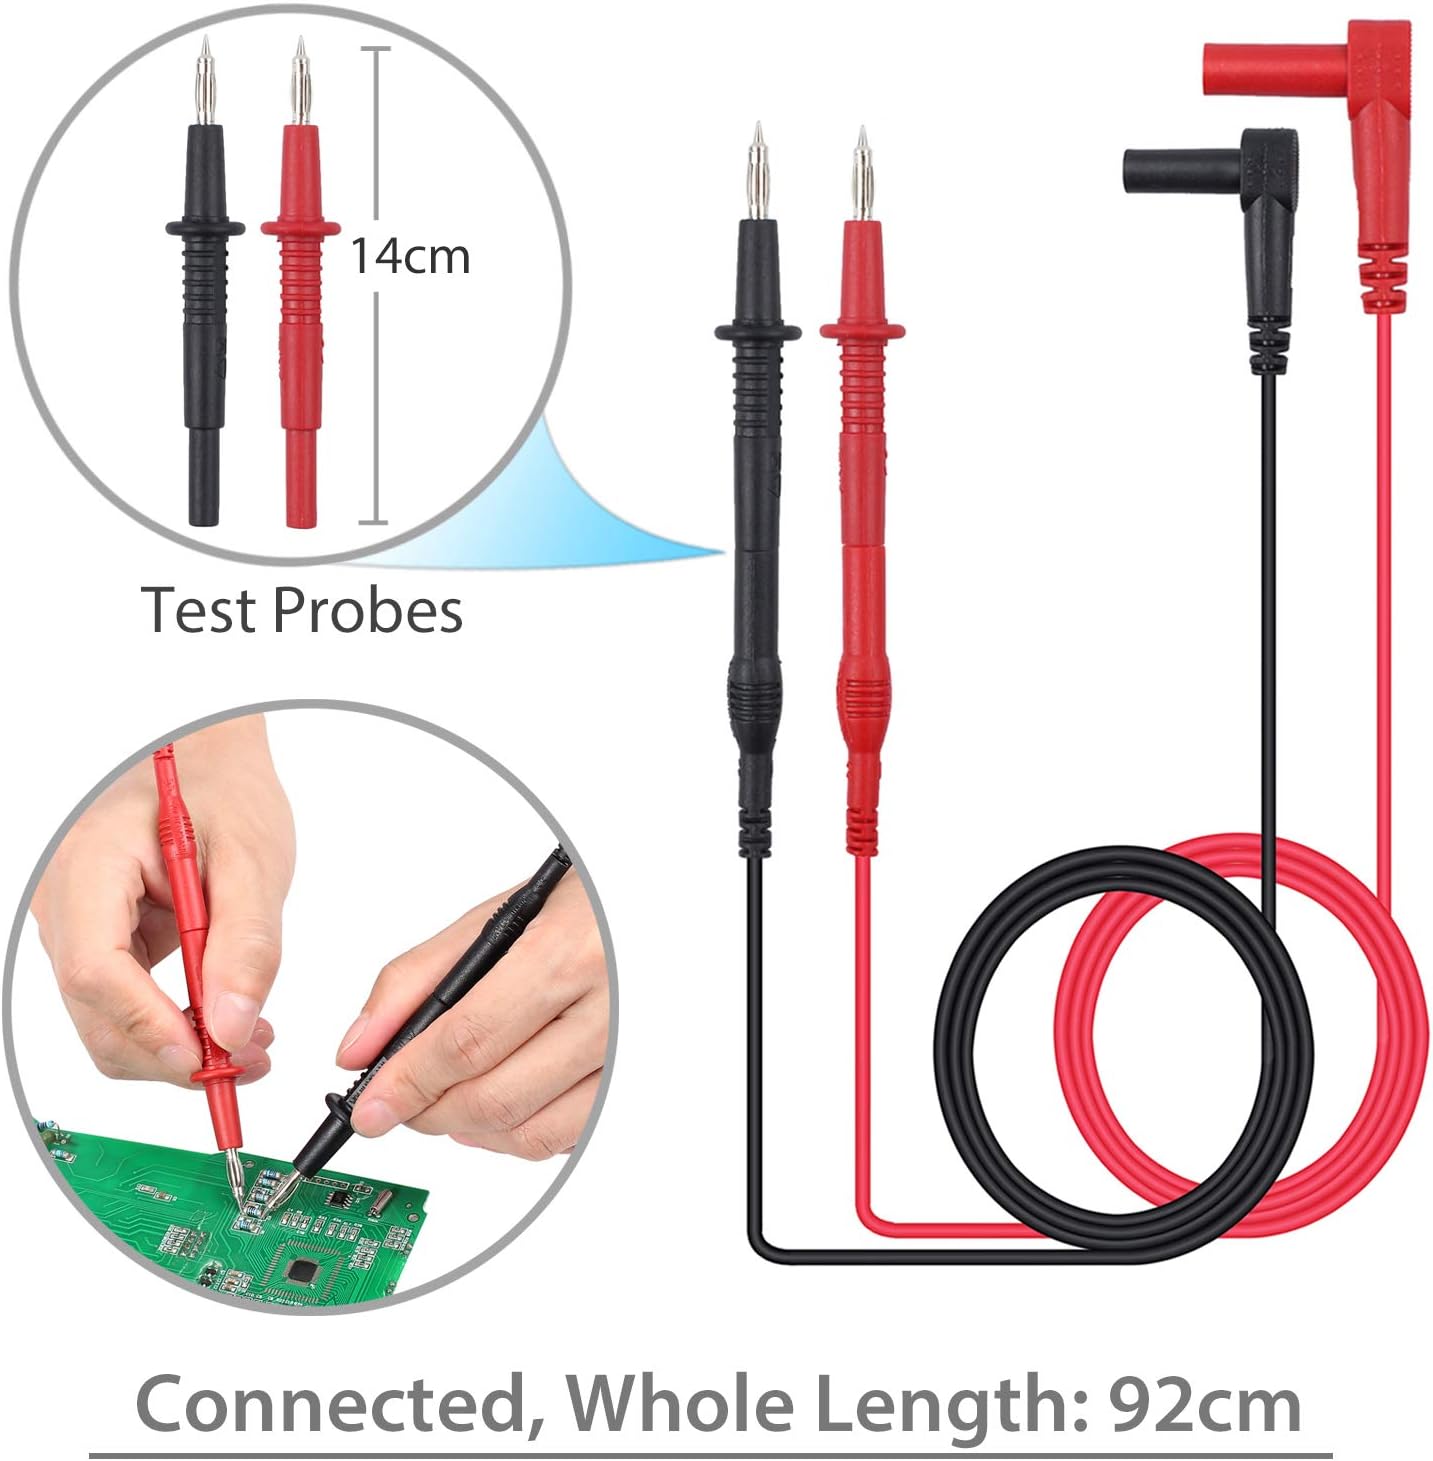
Standard test probes with 14cm length and a total connected length of 92cm. These are suitable for general purpose measurements.

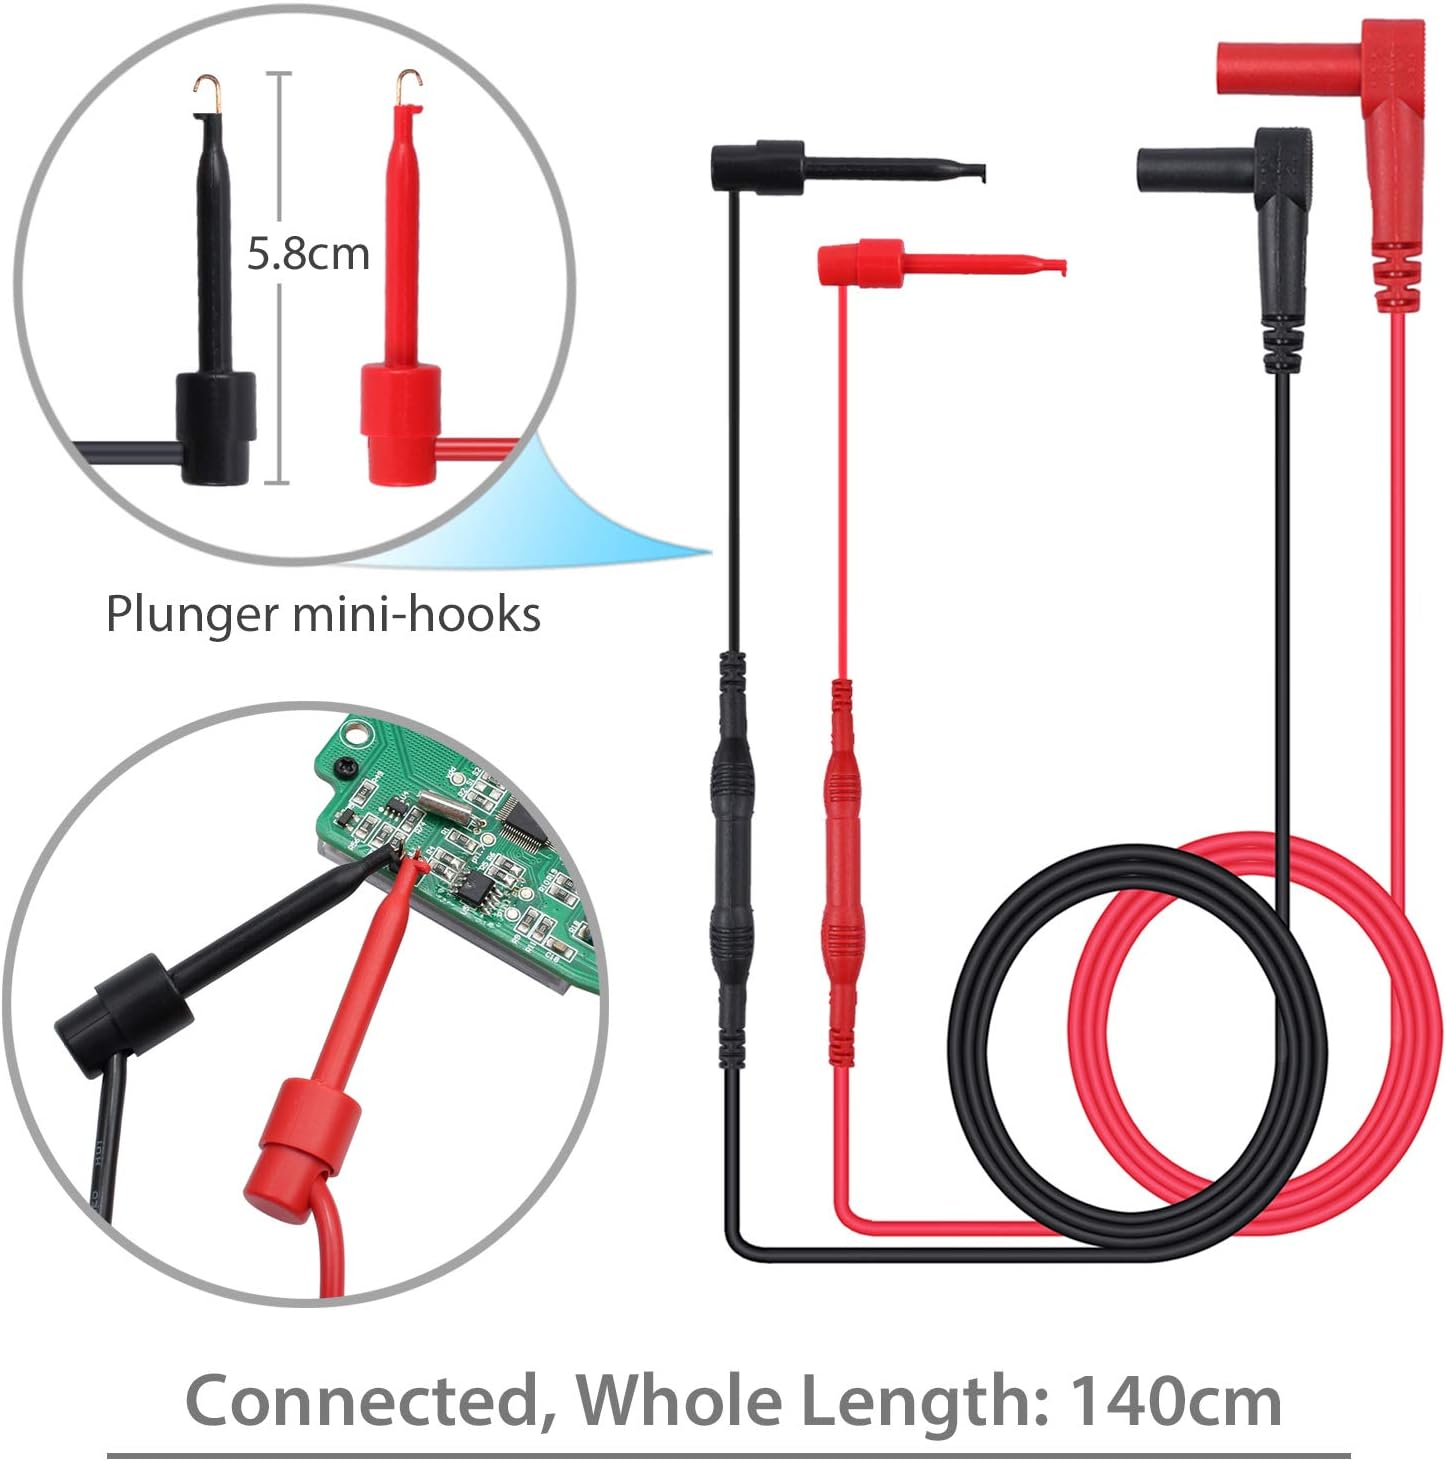
Plunger mini-hooks, 5.8cm in length, with a total connected length of 140cm. Ideal for connecting to small terminals or components.

Alligator clips, 9cm in length, with a total connected length of 90cm. Useful for hands-free connections to larger terminals or wires.
چمتو کول
د بیټرۍ نصب کول
- The multimeter requires two AAA batteries (included).
- د ملټي میټر شاته د بیټرۍ کڅوړه ومومئ.
- د بیټرۍ پوښ خلاصولو لپاره سکرو ډرایور وکاروئ.
- بیټرۍ دننه کړئ، سم قطبي حالت (+ او -) وګورئ.
- د بیټرۍ پوښ بدل کړئ او د سکرو سره یې خوندي کړئ.
د ټیسټ لیډونو سره وصل کول
- د ډیری برخې لپارهtage, resistance, and continuity measurements, connect the red test lead to the "VΩHz" ټرمینل او تور ټیسټ د دې لامل کیږي "COM" ترمینل
- For current measurements, connect the red test lead to the "uAmA" terminal (for micro/milli-amps) or the "A" ترمینل (لپاره amps) and the black test lead to the "COM" ترمینل
- Ensure test leads are fully inserted into the correct terminals.
عملیاتي لارښوونې
پاور آن/بند
- Turn the rotary switch from "بند" to any desired function to power on the multimeter.
- To power off, turn the rotary switch back to "بند". The multimeter also features an Auto Power Off (APO) function to conserve battery life.
د فعالیت انتخاب
- د مطلوب اندازه کولو فعالیت غوره کولو لپاره مرکزي ډایل وګرځوئ (د مثال په توګه، د AC حجم لپاره V~tage، V- د DC Vol لپارهtage, Ω for Resistance, A~ for AC Current, A- for DC Current, Hz for Frequency, °C/°F for Temperature).
- د کارولو "ټاکل" button to toggle between different modes within a single dial position (e.g., AC/DC voltage، مقاومت/دوام).
اندازه کول حجمtage (AC/DC)
- سره د سور ازموینې لیډ وصل کړئ "VΩHz" ټرمینل او تور ټیسټ د دې لامل کیږي "COM" ترمینل
- د روټري سویچ V~ ته واړوئ (AC Voltage) یا V- (DC Voltage). Use the "ټاکل" که اړتیا وي، تڼۍ.
- Connect the test probes in parallel with the circuit or component to be measured.
- ټوک ولولئtagد LCD نندارې ارزښت.
Measuring Current (AC/DC)
- خبرداری: Ensure the circuit is de-energized before connecting the multimeter for current measurement.
- د تور ټیسټ مشرتابه ته "COM" ترمینل
- For micro/milli-amps, connect the red test lead to the "uAmA" terminal. For amps, connect the red test lead to the "A" ترمینل
- Turn the rotary switch to A~ (AC Current) or A- (DC Current). Use the "ټاکل" که اړتیا وي، تڼۍ.
- سرکټ پرانیزئ او ملټي میټر په لړۍ کې د بار سره وصل کړئ.
- سرکټ بیا فعال کړئ او اوسنی ارزښت ولولئ.
د مقاومت اندازه کول
- خبرداری: د مقاومت اندازه کولو دمخه ډاډ ترلاسه کړئ چې سرکټ غیر انرژي شوی او ټول کپیسیټرونه خارج شوي دي.
- سره د سور ازموینې لیډ وصل کړئ "VΩHz" ټرمینل او تور ټیسټ د دې لامل کیږي "COM" ترمینل
- Turn the rotary switch to Ω (Resistance).
- د ازموینې پروبونه د اندازه کولو لپاره د برخې په اوږدو کې وصل کړئ.
- په LCD ډسپلې کې د مقاومت ارزښت ولولئ.
د دوام ازموینه
- خبرداری: د دوام ازموینې ترسره کولو دمخه ډاډ ترلاسه کړئ چې سرکټ غیر انرژي شوی دی.
- سره د سور ازموینې لیډ وصل کړئ "VΩHz" ټرمینل او تور ټیسټ د دې لامل کیږي "COM" ترمینل
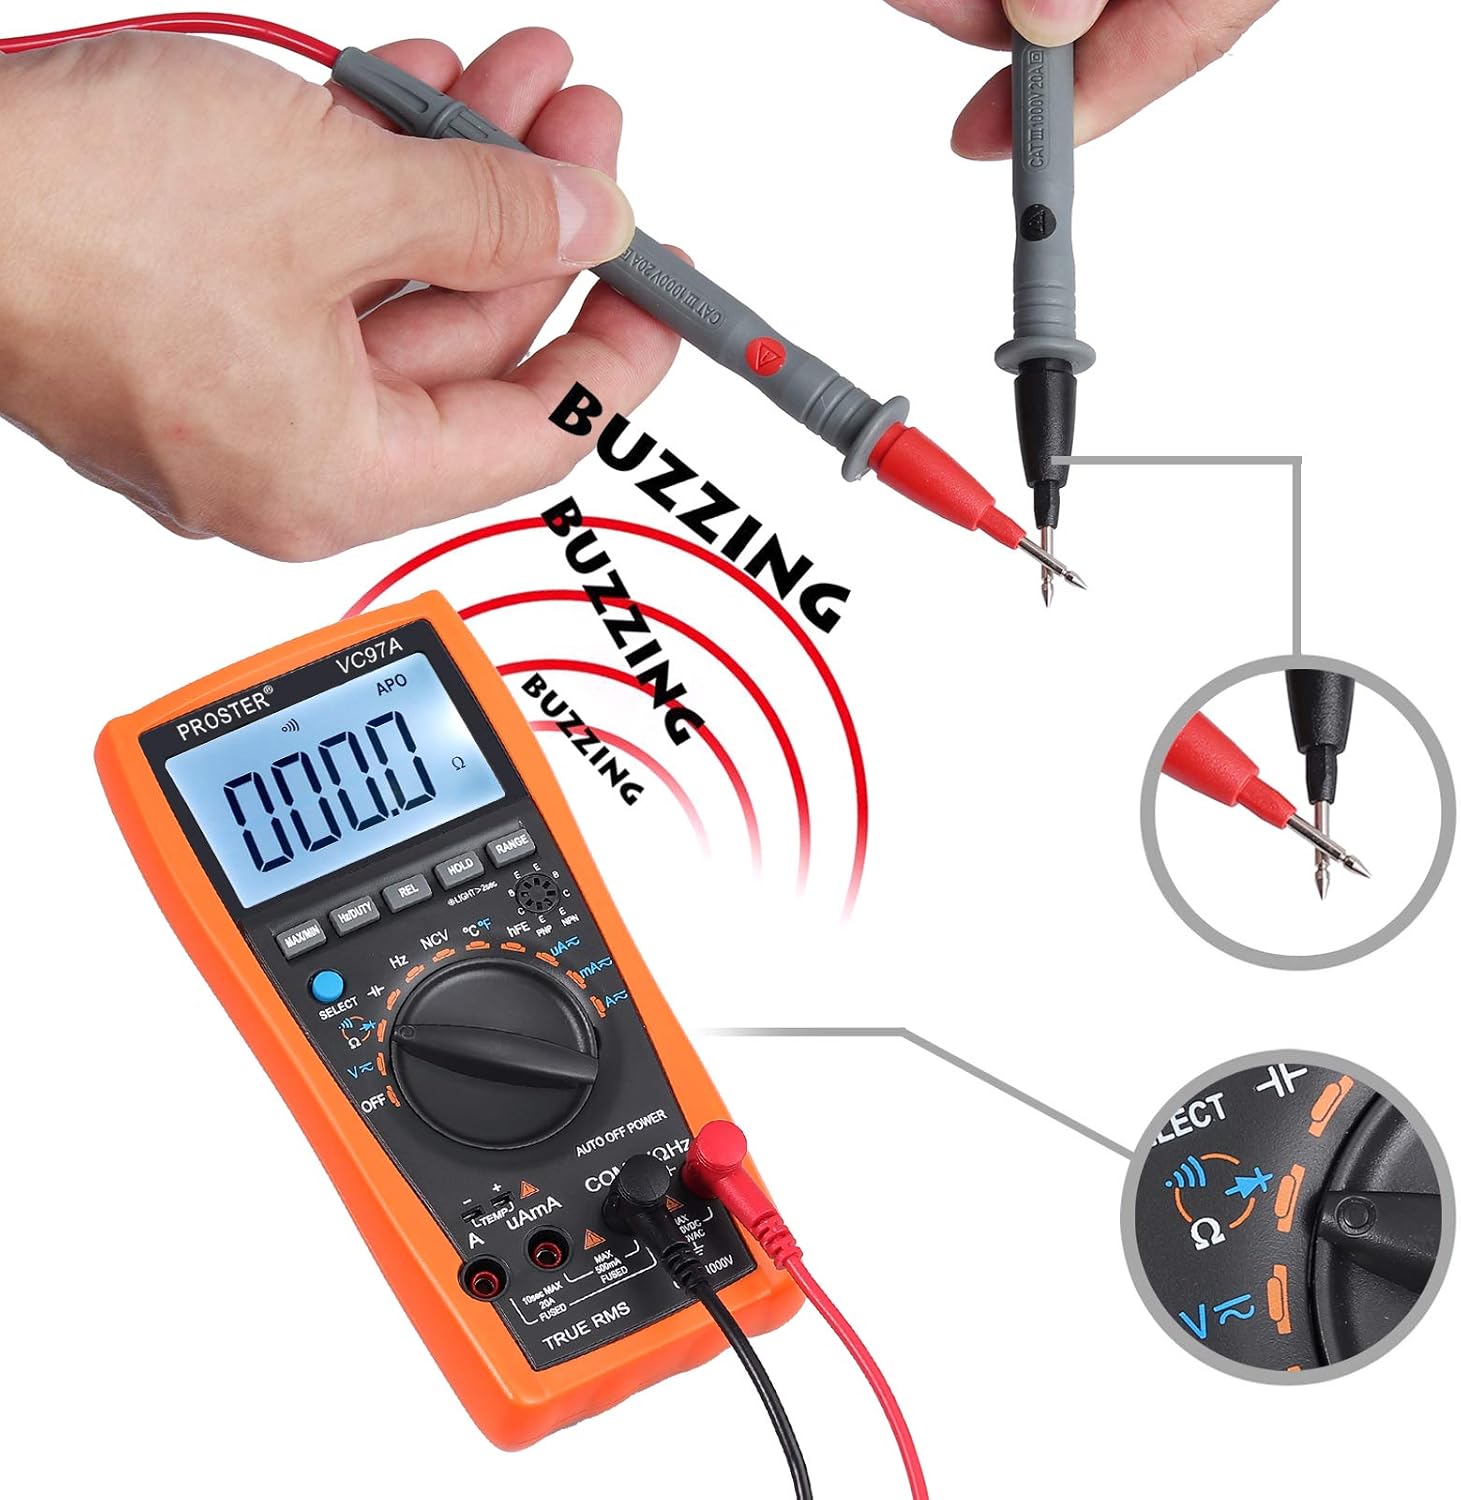
- Turn the rotary switch to the continuity symbol (speaker icon).
- د ازموینې پروبونه د سرکټ یا برخې په اوږدو کې وصل کړئ.
- A continuous beep indicates a complete circuit (low resistance). The display will show the resistance value.
Performing a continuity test. The multimeter emits a buzzing sound when a continuous circuit is detected, indicating low resistance.
د حرارت درجه اندازه کول
- Connect the K-type temperature probe (included) to the multimeter's input terminals, observing polarity.
- Turn the rotary switch to °C/°F.
- Place the temperature probe in the environment or on the object to be measured.
- د LCD ډسپلې په اړه د تودوخې ارزښت ولولئ.

Measuring the surrounding air temperature using the K-type temperature probe.
Measuring the temperature of a liquid using the K-type temperature probe.
ځانګړې دندې
- MAX/MIN: Press to display the maximum or minimum measured value.
- هولډ: په نندارتون کې د اوسني لوستلو منجمد کولو لپاره فشار ورکړئ.
- REL (نسبي اندازه کول): Press to store the current reading as a reference and display subsequent measurements as a deviation from this reference.
- رینج: For manual ranging (if auto-ranging is not desired or available for a specific function).
- شاته رڼا: Press the backlight button (often combined with HOLD or another button) to illuminate the display in low-light conditions.
- NCV (غیر تماس والی جلدtage): Allows detection of AC voltage without direct contact. Select NCV mode and bring the top of the multimeter near an AC voltage سرچینه.
ساتنه
د بیټرۍ بدلول
When the low battery indicator appears on the display, replace the batteries as described in the "Battery Installation" section.
پاکول
- د ملټي میټر کیس د اعلان سره پاک کړئamp ټوکر او نرم صابون. د کثافاتو او محلولونو څخه کار مه اخلئ.
- Ensure the device is powered off and test leads are disconnected before cleaning.
ذخیره کول
- If the multimeter is not used for an extended period, remove the batteries to prevent leakage.
- وسیله په یخ او وچ ځای کې وساتئ، د مستقیم لمر وړانګو او سختې تودوخې څخه لرې.
د ستونزو حل کول
هیڅ ښودنه نشته / د بریښنا فعالیدو ستونزه
- د بیټرۍ نصب او قطبي والی وګورئ.
- که بیټرۍ ټیټې یا ختمې شوې وي نو بدل یې کړئ.
- Ensure the rotary switch is turned to an active function, not "بند".
ناسم لوستل
- تایید کړئ چې سم فعالیت او حد غوره شوی دی.
- ډاډ ترلاسه کړئ چې د ازموینې لیډونه په سمه توګه د سم ان پټ ټرمینلونو سره وصل دي.
- Check for damaged test leads or probes.
- Ensure the circuit is de-energized for resistance/continuity measurements.
د اوورلوډ اشاره ("OL")
- The measured value exceeds the selected range. Switch to a higher range or verify the circuit conditions.
د دوام غږ نشته
- ډاډ ترلاسه کړئ چې سرکټ غیر انرژي شوی دی.
- Check for an open circuit or high resistance.
- Verify test lead connections.
مشخصات
- ښکاره کول: LCD، 3999 شمېره
- DC Voltage: تر 1000V پورې
- AC Voltage: تر 750V پورې
- DC اوسنی: تر 20A پورې
- AC اوسنی: تر 20A پورې
- مقاومت: هو
- ظرفیت: Up to 200uF
- فریکونسی: هو
- د دندې سایکل: هو
- دحرارت درجه: Yes (K-type probe included)
- دوام: هو (د بزر سره)
- د ډایډ ټیسټ: هو
- NCV (غیر تماس والی جلدtage): هو
- ځانګړي ځانګړتیاوې: د ټیټ بیټرۍ Voltage Indication, Overload Protection, Auto Power Off, Data Hold, MAX/MIN, Relative Measurement, Backlight.
- د بریښنا سرچینه: 2 x AAA بیټرۍ
- د خوندیتوب درجه: CAT II 1000V
تضمین او ملاتړ
For warranty information or technical support, please refer to the product packaging or contact Proster customer service directly. Contact details are typically available on the manufacturer's webسایټ یا شامل اسناد.


