1. پیژندنه
Welcome to the instruction manual for your HAPPYMODEL Crux3 FPV Drone. This manual provides essential information for the safe and effective operation, setup, maintenance, and troubleshooting of your drone. Please read this manual thoroughly before operating your Crux3 drone to ensure optimal performance and longevity.
2. محصول ختم شوview
کلیدي ځانګړتیاوې
- Ultra-lightweight 41-gram 1-2s brushless toothpick drone.
- Equipped with the New CrazybeeX 4in1 AIO Flight Controller.
- Features a CADDX ANT Camera for clear FPV feed.
- Powered by New 1202.5 6400KV brushless motors.
- Utilizes an XT30 connector for battery input.
- Compatible with Insta360 Go Camera for cinematic footage.
- Multiple receiver options available: Internal SPI Frsky (D8/D16), Internal SPI Flysky (AFHDS/AFHDS-2A), Internal SPI DSM2/X, External Frsky RXSR, and External TBS Crossfire Nano.
ابعاد او وزن
The Crux3 drone measures approximately 97mm x 97mm x 35mm (without propellers) and weighs 41g (without battery), making it highly portable and agile.

شکل 2.1: مخکی view of the HAPPYMODEL Crux3 FPV Drone, showcasing its compact design and propeller layout.

شکل 2.2: اړخ view of the Crux3 drone, highlighting the flight controller stack and camera placement.
3. اجزا شامل دي
Your HAPPYMODEL Crux3 package typically includes the following components:
- HAPPYMODEL Crux3 FPV Drone (with selected receiver version)
- Propellers (spare set usually included)
- Battery (may be sold separately or included depending on package)
- Camera (CADDX ANT pre-installed)
- Small accessories (e.g., zip ties, screwdriver, battery strap)

Figure 3.1: The Crux3 drone along with its typical accessories, neatly packed in a carrying case.
4. ترتیب کول
4.1 د بیټرۍ پیوستون
The Crux3 drone uses an XT30 connector for its power input. It is recommended to use 2s 350mAh / 400mAh / 450mAh / 520mAh LiPo batteries for optimal flight performance. Ensure the battery is fully charged before connecting.
- Carefully align the XT30 connector from the battery with the XT30 connector on the drone.
- Push firmly until the connectors are fully seated.
- Secure the battery to the drone's frame using the provided battery strap to prevent movement during flight.

Figure 4.1: The Crux3 drone with a battery connected via the XT30 connector, ready for flight.
4.2 د پروپیلر نصب کول
The Crux3 uses Gemfan 3018-2 propellers. Ensure propellers are installed correctly according to motor rotation direction.
- Identify the correct propeller for each motor (clockwise and counter-clockwise).
- Gently push the propeller onto the motor shaft until it sits flush.
- Ensure the propeller is securely attached but do not overtighten if using screws.

شکل ۶.۲: یوه نږدې کتنه view of the EX1202.5 6400KV motor and propeller assembly on the Crux3 drone.
4.3 Binding with Transmitter
The binding process varies depending on the receiver version of your Crux3 drone. Refer to your transmitter's manual for specific binding instructions.
- Internal SPI Frsky Version: Compatible with ACCST D8 / D16 modes. D8 mode is recommended.
- Internal SPI Flysky Version: Compatible with AFHDS and AFHDS-2A Flysky transmitters.
- Internal SPI DSM2/X Version: Compatible with Spektrum radio or DSM2/X multiprotocol.
- External Frsky RXSR Version: ACCST D16 sbus output.
- External TBS Crossfire Nano Version: Requires TBS Crossfire transmitter.
Typically, you will need to put both the drone's receiver and your transmitter into binding mode. Consult the flight controller firmware documentation (e.g., Betaflight) for detailed receiver setup and binding procedures.
5. عملیاتي لارښوونې
5.1 د الوتنې چمتو کول
- Ensure all components are securely attached and propellers are free from damage.
- Verify battery is fully charged and properly connected.
- Power on your FPV goggles and ensure a clear video feed from the drone's CADDX ANT camera.
- Power on your radio transmitter and ensure it is bound to the drone.
- Place the drone on a flat, stable surface in an open area, clear of obstacles.
۶.۵ د الوتنې اساسي کنټرولونه
Familiarize yourself with the basic controls on your transmitter:
- وهل: Controls altitude (usually left stick, vertical).
- یا: Rotates the drone left or right (usually left stick, horizontal).
- پچه: Tilts the drone forward or backward (usually right stick, vertical).
- رول: Tilts the drone left or right (usually right stick, horizontal).
Arm the motors using the designated arming switch on your transmitter (refer to your Betaflight configuration). Once armed, slowly increase throttle for takeoff.
5.3 Insta360 Go Camera Compatibility
The Crux3 drone is designed to be compatible with the Insta360 Go Camera. This allows for capturing high-quality stabilized footage during your flights. Ensure the Insta360 Go is securely mounted to the drone's designated mount point before flight.
6. ساتنه
۴.۲ د ساتنې عمومي لارښوونې
- پروپیلر معاینه: Regularly check propellers for cracks, bends, or nicks. Replace damaged propellers immediately as they can cause vibrations and affect flight performance.
- د چوکاټ معاینه: After any hard landing or crash, inspect the carbon fiber frame for cracks or damage.
- د موټرو پاکول: Keep motors free from dirt, dust, and debris. Use compressed air to clean if necessary.
- د اجزاوو چک: Ensure all screws are tight and electrical connections (e.g., XT30, motor wires) are secure.
- د بیټرۍ پاملرنه: د لیپو بیټرۍ د ذخیره کولو حجم کې وساتئtage (around 3.8V per cell) when not in use. Do not overcharge or over-discharge.
7. ستونزه حل کول
7.1 عام مسایل او حلونه
- Drone not arming: Check if the arming switch on your transmitter is correctly configured in Betaflight. Ensure the drone is level and no pre-arm conditions (e.g., low battery, no receiver signal) are preventing arming.
- د ویډیو فیډ نشته: Verify the CADDX ANT camera is properly connected to the flight controller. Check your FPV goggles for correct channel selection and battery level.
- Unstable flight/Vibrations: Inspect propellers for damage and ensure they are securely attached. Check for loose motors or frame components. Recalibrate accelerometer in Betaflight if necessary.
- Loss of control/Range issues: Ensure your receiver is properly bound to your transmitter. Check for antenna damage on both the drone and transmitter. Avoid flying in areas with high interference.
- Motors not spinning: Check motor connections to the ESC. Ensure motors are not obstructed. Verify motor output in Betaflight configurator.
For more advanced troubleshooting or configuration, refer to the official Betaflight documentation and community forums for the CrazybeeX flight controller.
8. مشخصات
8.1 CADDX ANT 1200TVL Camera
| فیچر | مشخصات |
|---|---|
| د انځور سینسر | ۱/۲.۳" د CMOS سینسر |
| افقی حل | 1200 تلویزیون |
| د تلویزیون سیسټم | NTSC یا PAL |
| د انځور اړخ نسبت | ۱:۱ یا ۲.۰:۱ |
| همغږي کول | داخلي |
| بریښنایی شټر | پال: 1 / 50-100,000،1؛ NTSC: 60 / 100,000-XNUMX،XNUMX |
| د S/N تناسب | > 52dB (AGC آف) |
| د ویډیو تولید | CVBS |
| لینس | 1.8mm |
| من روښانه کول | 0.001Lux@F1.2 |
| د آټو ګین کنټرول (AGC) | هو |
| BLC | هو |
| WDR | نړیوال WDR |
| DNR | 3D DNR |
| ابعاد | 14*14mm (with bracket to 19*19mm) |
| د پراخه ځواک ننوت | ډي 3.7-18V |
| د کار د حرارت درجه | -20℃~+60℃ |
| وزن | ۲ ګرامه (شمال لویدیځ) |

Figure 8.1: Detailed specifications for the integrated CADDX ANT 1200TVL FPV camera.
8.2 د ترلاسه کونکي مشخصات
| د ترلاسه کونکي ډول | جزیات |
|---|---|
| Onboard DSM2/X SPI Receiver Version | Failsafe support, SPI BUS receiver DSM2/DSMX compatible, Max 12 channels, No ground interference (Transmitter and receiver 1m from the ground), 200m-300m range, RSSI enable (show on goggles). |
| External Frsky R-XSR Receiver Version | Weight: 1.5g, Number of channels: 16CH (1-16CH from SBUS channel, 1-8CH from CPPM channel), Operating Voltage Range: 3.5V-10V, Operating Current: 70mA@5V, Firmware Upgradable, Compatibility: FrSky X Series modules and radios in D16 mode, Could support Frsky New ACCESS Protocol (Upgrade firmware). |
| External TBS CRSF Nano Receiver Version | Original TBS CROSSFIRE Receiver, CRSF Protocol, Official TBS transmitter compatible. |

Figure 8.2: Specifications for various receiver options available with the Crux3 drone.
8.3 Flight Controller, Motor, and Propeller Specifications
| اجزا | مشخصات |
|---|---|
| Flight Controller (CrazybeeX 4in1 AIO) | MCU: STM32F411CEU6 (100MHz, 512K FLASH), Sensor: MPU-6000 (SPI connection), Board size: 28.5 * 28.5MM, Power supply: 1-2S battery input (DC 2.9V-8.7V), Built-in 5A (each) Blheli_S 4in1 ESC Dshot600 ready, Built-in Betaflight OSD (SPI Control), Built-in 5.8G VTX, Built-in SPI Frsky/Flysky receiver or no receiver, Built-in 5V 1A BEC. Firmware targets: CrazybeeF4FR (Frsky SPI RX), CrazybeeF4FS (Flysky SPI RX), CrazybeeF4DXS (DSM2/X SPI RX), CrazybeeF4DX (External Frsky RXSR/TBS CRSF Nano). |
| Motor (EX1202.5 KV6400) | Configuration: 9N12P, Stator Diameter: 12mm, Stator Length: 2.5mm, Shaft Diameter: Φ1.5mm, Motor Dimension (Dia.*Len): Φ14mm*14.5mm, Weight (g): 4.4g, No. of Cells (Lipo): 1-2S. |
| Propellers (Gemfan 3018-2) | Center Thickness: 5.5mm, Prop Diameter: 76.5mm, Center Hole diameter: 1.5mm. |
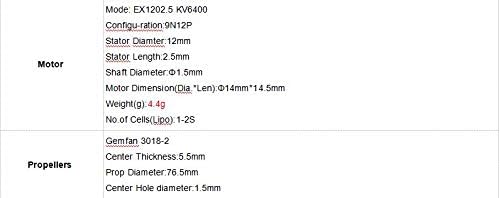
Figure 8.3: Detailed specifications for the CrazybeeX flight controller, EX1202.5 motors, and Gemfan 3018-2 propellers.
9. تضمین او ملاتړ
For warranty information and technical support, please refer to the official HAPPYMODEL website or contact your retailer. Keep your proof of purchase for any warranty claims. Online resources, including firmware updates and community forums, can also provide valuable assistance for advanced users.