1. د خوندیتوب معلومات
Please read and understand all safety information and operating instructions before using this multimeter. Failure to follow these instructions may result in electric shock, fire, or damage to the meter.
- Always ensure the test leads are properly connected and the function switch is set to the correct range before making any measurements.
- د حجم اندازه کولو هڅه مه کوئtages or currents exceeding the maximum rated values for this meter.
- د ژوندیو سرکټونو سره د کار کولو پر مهال خورا احتیاط وکړئ. لوړ حجمtages خطرناک کیدی شي.
- Never open the meter casing unless specifically instructed for battery or fuse replacement. Ensure test leads are disconnected before opening.
- کله چې د بیټرۍ ټیټ شاخص څرګند شي نو بیټرۍ بدله کړئ ترڅو دقیق لوستل ډاډمن شي.
- که چیرې میټر خراب ښکاري یا د ازموینې لیډونو موصلیت خراب شوی وي نو مه یې کاروئ.
شکل 1: شاته view of the Rebel MIE-RB-830 Multimeter, showing the battery compartment cover and a warning label. The label advises removing test leads before opening the case to avoid electrical shock and to install fuses with correct amp/volt ratings. It also indicates the power supply is a 9V battery, type NEDA 1604 9V 6F22.
2. محصول ختم شوview
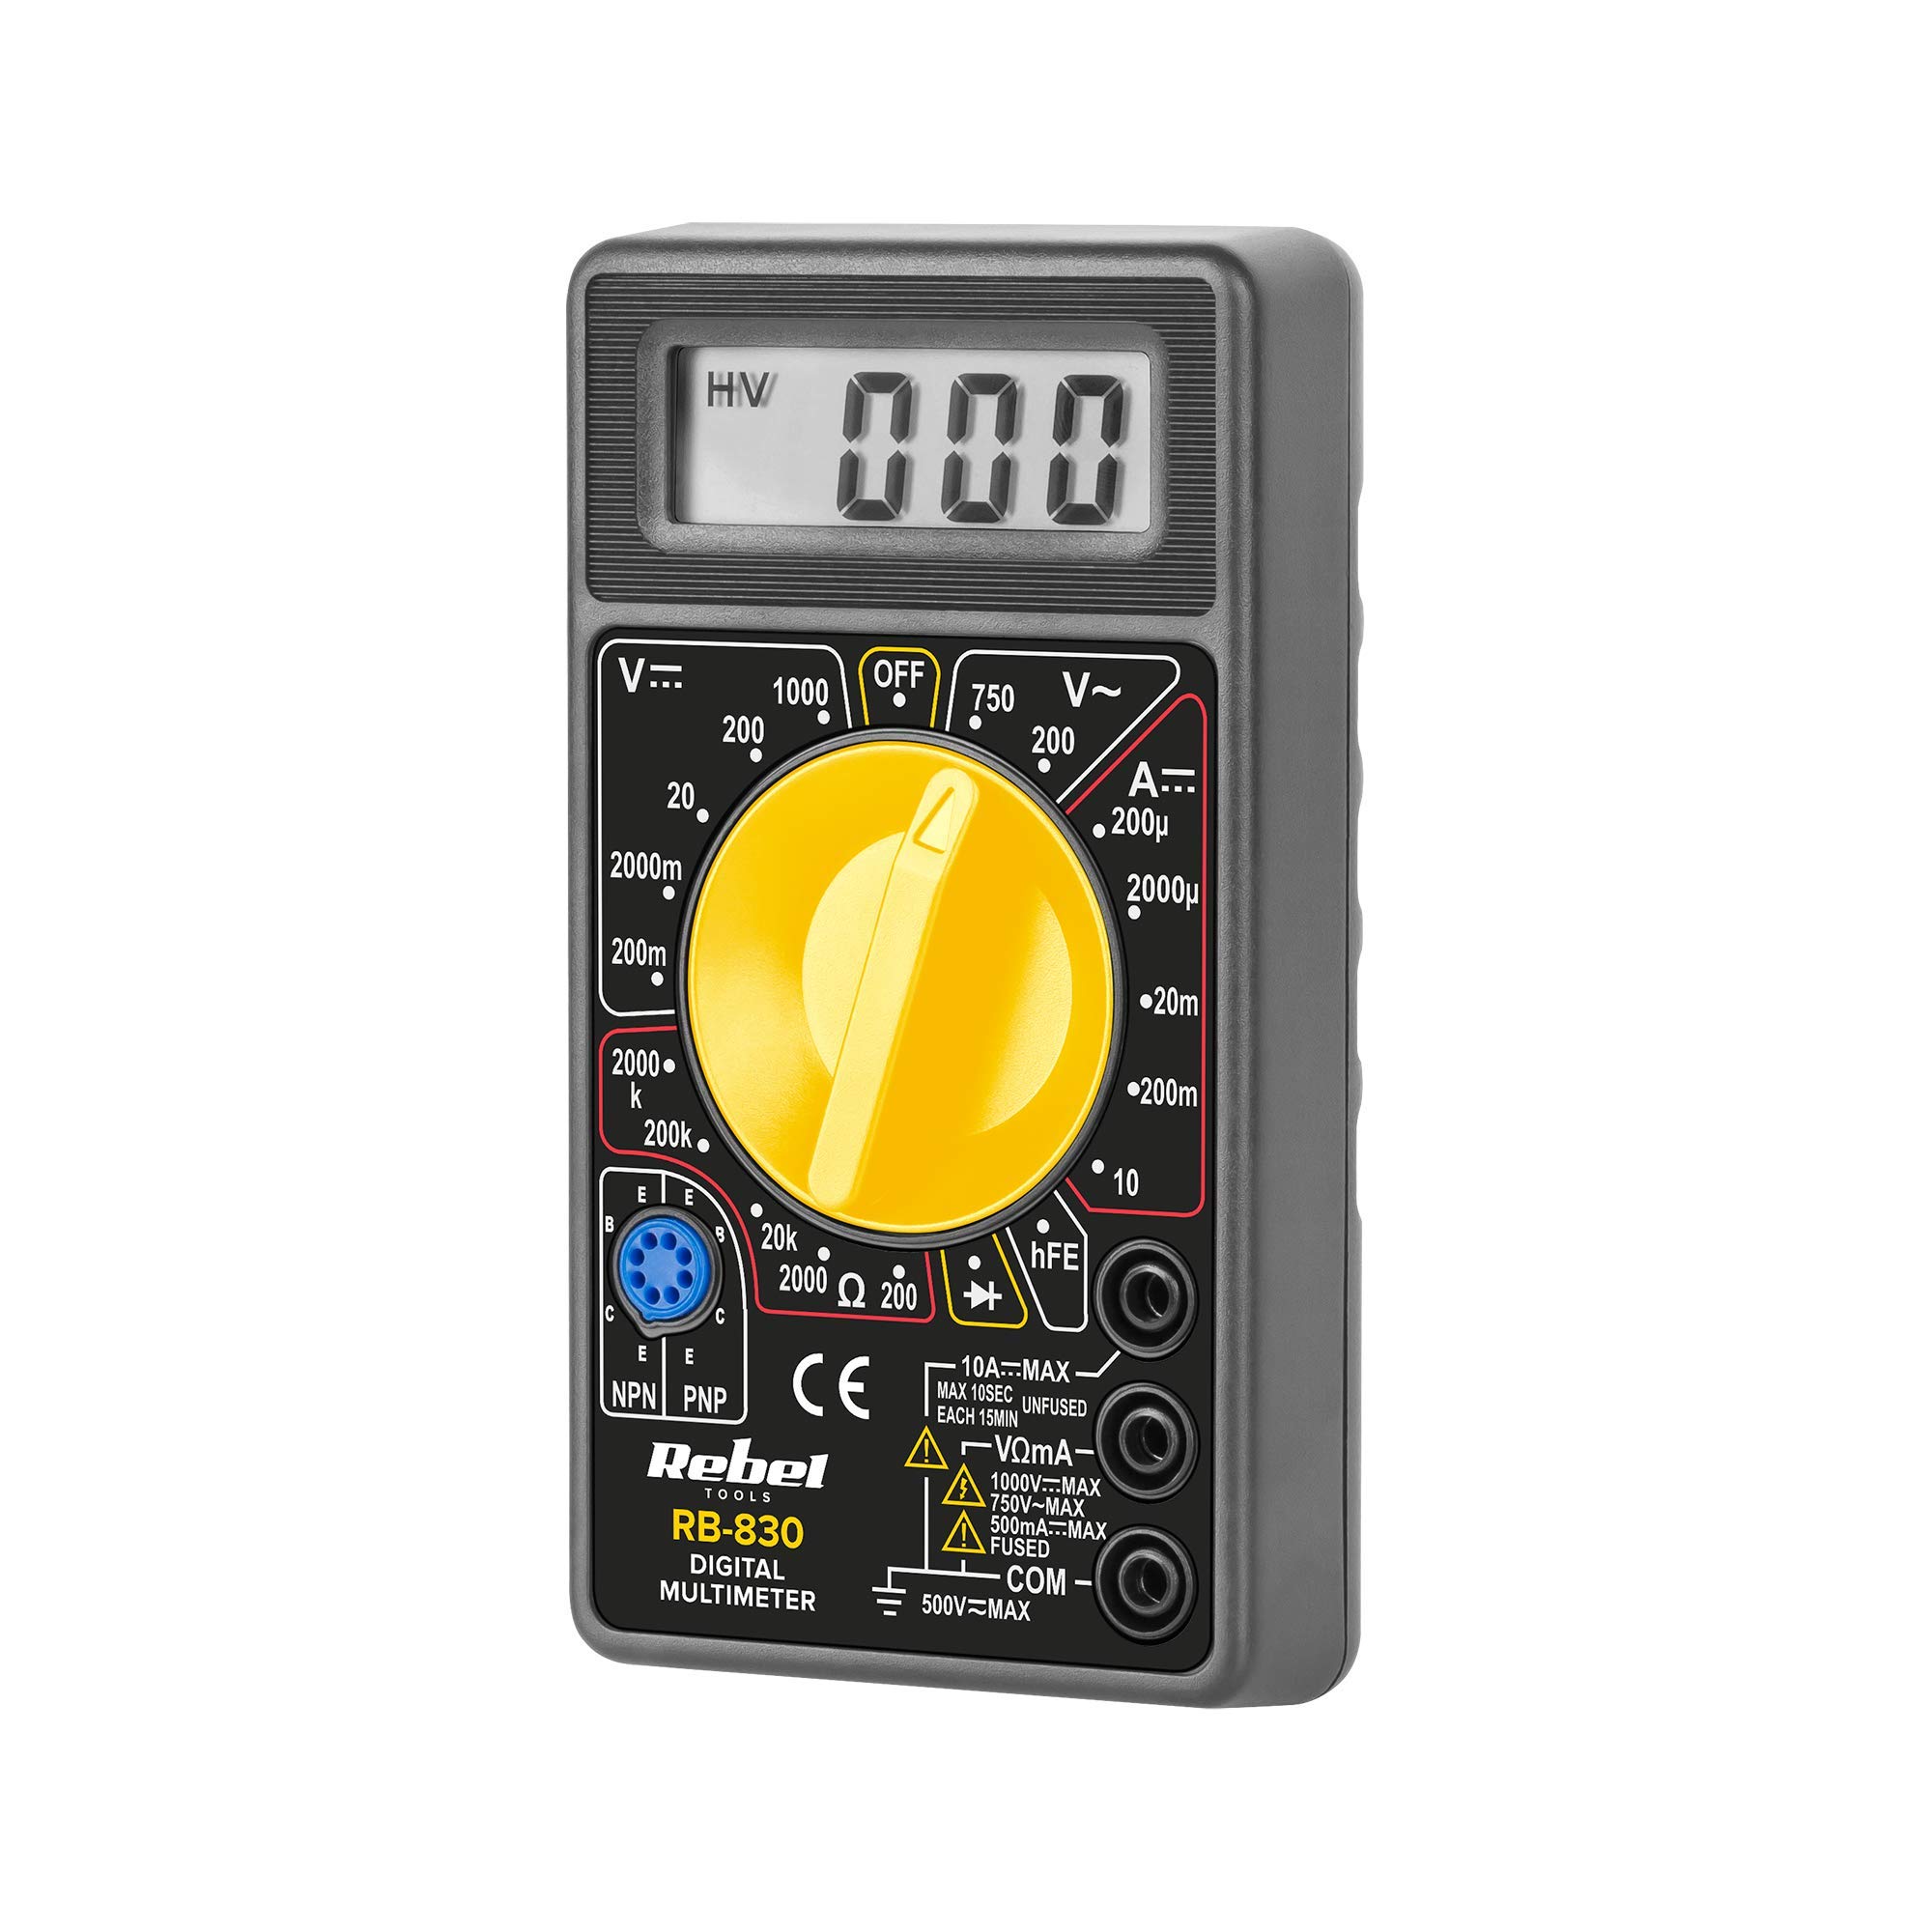
The Rebel MIE-RB-830 is a compact, battery-operated digital multimeter designed for measuring DC/AC voltage, DC current, resistance, diode, and transistor (hFE) values. It is suitable for general electrical testing and troubleshooting.
2.1. اجزاء
- Digital Multimeter Unit
- د ازموینې لیډونه (سور او تور)
- د 9V بیټرۍ (کیدای شي شامله وي یا په جلا توګه وپلورل شي)
- د کارونکي لارښود (دا لاسوند)

شکل 2: The Rebel MIE-RB-830 Digital Multimeter shown with its accompanying red and black test leads. The multimeter features a large LCD display and a rotary function switch.

شکل 3: تړل view of the red and black test leads. These leads are essential for connecting the multimeter to the circuit under test.
3. ترتیب کول
3.1. د بیټرۍ نصب کول
- ډاډ ترلاسه کړئ چې ملټي میټر بند دی او ټول ټیسټ لیډونه منقطع شوي دي.
- د میټر په شا کې د بیټرۍ د برخې پوښ ومومئ (شکل 1 ته مراجعه وکړئ).
- د ساتلو سکرو خلاص کړئ او په احتیاط سره پوښ لرې کړئ.
- Insert a new 9V battery (NEDA 1604 or 6F22 type), observing the correct polarity (+ and -).
- د بیټرۍ د برخې پوښ بدل کړئ او د سکرو سره یې خوندي کړئ.
۲. د ازموینې لیډونو نښلول
- سره وصل کړئ سور test lead to the "VΩmA" input jack.
- سره وصل کړئ تور test lead to the "COM" (common) input jack.
- For current measurements exceeding 200mA (up to 10A), connect the red test lead to the "10A" input jack.
4. عملیاتي لارښوونې
4.1. د فعالیت انتخاب
Turn the rotary switch to the desired measurement function and range. Always start with a higher range if the approximate value is unknown to prevent overloading the meter.
۵.۱. د DC حجم اندازه کولtagای (وی–)
- د روټري سویچ مطلوب DC حجم ته تنظیم کړئtage (V–) range (e.g., 20V, 200V).
- سور ټیسټ لیډ د سرکټ مثبت (+) اړخ ته او تور ټیسټ لیډ منفي (-) اړخ ته وصل کړئ.
- ټوک ولولئtagد LCD نندارې ارزښت.
4.3. د AC حجم اندازه کولtagای (وی ∼)
- د روټري سویچ مطلوب AC حجم ته تنظیم کړئtage (V∼) range (e.g., 200V, 750V).
- د ازموینې لیډونه د AC حجم په اوږدو کې وصل کړئtage سرچینه.
- ټوک ولولئtagد LCD نندارې ارزښت.
۵.۳. د ډي سي جریان اندازه کول (A–)
احتیاط: To measure current, the meter must be connected in series with the circuit. Never connect the meter in parallel with a voltagد بریښنا سرچینه کله چې په اوسني حالت کې وي، ځکه چې دا کولی شي میټر او سرکټ ته زیان ورسوي.
- Set the rotary switch to the desired DC Current (A–) range (e.g., 20mA, 200mA, 10A).
- For currents up to 200mA, ensure the red lead is in the "VΩmA" jack. For currents up to 10A, move the red lead to the "10A" jack.
- هغه سرکټ پرانیزئ چیرې چې جریان اندازه کیږي او میټر په لړۍ سره وصل کړئ.
- په LCD نندارې کې اوسنی ارزښت ولولئ.
۵.۴. د مقاومت اندازه کول (Ω)
احتیاط: Ensure the circuit or component under test is de-energized before measuring resistance.
- Set the rotary switch to the desired Resistance (Ω) range (e.g., 200Ω, 2kΩ, 200kΩ).
- د ازموینې لیډونه د هغه برخې یا سرکټ په اوږدو کې وصل کړئ چې اندازه کیږي.
- په LCD ډسپلې کې د مقاومت ارزښت ولولئ.
4.6. Diode Test (→|–)
- Set the rotary switch to the Diode Test (→|–) position.
- سور ټیسټ لیډ د ډایډ د انود سره او تور ټیسټ لیډ د کیتوډ سره وصل کړئ.
- ښودنه به د مخکینۍ حجم وښييtage ډراپ (معمولا د سیلیکون ډایډونو لپاره له 0.5V څخه تر 0.8V پورې).
- Reverse the leads. The display should show "OL" (Open Loop) for a good diode.
۶.۱۰. ټرانزیسټر (hFE) ازموینه
- روټری سویچ د HFE موقعیت ته تنظیم کړئ.
- معلومه کړئ چې ټرانزیسټر NPN دی که PNP.
- Insert the transistor's emitter, base, and collector leads into the corresponding sockets on the hFE test socket.
- Read the hFE (DC current gain) value on the display.
5. ساتنه
5.1. د بیټرۍ بدلول
When the low battery indicator appears on the display, replace the 9V battery as described in Section 3.1. Using a low battery can lead to inaccurate readings.
5.2. د فیوز بدلول
If the current measurement function stops working, the fuse may need replacement. This operation should only be performed by qualified personnel.
- ډاډ ترلاسه کړئ چې ملټي میټر بند دی او ټول ټیسټ لیډونه منقطع شوي دي.
- شاته برخه خلاصه کړئ جasing of the meter (this may involve more screws than just the battery compartment).
- Locate the blown fuse and replace it with a fuse of the exact same type and rating (e.g., F200mA/250V for mA range, F10A/250V for 10A range). Refer to the internal markings or specifications for precise fuse ratings.
- میټر په احتیاط سره بیا سره یوځای کړئ، ډاډ ترلاسه کړئ چې ټول پیچونه ټینګ شوي دي.
5.3. پاکول
میټر د اعلان سره پاک کړئamp cloth and mild detergent. Do not use abrasives or solvents. Keep the meter dry.
6. ستونزه حل کول
| ستونزه | احتمالي لامل | د حل لاره |
|---|---|---|
| هیڅ ښودنه یا کمزوری ښودنه نشته | ټیټ یا مړ بیټرۍ | د 9V بیټرۍ ځای په ځای کړئ. |
| غلط لوستل | Low battery; Incorrect range selection; Poor test lead connection | Replace battery; Select appropriate range; Ensure leads are firmly connected. |
| اوسنی اندازه کول کار نه کوي | Blown fuse; Incorrect lead connection for current | Replace fuse (see Section 5.2); Ensure red lead is in "VΩmA" or "10A" jack as appropriate. |
| "OL" (اوورلوډ) ښودل شوی | Measured value exceeds selected range; Open circuit (for resistance/continuity) | لوړ حد غوره کړئ؛ د وقفو لپاره سرکټ وګورئ. |
7. مشخصات
| د اندازه کولو دنده | رینج | دقت |
|---|---|---|
| DC Voltagای (وی–) | 200mV، 2V، 20V، 200V، 1000V | ±(0.5% + 2 عدد) |
| AC Voltagای (وی ∼) | 200V، 750V | ±(1.2% + 10 عدد) |
| DC Current (A–) | ۲۰۰µA، ۲mA، ۲۰mA، ۲۰۰mA، ۱۰A | ±(1.0% + 2 عدد) |
| مقاومت (Ω) | 200Ω, 2kΩ, 20kΩ, 200kΩ, 2MΩ | ±(0.8% + 2 عدد) |
| د ډایډ ټیسټ | هو | مخکینی ټوکtage غورځول |
| ټرانزیسټر (hFE) ازموینه | هو | hFE value |
| د بریښنا رسول | 9V Battery (NEDA 1604 or 6F22) | |
| ښودل | 3½ Digit LCD, Max. 1999 | |
| ابعاد | نږدې 13.5 x 10 x 4 سانتي متره | |
| وزن | Approx. 107 grams (without battery) | |
| د عملیاتي حرارت درجه | له 0°C څخه تر 40°C (32°F څخه تر 104°F) | |
| د ذخیرې د حرارت درجه | -10°C ته 50°C (14°F ته 122°F) | |
| د خوندیتوب معیارونه | CE، RoHS |
8. تضمین او ملاتړ
This Rebel MIE-RB-830 Digital Multimeter is covered by a standard manufacturer's warranty against defects in materials and workmanship. Please refer to the warranty card included with your purchase or contact your retailer for specific warranty terms and conditions.
For technical support or service inquiries, please contact the point of purchase or visit the official Rebel webد اړیکو معلوماتو لپاره سایټ.


