1. پیژندنه
This manual provides comprehensive instructions for the installation, operation, and maintenance of the SINOTIMER TM919B 30A Programmable Electronic Timer Switch. This device is designed to automatically control the ON/OFF switching of various electrical appliances based on user-defined daily or weekly programs. Please read this manual carefully before installation and use to ensure proper function and safety.
2. د خوندیتوب معلومات
WARNING: Risk of electric shock. Installation should only be performed by a qualified electrician or trained personnel.
- Always disconnect power at the circuit breaker before installing or servicing the timer switch.
- ډاډ ترلاسه کړئ چې د تارونو ټولې اړیکې خوندي دي او د ځایی بریښنایی کوډونو سره مطابقت لري.
- د اعظمي بار درجه بندي 30A څخه ډیر مه کوئ.
- This device is intended for indoor use only. Avoid exposure to moisture or extreme temperatures.
- د واحد د جلا کولو یا ترمیم کولو هڅه مه کوئ. د وړ خدماتو پرسونل سره اړیکه ونیسئ.
3. محصول ختم شوview
The SINOTIMER TM919B is a digital timer switch featuring a large LCD display, multiple programming options, and a manual override function. It is designed for DIN rail mounting.
۲. اجزا او کنټرولونه
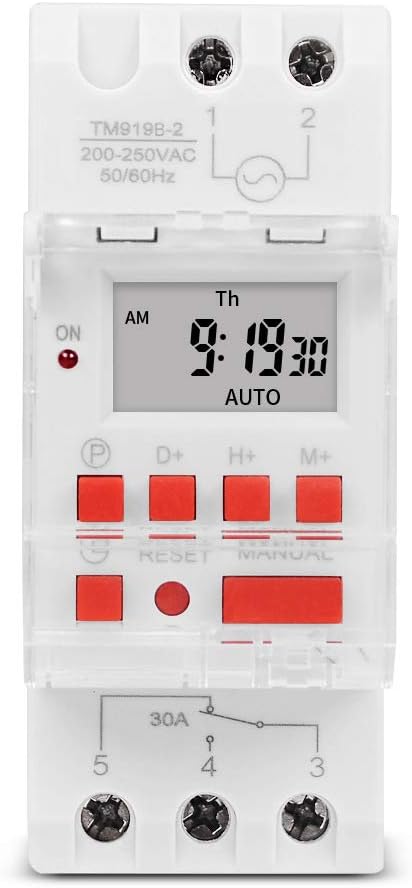
شکل 1: مخکی view of the TM919B timer switch, showing the LCD display, control buttons, and terminal connections.

شکل 2: زاویه view of the TM919B with the transparent protective cover open, revealing the programming buttons (P, D+, H+, M+, RESET, MANUAL).
- د LCD نندارې: اوسنی وخت، ورځ، او د پروګرام حالت ښیي.
- د (پروګرام) تڼۍ: Enters/exits program setting mode.
- D+ (Day) Button: Adjusts day of the week in setting modes.
- H+ (Hour) Button: Adjusts hour in setting modes.
- M+ (Minute) Button: Adjusts minute in setting modes.
- د ری سیٹ تڼۍ: Clears all settings and resets the timer to factory defaults.
- MANUAL Button: Toggles between ON, AUTO, and OFF modes.
- ترمینل اړیکې: For power input and load output.
4. مشخصات
| فیچر | مشخصات |
|---|---|
| ماډل | TM919B |
| والیtage | 220V (AC200-250V) |
| فریکونسی | 50/60Hz |
| اعظمي بار | 30A (د مقاومت وړ بار) |
| پروګرامونه | 16 ON/OFF programs per day/week |
| لږترلږه وقفه | ۱ دقیقه |
| د بیټرۍ بیک اپ | Built-in rechargeable battery (for memory retention) |
| پورته کول | 35 ملي متري DIN ریل |
| ابعاد | شکل 3 ته مراجعه وکړئ |

شکل 3: Detailed dimensions of the TM919B timer switch, showing height, width, and depth measurements.
5. ترتیب او نصب کول
Follow these steps for safe and correct installation of your timer switch.
5.1. پورته کول
- Ensure power is disconnected at the main circuit breaker.
- Mount the TM919B onto a standard 35mm DIN rail. The device features a clip mechanism on the back for secure attachment.
- Press the orange clip at the bottom of the unit to release it from the DIN rail if removal is necessary.

شکل 4: اړخ view of the TM919B, highlighting the orange DIN rail mounting clip.

شکل 5: شاته view of the TM919B, illustrating the DIN rail mounting mechanism.
5.2. د بریښنا تار
Refer to the diagram below for correct wiring connections. Ensure all connections are tight and insulated.

شکل 6: اړخ view of the TM919B showing the wiring diagram printed on the casing. Terminals 1 and 2 are for power input (L and N). Terminals 3, 4, and 5 are for load output (Common, Normally Open, Normally Closed).
- Terminals 1 & 2: Power Input (L - Live, N - Neutral). Connect your 220V AC supply here.
- ټرمینل 3: Common (COM) for the output relay.
- ټرمینل 4: Normally Open (NO) output. The load will be powered when the timer is ON.
- ټرمینل 5: Normally Closed (NC) output. The load will be powered when the timer is OFF.
For typical applications where the load is switched ON by the timer, connect the load between Terminal 3 (COM) and Terminal 4 (NO).
6. عملیاتي لارښوونې
6.1. Initial Setup and Reset
- After connecting power, the display may be blank or show random characters. Press the RESET button with a pointed object (e.g., a pen tip) to clear all memory and reset the timer. The display will show "0:00" and "MO".
- Allow the internal battery to charge for at least 30 minutes before programming for optimal performance and memory retention during power outages.
۵.۱. د اوسني وخت او ورځې ټاکل
- فشار ورکړئ او ونیسئ D+ button to set the current day of the week (MO, TU, WE, TH, FR, SA, SU).
- فشار ورکړئ او ونیسئ H+ button to set the current hour (0-23).
- فشار ورکړئ او ونیسئ M+ button to set the current minute (0-59).
- Release the buttons when the correct time and day are displayed. The timer will automatically save the settings.
۲. د فعال/بند سایکلونو پروګرام کول
The TM919B supports up to 16 ON/OFF programs. Each program consists of an ON time and an OFF time.
- فشار ورکړئ P button once. The display will show "1 ON". This is for the first ON program.
- کارول D+ to select the day(s) for this program. Options include:
- MO TU WE TH FR SA SU (Every day)
- MO (Monday only)
- TU (Tuesday only)
- ...
- MO TU WE TH FR (Weekdays)
- SA SU (Weekends)
- MO TU WE (Mon-Wed)
- TH FR SA (Thu-Sat)
- MO WE FR (Mon, Wed, Fri)
- TU TH SA (Tue, Thu, Sat)
- MO TU WE TH FR SA (Mon-Sat)
- کارول H+ او M+ to set the desired ON hour and minute.
- فشار ورکړئ P button again. The display will show "1 OFF". This is for the first OFF program.
- کارول D+, H+، او M+ to set the desired OFF day, hour, and minute. Ensure the OFF time is after the ON time for the same program.
- Repeat steps 1-5 for additional ON/OFF programs (up to 16). If you don't need all 16 programs, simply press P to cycle through unused programs until you return to the current time display.
- To exit programming mode and save settings, press the clock button (usually labeled with a clock icon, or simply wait for 30 seconds without input).
6.4. لارښود اوورایډ
فشار ورکړئ لارښود د عملیاتي حالتونو له لارې د تګ لپاره تڼۍ:
- په: The timer output is continuously ON, ignoring all programs.
- اتو: ټایمر د پروګرام شوي ON/OFF دورې سره سم کار کوي. دا د عملیاتي معیاري حالت دی.
- بند: The timer output is continuously OFF, ignoring all programs.
ډاډ ترلاسه کړئ چې ټایمر ټاکل شوی دی آټو د پروګرام شوي عملیاتو لپاره.
7. ساتنه
- The TM919B is designed for maintenance-free operation.
- بهرنۍ برخه د نرم او وچ ټوکر سره پاکه کړئ. د کثافاتو پاکوونکو یا محلولونو څخه کار مه اخلئ.
- Ensure the internal battery is charged by keeping the unit powered for at least 24 hours initially, and periodically thereafter, to maintain time and program memory during power outages.
8. ستونزه حل کول
| ستونزه | احتمالي لامل | د حل لاره |
|---|---|---|
| ښودنه خالي ده. | برېښنا نشته؛ داخلي بیټرۍ چارج شوې ده. | Check power connections. Allow unit to charge for 30 minutes. |
| Timer not switching load. | Incorrect wiring; timer in MANUAL ON/OFF mode; incorrect program settings. | Verify wiring (refer to Figure 6). Ensure timer is in AUTO mode. Check program times and days. |
| Programs are lost after power outage. | Internal battery not fully charged or faulty. | Ensure unit is powered for at least 24 hours to fully charge the battery. If problem persists, contact support. |
| تڼۍ بې ځوابه دي. | Unit frozen; temporary glitch. | فشار ورکړئ RESET تڼۍ |
9. تضمین او ملاتړ
SINOTIMER products are manufactured to high-quality standards. For warranty information or technical support, please refer to the documentation provided with your purchase or visit the official SINOTIMER webسایټ. د پیرود ثبوت په توګه د پیرود رسید وساتئ.
For further assistance, you may contact SINOTIMER customer service through their official channels.


