1. پیژندنه
د پیرودلو لپاره مننهasing the Udreamer Turntable Vinyl Record Player Model UD001. This manual provides essential information for the proper setup, operation, and maintenance of your new record player. Please read these instructions carefully before use to ensure optimal performance and longevity of the product. Keep this manual for future reference.

Image 1.1: Udreamer Turntable Vinyl Record Player Model UD001. This image shows the turntable with its clear dust cover open, revealing the black platter, tonearm, and cartridge.
2. د خوندیتوب لارښوونې
- د بریښنا سرچینه: یوازې ټاکل شوی بریښنا اډاپټر وکاروئ. ډاډ ترلاسه کړئ چې حجمtage ستاسو د محلي بریښنا رسولو سره سمون لري.
- اوبه او رطوبت: واحد د باران، رطوبت یا مایعاتو سره مه مخ کوئ. په واحد کې هغه شیان مه کېږدئ چې د مایعاتو څخه ډک وي، لکه ګلدانونه.
- تودوخه: واحد د تودوخې سرچینو ته نږدې مه کېږدئ لکه ریډیټرونه، د تودوخې راجسترونه، بخارۍ، یا نور وسایل (په شمول د ampلایفیر) چې تودوخه تولیدوي.
- وینټیلیشن: د هوا مناسبه هوا ورکول ډاډمن کړئ. د هوا د بهېدو هیڅ لاره مه بندوئ.
- پاکول: د پاکولو دمخه د دیوال له ساکټ څخه واحد خلاص کړئ. یوازې نرم، وچ ټوکر وکاروئ.
- خدمت کول: د دې محصول پخپله خدمت کولو هڅه مه کوئ. ټول خدمتونه وړ خدماتي پرسونل ته راجع کړئ.
- ځای په ځای کول: Place the unit on a stable, level surface to prevent damage from falling.
3. د بسته محتويات
مهرباني وکړئ وګورئ چې لاندې ټول توکي ستاسو په بسته کې شامل دي:
- Udreamer Turntable Unit
- د دوړو پوښ
- تالی
- فټ مټ
- د وزن ضد
- د RPM اډیپټر
- د بریښنا اډاپټر
- USB کیبل
- د کارونکي لارښود (دا لاسوند)
4. محصول ختم شوview
Familiarize yourself with the various parts and controls of your Udreamer Turntable.

Image 4.1: Key features of the Udreamer Turntable. This image highlights the turntable's capabilities such as Vinyl to Computer conversion, Bluetooth output, iron platter, built-in phono equalizer, needle pressure adjustment, speed alignment, and moving magnet cartridge.

انځور ۲: تفصیلي view of the turntable's components. This image shows the solid iron platter for stability and the moving magnet cartridge, which provides accurate audio reproduction and has a longer lifespan.

Image 4.3: Internal and external components of the turntable system. This diagram illustrates the belt-driven mechanism, arm lifter, record mat, foot pads for vibration isolation, and the 45 RPM adapter.
۳.۱ مخکینۍ او پورته برخه View
- د دوړو پوښ: د پلیټ او ټونر بازو د دوړو څخه ساتي.
- تخته: The surface on which records are placed.
- سپندل: Holds the record in place on the platter.
- د احساس چت: Provides cushioning for records and reduces static.
- ټونارم: کارتریج او سټایلس ساتي.
- Cartridge with Stylus: د ریکارډ لنډیزونه لولي.
- د وزن ضد: د ټون آرم متوازن کوي او د تعقیب ځواک تنظیموي.
- د کووینګ لیور: Raises and lowers the tonearm gently.
- د ټونر استراحت: د نه کارولو په وخت کې ټونرما خوندي کوي.
- سرعت ټاکونکی: Switches between 33 1/3 and 45 RPM.
- د پیچ کنټرول: Adjusts playback speed fine-tuning.
4.2 شاته پینل
- LINE/BT OUT/PHONO Switch: Selects output mode (Line Out, Bluetooth Out, Phono Out).
- د RCA آوټ پټ جیکونه (L/R): Connects to external active speakers or an ampلايف
- د USB-PC پورټ: Connects to a computer for vinyl-to-digital conversion.
- په جیک کې DC: د بریښنا اډاپټر سره نښلوي.
- بریښنا آن / بند سویچ: واحد فعال یا بندوي.
5. ترتیب کول
5.1 پاکول او ځای پرځای کول
- Carefully remove the turntable from its packaging. Retain packaging for future transport.
- Place the turntable on a stable, level surface, away from direct sunlight, heat sources, and excessive dust or vibrations.
۵.۲ د پلیټ او کمربند نصبول
- تالی په مرکزي تکلي کې ځای په ځای کړئ.
- Carefully lift the felt mat to expose the drive belt underneath the platter.
- Locate the motor pulley (a small brass cylinder) on the top left of the turntable chassis.
- Using the provided ribbon or your fingers, gently stretch the drive belt and hook it around the motor pulley. Ensure the belt is flat and not twisted.
- Place the felt mat back on the platter.
۴.۳ د وزن ضد تنظیم
Proper counterweight adjustment is crucial for optimal sound quality and to prevent damage to your records and stylus.

Image 5.1: Counterweight and Pitch Adjustment. This image illustrates how to accurately adjust the tonearm pressure using the counterweight and fine-tune the playback speed with the pitch control.
- په نرمۍ سره د سټایلس محافظ لرې کړئ.
- Place the counterweight onto the rear of the tonearm. Rotate it clockwise until it is fully threaded.
- Release the tonearm from its rest. Move the cueing lever to the down position.
- Carefully rotate the counterweight until the tonearm is perfectly balanced horizontally, floating freely without touching the surface or rising too high.
- Once balanced, hold the counterweight steady with one hand and rotate the numbered ring on the front of the counterweight until '0' aligns with the line on the tonearm.
- Rotate the entire counterweight (including the numbered ring) counter-clockwise to the recommended tracking force. For the pre-installed magnetic cartridge, a typical tracking force is between 2.5 to 3.5 grams. Refer to your cartridge's specific recommendations if available.
- Return the tonearm to its rest and engage the tonearm clamp.
۵.۲ د دوړو پوښ نصبول
Insert the hinges of the dust cover into the hinge receptacles at the rear of the turntable chassis.
5.5 د بریښنا نښلول
Connect the power adapter to the DC IN jack on the rear of the turntable, then plug the adapter into a wall outlet.
6. عملیاتي لارښوونې
۶.۱ د ریکارډ اساسي غږول
- Place a record on the platter. If playing a 45 RPM single, place the 45 RPM adapter on the spindle first.
- Select the appropriate speed (33 1/3 or 45 RPM) using the speed selector switch.
- Ensure the LINE/BT OUT/PHONO switch is set to 'LINE OUT' or 'PHONO' if connecting to external speakers, or 'BT OUT' for Bluetooth.
- Turn on the turntable using the Power ON/OFF switch.
- ټونرمام له آرام څخه خلاص کړئ.
- د کیوینګ لیور په کارولو سره ټونرمام پورته کړئ.
- ټونرمام په لاسي ډول د ریکارډ د مطلوب پیل شوي نالی په سر کې ځای په ځای کړئ.
- Gently lower the tonearm using the cueing lever. The stylus will make contact with the record, and playback will begin.
- At the end of the record, the auto-stop function will stop the platter rotation. Lift the tonearm, return it to its rest, and turn off the turntable.
۳.۳ د پچ سمون
Use the Pitch Control knob (refer to Image 5.1) to fine-tune the playback speed. Rotate the knob to increase or decrease the speed slightly.
6.3 Bluetooth Output
The turntable can wirelessly stream audio to Bluetooth-enabled devices such as headphones, speakers, or soundbars.

Image 6.1: Bluetooth Output functionality. This image demonstrates the turntable's ability to wirelessly connect to various Bluetooth receivers like earphones, soundbars, and external speakers.
- Ensure the LINE/BT OUT/PHONO switch on the rear is set to 'BT OUT'.
- Turn on your Bluetooth receiving device (e.g., speaker, headphones) and set it to pairing mode.
- Turn on the turntable. The Bluetooth indicator light on the turntable will flash, indicating it is searching for a device.
- Once paired, the Bluetooth indicator light will become solid. Audio from the turntable will now play through your Bluetooth device.
- If pairing fails, turn off both devices and try again.
6.4 Vinyl to Computer Recording (USB-PC)
You can convert your vinyl records into digital audio files using the USB-PC output.

Image 6.2: Vinyl to Computer conversion setup. This image shows the turntable connected to a laptop via a USB cable, illustrating the process of converting vinyl audio to MP3 format for computer playback.
- Connect the USB cable from the turntable's USB-PC port to an available USB port on your computer.
- Ensure the LINE/BT OUT/PHONO switch is set to 'LINE OUT' or 'PHONO'.
- Install and open audio recording software on your computer (e.g., Audacity, a free open-source software).
- In your recording software's preferences, select the turntable as the audio input device (it may appear as 'USB Audio CODEC' or similar).
- Start recording in the software, then begin playing your record on the turntable (refer to Section 6.1).
- Once the record finishes, stop recording in the software and save your digital audio file.
6.5 Connecting External Speakers (RCA)
The turntable features RCA output jacks for connecting to external active speakers or an ampلايف
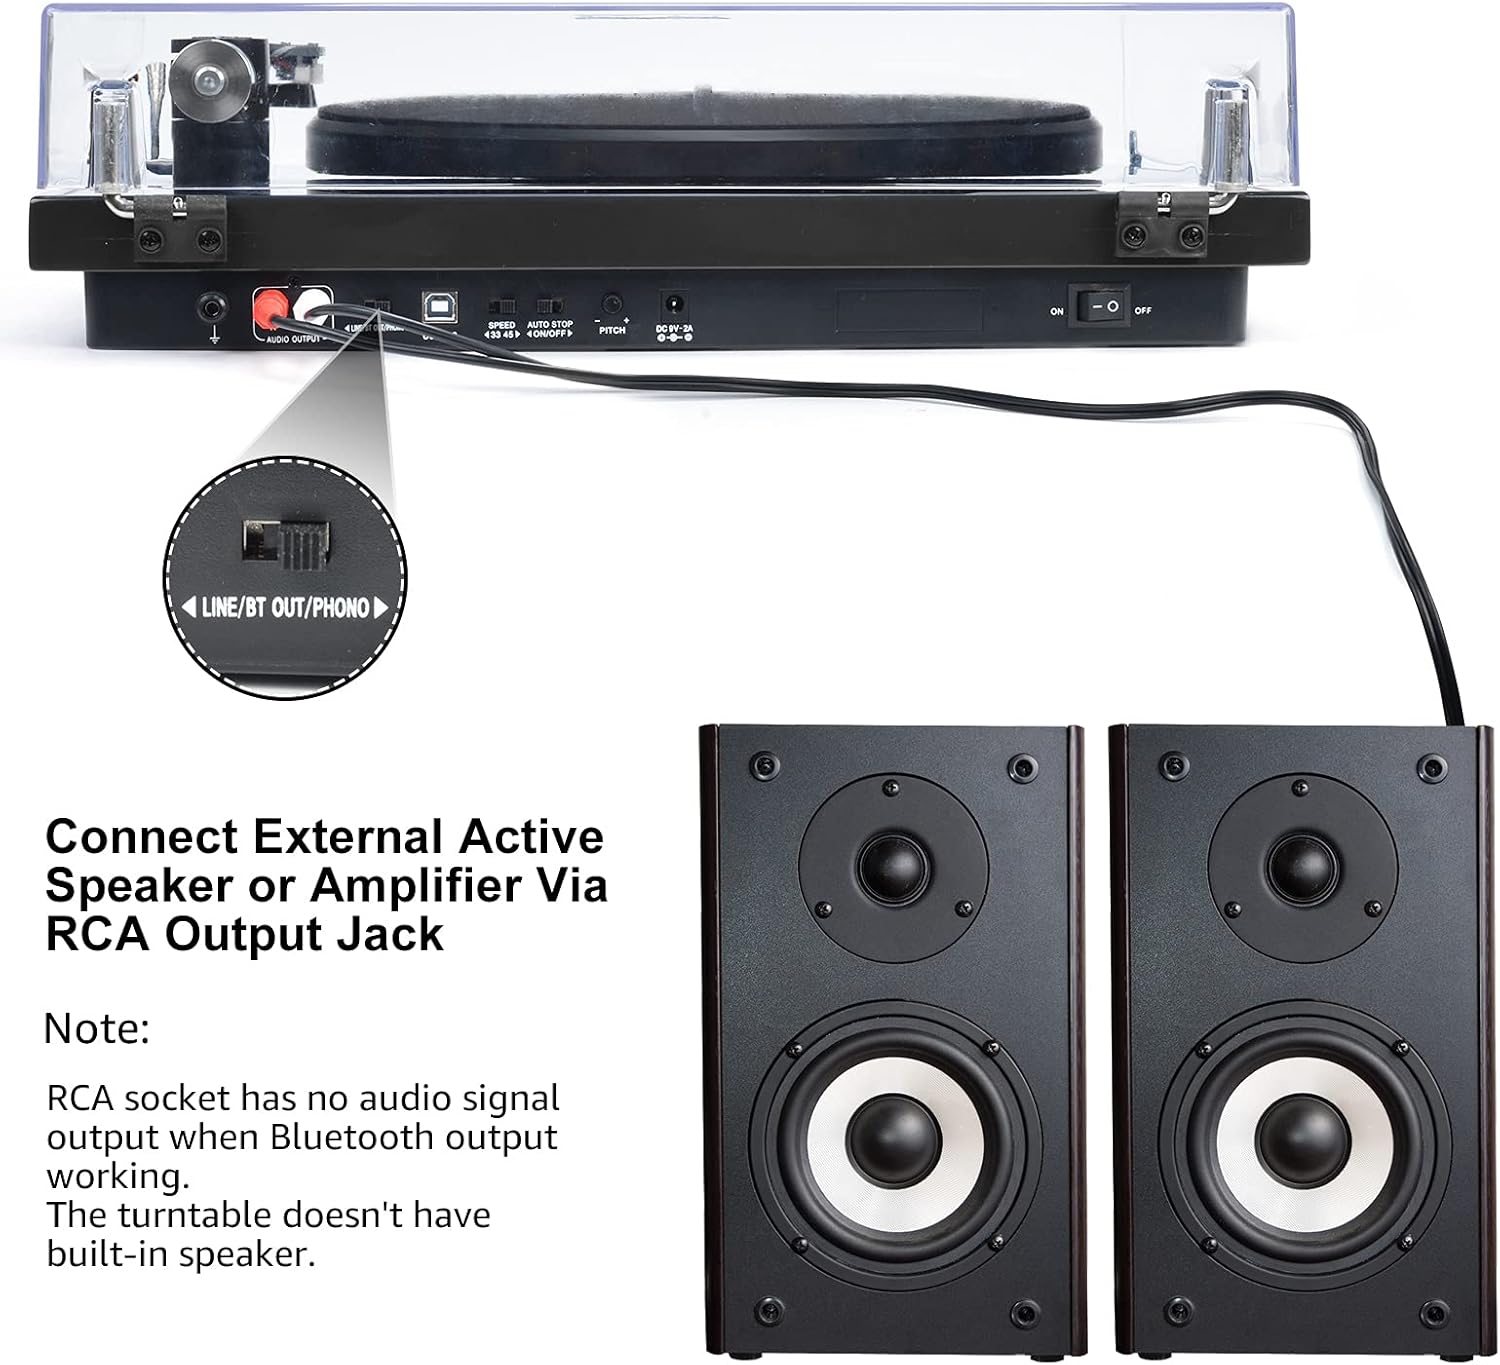
Image 6.3: Connecting to external speakers. This image shows the rear panel of the turntable with the RCA output jacks connected to a pair of external active speakers, indicating how to route audio for amplified playback.
- Ensure the LINE/BT OUT/PHONO switch on the rear is set to 'LINE OUT' if connecting to active speakers (speakers with their own ampژوندی کوونکی) یا یو amplifier's 'LINE IN' input. Set to 'PHONO' if connecting to an amplifier with a dedicated 'PHONO' input.
- Connect the RCA cables (red for right channel, white for left channel) from the turntable's RCA output jacks to the corresponding input jacks on your active speakers or ampلايف
- Turn on your external audio system and adjust the volume.
یادونه: The Udreamer Turntable Model UD001 does not have built-in speakers. An external audio system (active speakers, amplifier, or Bluetooth device) is required for sound output.
7. ساتنه
7.1 پاکول
- Turntable Unit: Wipe the exterior with a soft, dry, lint-free cloth. Do not use harsh chemicals or abrasive cleaners.
- د دوړو پوښ: Clean with a soft cloth and a mild, non-abrasive cleaner. Avoid scratching the surface.
- ستولیس: Use a soft stylus brush, brushing gently from back to front (in the direction of play) to remove dust and debris. Never use your fingers.
۶.۴ د سټایلس ځای ناستی
The stylus (needle) is a consumable part and will wear out over time, typically after 300-500 hours of playback. A worn stylus can damage your records and degrade sound quality. Replace the stylus when you notice a decrease in sound quality or visible wear.
- Gently grasp the front of the cartridge body.
- Pull the old stylus assembly downwards and forwards to detach it from the cartridge body.
- Align the new stylus assembly with the cartridge body and push it upwards and backwards until it clicks into place.
- Re-adjust the tracking force if necessary after replacing the stylus.
8. ستونزه حل کول
که تاسو د خپل ټرن میز سره ستونزې سره مخ شئ، لاندې عام ستونزو او حلونو ته مراجعه وکړئ:
| ستونزه | احتمالي لامل | د حل لاره |
|---|---|---|
| هیڅ ځواک نشته | د بریښنا اډاپټر وصل نه دی؛ د بریښنا سویچ بند دی | Ensure power adapter is securely plugged in; Turn power switch ON |
| غږ نشته | Incorrect output mode selected; External speakers not connected/powered; Bluetooth not paired | Set LINE/BT OUT/PHONO switch correctly; Connect/power on external speakers; Pair Bluetooth device |
| د غږ تحریف یا پریښودل | Stylus dirty or worn; Tracking force incorrect; Turntable not level; Record dirty or damaged | Clean or replace stylus; Adjust counterweight; Place turntable on a level surface; Clean record |
| تالی نه ګرځیده | Drive belt dislodged or broken; Auto-stop engaged | Re-install or replace drive belt; Ensure tonearm is over the record to disengage auto-stop |
| بلوتوث جوړه ناکامه ده | Device too far; Device not in pairing mode; Interference | Move devices closer; Ensure receiving device is in pairing mode; Restart both devices |
9. مشخصات
| فیچر | مشخصات |
|---|---|
| د محصول ابعاد | 12.8 x 9.8 x 4.7 انچه |
| د توکي وزن | ۲.۴۵ پونډه |
| د توکي ماډل شمیره | UD001 |
| برانډ | اډریمر |
| ځانګړی ځانګړنه | بلوتوث اخیستونکی جوړ شوی |
| مواد | پلاستیک |
| سټایل | وینtage |
| مطابقت لرونکې وسیلې | هیډفون ، سپیکر |
| د موټرو ډول | AC موټور |
| د سیګنال بڼه | ډیجیټل |
| د بریښنا سرچینه | د بریښنا تار شوی |
| د سیګنال څخه تر شور پورې نسبت | 60 dB |
10. تضمین او ملاتړ
Udreamer products are designed and manufactured to the highest quality standards. For warranty information or technical support, please refer to the contact details provided with your purchase or visit the official Udreamer website. Please have your model number (UD001) and purchase information ready when contacting support.


