پیژندنه
This manual provides instructions for the proper use and maintenance of your BOBLOV Body Camera Magnetic Mount. Designed for universal compatibility with various body camera models, this magnetic clip offers a secure and convenient way to attach your camera to clothing.
محصول پای ته ورسیدview
The BOBLOV Body Camera Magnetic Mount consists of two silicone sheets embedded with strong magnets. These components work together to create a robust attachment point for your body camera on various types of clothing. The mount is crafted from high-quality black silicone, ensuring durability, flexibility, and safety.

Figure 1: BOBLOV Body Camera Magnetic Mount in use on a police vest.
کلیدي ځانګړتیاوې:
- 8pcs Strong Magnetic Force: کله چې clamped together, the magnets create a powerful magnetic suction, forming the strongest clip. Ensure correct alignment for maximum strength, as reversing the direction weakens the force.
- Universal Body Camera Clip: Compatible with all brands and models, this clip is made from high-quality black silicone, which is safe, non-toxic, odorless, soft, and elastic. It won't damage clothes and offers thermal stability, resisting melting.
- د جیب په اندازه اسانتیا: The Magnetic Suction Clips consist of two silicone sheets with magnets, making them easy to carry. Measuring 10x12cm, they can be fixed on clothes or stored in a pocket. Suitable for most body cameras.

Figure 2: Detailed dimensions of the magnetic mount components.
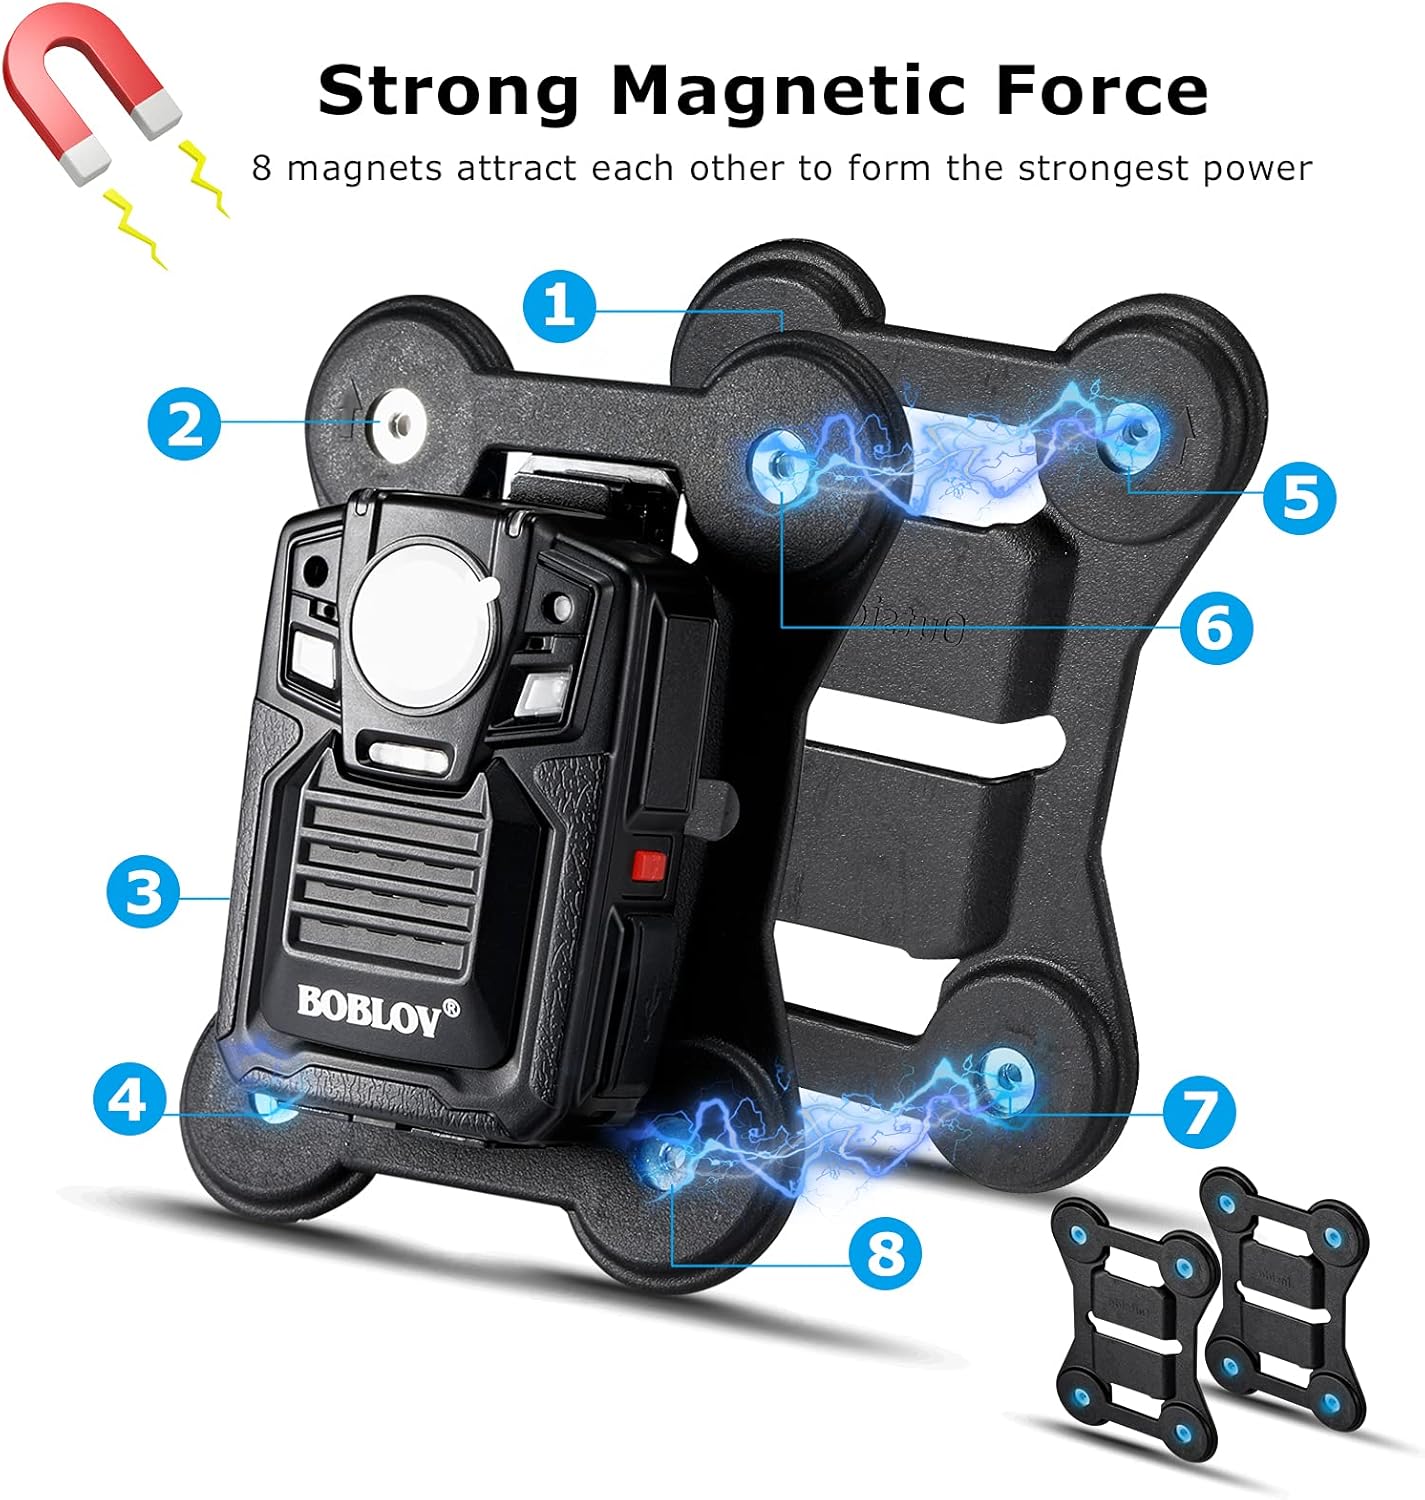
Figure 3: Illustration of the eight strong magnets providing secure attachment.
تنظیم او نصب کول
Proper installation of the magnetic mount is crucial for secure attachment of your body camera. Follow these steps carefully:
- Identify Inside and Outside Components: The magnetic mount consists of two pieces. One piece is marked "Inside" and the other "Outside".
- Separate the Clips: Gently pull apart the two magnetic clips.
- Attach Camera to Outside Clip: Securely insert your body camera into the designated slot on the "Outside" clip. Ensure the camera's clip is firmly seated.
- Position Inside Clip: Place the "Inside" magnetic clip inside your clothing (e.g., shirt, jacket) at the desired mounting location.
- سمون او خوندي کول: Align the "Outside" clip (with the camera attached) on the exterior of your clothing, directly over the "Inside" clip. The magnets will attract, creating a strong hold.
- ثبات تایید کړئ: Gently tug on the camera to ensure it is firmly attached and does not wobble.

Figure 4: The two magnetic mount components, clearly marked for inside and outside placement.

Figure 5: Visual guide for the four-step installation process of the magnetic mount and body camera.
Note: The magnetic force is very strong. Be careful not to pinch your hands during installation. Incorrect alignment of the two clips will decrease the magnetic force and may cause the camera to fall off.

شکل 6: مثالample of a body camera mounted in the upper position for a full field of view.

شکل 7: مثالample of a body camera mounted in the lower position for a lower field of view.
The magnetic clip is designed to be symmetrical, allowing for flexible orientation regardless of the direction, ensuring stable camera placement.
عملیاتي لارښوونې
Once the body camera is securely attached to the magnetic mount, operate your body camera according to its specific user manual. The magnetic mount provides a stable platform for recording activities.
مطابقت:
This magnetic mount is designed for universal compatibility with body cameras that feature a standard short clip. It is not suitable for cameras with long clips.

Figure 8: The magnetic mount is compatible with short body camera clips, but not long clips.

Figure 9: The magnetic mount is compatible with various body camera models.
ساتنه
- پاکول: Wipe the silicone parts with a damp cloth to remove dust or dirt. Avoid harsh chemicals.
- ذخیره کول: Store the magnetic mount in a cool, dry place when not in use. Keep magnets away from sensitive electronic devices.
- معاینه: Periodically inspect the silicone for any signs of wear or damage. Replace if necessary to ensure optimal performance.
د ستونزو حل کول
Issue: Camera falls off or mount feels loose.
- حل 1: Ensure the "Inside" and "Outside" magnetic clips are perfectly aligned. Misalignment can significantly reduce magnetic strength.
- حل 2: Verify that the body camera is correctly inserted and secured into the "Outside" clip.
- حل 3: Check the thickness of the clothing. Very thick materials might reduce the magnetic hold. Consider using the mount on thinner garments for better security.
- حل 4: Inspect the magnets for any damage or debris that might be interfering with their attraction.
Issue: Magnetic mount feels too strong or difficult to separate.
- حل لاره: When separating, slide the two pieces apart rather than pulling directly. This can make separation easier. Always exercise caution to avoid pinching fingers.
مشخصات
| د محصول ابعاد | 0.98 x 2.36 x 3.35 انچه |
| د توکي وزن | 5.3 اونس |
| د توکي ماډل شمیره | مقناطیسي سکشن |
| ځانګړي ځانګړتیاوې | شاک مزاحمت |
| رنګ | تور |
| جوړونکی | بوبلوف |
| مطابقت لرونکې وسیلې | کیمرې |
| د مناسب تلیفون ماډلونه | یونیورسل |
| د نصب کولو ډول | Clothing Mount |
تضمین او ملاتړ
BOBLOV products are designed for reliability and performance. For specific warranty details and customer support, please refer to the official BOBLOV website or contact their customer service directly. Product coverage is typically provided for 24 months.
د اړیکو معلومات:
- رسمي Webسایټ: www.boblov.com
- بریښنالیک: support@boblov.com
- Quick response within 24 hours & lifetime technical support.


