1. پیژندنه
This manual provides detailed instructions for the installation, operation, and maintenance of the Vivotek ND9425P 16-Channel 4K UHD Network Video Recorder (NVR). This NVR is designed to manage and record video streams from up to 16 IP cameras, offering 4K UHD resolution support for high-quality surveillance. It is an integral component of a comprehensive security system, suitable for various applications requiring reliable video monitoring and recording.
Key features of the Vivotek ND9425P NVR include:
- Multimedia SoC CPU for efficient processing.
- Support for H.265, H.264, and MJPEG video codecs for flexible compression.
- Seamless recording capabilities.
- Smart Stream III optimization for bandwidth efficiency.
- Integrated PoE technology for simplified camera connectivity (when used with compatible PoE cameras).
2. د خوندیتوب معلومات
Please read all safety instructions carefully before operating the device. Failure to follow these instructions may result in injury or damage to the product.
- د بریښنا سرچینه: Use only the power adapter supplied with the NVR. Ensure the power outlet provides the correct voltage.
- وینټیلیشن: Do not block any ventilation openings. Install the NVR in a well-ventilated area to prevent overheating.
- چاپیریال: Avoid exposing the NVR to water, moisture, extreme temperatures, or direct sunlight.
- پاکول: Disconnect power before cleaning. Use a dry, soft cloth. Do not use liquid or aerosol cleaners.
- خدمت کول: د دې محصول پخپله خدمت کولو هڅه مه کوئ. ټول خدمتونه وړ خدماتي پرسونل ته راجع کړئ.
- کیبلونه: Ensure all cables are properly connected and secured to prevent tripping hazards or accidental disconnections.
3. د بسته محتويات
د نصبولو دمخه ډاډ ترلاسه کړئ چې ټول توکي په بسته کې شتون لري:
- Vivotek ND9425P 16-Channel 4K UHD NVR Unit
- د بریښنا اډاپټر
- USB ماؤس
- د چټک نصبولو لارښود
- Resource CD (containing full manual and software)
- د HDD نصبولو لپاره پیچونه (که چیرې تطبیق شي)
- ایترنیټ کیبل
Note: The package contents may vary slightly depending on the specific kit purchased. For example, some kits may include 8 x 2 MP Night Vision Dome Cameras and 8 x Ethernet Patch Cables.
4. محصول ختم شوview
دا برخه یو اوور چمتو کويview of the Vivotek ND9425P NVR's physical components and interfaces.
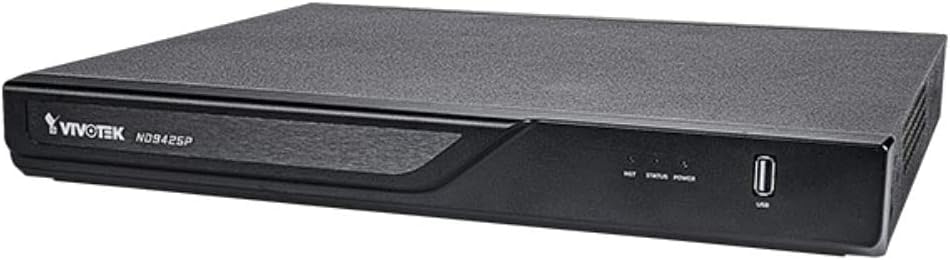
شکل 4.1: Vivotek ND9425P NVR Front Panel
The image displays the Vivotek ND9425P NVR unit, a compact black rectangular device. The front panel features the "VIVOTEK ND9425P" logo on the left, followed by three small indicator lights labeled "NET", "STATUS", and "POWER". On the far right of the front panel, there is a USB port, labeled "USB" below it. The top surface of the NVR has a textured finish.
4.1 Front Panel Indicators and Ports
- د نیټ ایل ای ډي: د شبکې فعالیت په ګوته کوي.
- د حالت LED: Indicates system status (e.g., recording, error).
- د بریښنا څراغونه: د ځواک حالت په ګوته کوي.
- USB پورټ: For connecting a USB mouse, keyboard, or external storage devices for backup.
۳.۲ د شا پینل بندرونه
The rear panel typically includes ports for power input, Ethernet (LAN), HDMI/VGA video output, audio input/output, and additional USB ports for peripheral connections.
5. ترتیب کول
5.1 د هارډویر نصب کول
- د هارډ ډرایو نصب کول (که مخکې له مخکې نصب شوي نه وي):
Unscrew the NVR cover. Carefully slide the hard drive into the bay and secure it with the provided screws. Reattach the cover.
- کیمرې وصل کړئ:
Connect your IP cameras to the NVR's PoE ports (if available) or to your network switch. Ensure all cameras are powered on and accessible on the network.
- شبکې سره وصل شئ:
د NVR د LAN پورټ څخه د ایترنیټ کیبل خپل روټر یا شبکې سویچ سره وصل کړئ.
- د نښلولو ښودنه:
یو مانیټر د NVR د HDMI یا VGA آوټ پټ پورټ سره وصل کړئ.
- پرفیریلز وصل کړئ:
د USB موږک په NVR کې د USB پورټ سره وصل کړئ.
- پاور آن:
د بریښنا اډاپټر د NVR د بریښنا ان پټ سره وصل کړئ او بیا یې د بریښنا آوټ لیټ سره وصل کړئ. NVR به په اتوماتيک ډول فعال شي.
5.2 Initial Configuration Wizard
Upon the first boot, the NVR will typically launch an initial configuration wizard. Follow the on-screen prompts to:
- د مدیر پټنوم تنظیم کړئ.
- Configure network settings (DHCP or Static IP).
- لټون and add connected IP cameras.
- نیټه او وخت وټاکئ.
- Initialize the hard drive for recording.
۴. د NVR چلول
6.1 ژوندی View
د لومړني تنظیم وروسته، NVR به ژوندۍ بڼه ښکاره کړي view د وصل شویو کیمرونو. تاسو کولی شئ د یوې کیمرې ترمنځ بدل شئ view او څو کیمرې گرډ views.
6.2 د ثبت کولو ترتیب
Access the recording settings through the main menu to configure recording schedules and modes:
- دوامداره ثبت کول: ریکارډونه ۲۴/۷.
- د حرکت موندنې ثبتول: یوازې هغه وخت ثبت کیږي کله چې کیمره حرکت کشف کړي.
- مهال ویش ثبتول: Records during specific times of the day or week.
- د پیښو ثبتول: Records based on specific events (e.g., alarm input).
۴.۲ پلې بیک او بیک اپ
بیا بیاview ثبت شوی footage:
- Navigate to the "Playback" section from the main menu.
- مطلوب کیمره او نیټه/وخت حد غوره کړئ.
- د ثبتونو له لارې د تګ راتګ لپاره د مهال ویش څخه کار واخلئ.
- د foo بیک اپ کولو لپارهtage, insert a USB drive into the NVR's USB port and follow the on-screen instructions for export.
6.4 ریموټ لاسرسی
The Vivotek ND9425P NVR supports remote access via a web browser or dedicated mobile applications (e.g., VIVOCloud). Refer to the full user manual on the Resource CD for detailed instructions on setting up remote access, including port forwarding or P2P cloud services.
7. ساتنه
7.1 د فرم ویئر تازه معلومات
Regularly check for and install firmware updates to ensure optimal performance, security, and access to new features. Firmware updates can typically be performed via the NVR's web interface or through a USB drive.
۵.۲ د هارډ ډرایو مدیریت
The NVR will automatically overwrite the oldest recordings when the hard drive is full. You can configure storage settings, check HDD health, and format the drive through the system settings.
7.3 پاکول
Keep the NVR unit clean by gently wiping its exterior with a dry, soft cloth. Ensure ventilation openings are free from dust and obstructions.
8. ستونزه حل کول
| ستونزه | احتمالي لامل | د حل لاره |
|---|---|---|
| هیڅ ځواک نشته | Power cable disconnected; faulty power adapter; power outlet issue. | Check power cable connection; try a different power outlet; contact support if adapter is faulty. |
| نه د ویډیو وتنه | HDMI/VGA cable loose; incorrect display input selected; NVR not booted. | Ensure display cable is secure; select correct input on monitor; wait for NVR to boot up. |
| Cameras Not Displaying | Network issue; camera not powered; incorrect camera IP address; camera not added to NVR. | Check network cables; ensure cameras are powered; verify camera IP settings; add cameras via NVR interface. |
| هیڅ ریکارډ نشته | Hard drive not initialized; recording schedule not set; HDD full. | Initialize HDD in settings; configure recording schedule; check HDD status. |
| Remote Access Fails | Network configuration issue; port forwarding not set up; firewall blocking. | Verify network settings; configure port forwarding on router; check firewall rules. |
For more detailed troubleshooting, refer to the comprehensive user manual provided on the Resource CD or visit the VIVOTEK support webسایټ
9. مشخصات
| فیچر | تفصیل |
|---|---|
| د ماډل شمیره | ND9425P |
| جوړونکی | Vivotek USA |
| د محصول ابعاد | 19.69 x 19.69 x 11.02 انچه |
| د توکي وزن | ۲.۴۵ پونډه |
| د ارتباط ټیکنالوژي | ایترنیټ |
| مطابقت لرونکې وسیلې | کیمره |
| د حافظې د ذخیره کولو ظرفیت | 64 GB (referring to internal flash/RAM, not HDD capacity) |
| د چینلونو شمیر | 16 |
| ویډیو کوډیکس | H.265 ، H.264 ، MJPEG |
| د اعظمي حل ملاتړ | 4K UHD (as per product title) |
10. تضمین او ملاتړ
For warranty information, please refer to the warranty card included with your product or visit the official VIVOTEK website. VIVOTEK provides technical support for its products. If you encounter issues that cannot be resolved using this manual or the troubleshooting section, please contact VIVOTEK customer support through their official webسایټ یا ټاکل شوي ملاتړ چینلونه.
Official VIVOTEK Webسایټ: www.vivotek.com


