1. پیژندنه
Thank you for choosing the ETA Falco Smart Robot Vacuum Cleaner with Mopping Function. This manual provides essential information for the safe and efficient operation, maintenance, and troubleshooting of your device. Please read this manual thoroughly before using the product and keep it for future reference.
د خوندیتوب مهم معلومات
- Always ensure the robot is placed on a stable, level surface.
- وسیله د اوبو او رطوبت څخه لرې وساتئ.
- ماشومانو یا غیر مجاز اشخاصو ته اجازه مه ورکوئ چې روبوټ چل کړي.
- Use only the original charging adapter and accessories provided.
- Before cleaning or maintenance, ensure the robot is powered off and unplugged from the charging station.
- Avoid operating the robot near open flames or flammable materials.
2. محصول ختم شوview
اجزا او کنټرولونه
Familiarize yourself with the main parts and controls of your ETA Falco Smart robot vacuum cleaner.
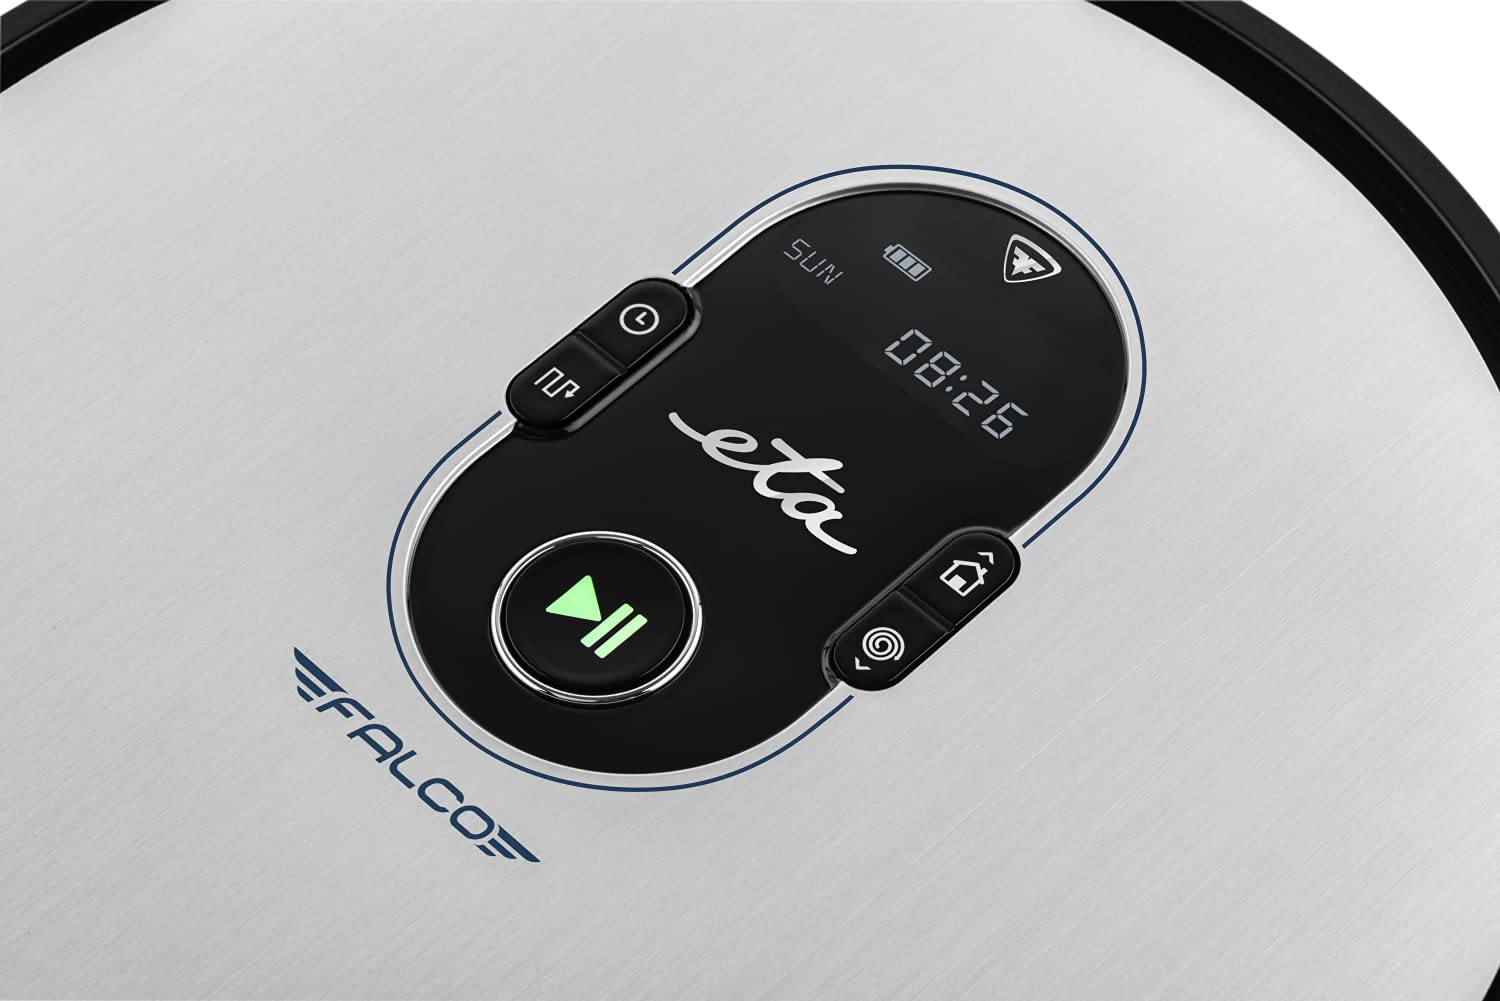
انځور 2.1: Top panel controls. This image shows the main control panel on the top of the robot, including buttons for power, scheduling, and return to charging station, along with a digital display.

انځور 2.2: لاندې view. This image displays the bottom of the robot, highlighting the main brush, two side brushes, and the mop attachment.

انځور 2.3: Underside diagram. This diagram labels the key components on the robot's underside, including the side brushes, main brush, and mop attachment.
3. د بسته محتويات
د خلاصولو پر مهال، مهرباني وکړئ ډاډ ترلاسه کړئ چې لاندې ټول توکي شتون لري:
- ETA Falco Smart Robot Vacuum Cleaner
- چارج سټیشن
- د چارج کولو اډاپټر
- ریموټ کنټرول
- 2x Spare Side Brushes
- Special Rotary and Lamella Brush
- 2x Cleaning Cloths (Mop Pads)
- اضافي HEPA فلټر
- Mop Attachment with 300 ml Water Tank
- مجازی دیوال
4. ترتیب کول
4.1 ابتدايي چارج کول
- Place the charging station against a wall in an open area, ensuring there are no obstacles within 1 meter to the sides and 2 meters in front.
- Connect the charging adapter to the charging station and plug it into a power outlet.
- Place the robot vacuum cleaner on the charging station. Ensure the charging contacts align. The robot will begin charging automatically. A full charge takes approximately 5 hours.
۴.۴ د غاړې برشونو نصب کول
Attach the side brushes to the designated posts on the underside of the robot by pressing them down until they click into place. Ensure the 'L' and 'R' markings on the brushes match the corresponding markings on the robot.
4.3 Connecting to the ETA SMART App
The ETA SMART app enhances the functionality of your robot. Download the app from your smartphone's app store. Follow the in-app instructions to connect your robot to your home Wi-Fi network and pair it with the app.
4.4 Setting up the Virtual Wall
The virtual wall creates an invisible barrier to restrict the robot's access to certain areas. Place the virtual wall device on the floor where you want to create a boundary. Ensure the infrared beam is directed towards the area you wish to block. The robot will detect this beam and avoid crossing it.

انځور 4.1: Robot with charging station and virtual wall. This image shows the robot positioned near its charging station, with a virtual wall device placed nearby to illustrate its function.
5. عملیاتي لارښوونې
5.1 د پاکولو طریقې
The ETA Falco Smart offers four distinct cleaning modes:
- سمارټ: General cleaning mode for optimal coverage.
- کلاسیک: Standard cleaning pattern.
- EDGE: د دیوالونو او فرنیچر څنډو سره پاکوي.
- ځای: Concentrated cleaning in a specific area.
You can select these modes via the ETA SMART app or the remote control.
۶.۴ د پاکولو مهالویش
Use the ETA SMART app to set a cleaning schedule for your robot. You can program specific times and days for the robot to automatically start cleaning.
5.3 لاسي کنټرول
You can manually control the robot's movement and functions using the remote control or the ETA SMART app. The app also allows you to monitor cleaning activity, battery charge, and view cleaning routes.

انځور 5.1: ETA Smart App features. This image displays the ETA Smart App interface on a smartphone, highlighting features such as remote control, cleaning history, activity monitoring, battery status, cleaning modes (SMART, CLASSIC, EDGE, SPOT), cleaning schedule, mopping intensity control, and suction power adjustment.
5.4 د پاکولو فعالیت
- Fill the 300 ml water tank with clean water. Do not use detergents or cleaning solutions that are not approved for robot vacuums.
- Attach a clean mop pad to the mop attachment.
- Slide the mop attachment into the designated slot on the underside of the robot.
- د پاکولو دوره پیل کړئ. روبوټ به په ورته وخت کې ویکیوم او موپ وکړي.
6. ساتنه
منظم ساتنه غوره فعالیت تضمینوي او ستاسو د روبوټ ویکیوم کلینر عمر اوږدوي.
6.1 Cleaning the Dust Bin and Filter
- د دوړو بن خوشې کولو تڼۍ فشار کړئ او د دوړو بن لرې کړئ.
- د کثافاتو ډبه پرانیزئ او محتويات یې په کثافاتو ډبه کې خالي کړئ.
- Remove the HEPA filter and primary filter. Tap them gently to remove dust. If washable, rinse under running water and allow to air dry completely before reinserting.
- Wipe the inside of the dust bin with a dry cloth.
- Reassemble the filters and dust bin, then reinsert into the robot.
۷.۳ د اصلي برش پاکول
- روبوټ وګرځوئ.
- Remove the main brush cover by pressing the release tabs.
- اصلي برش پورته کړئ.
- Use the cleaning tool (if provided) or scissors to remove hair and debris tangled around the brush.
- Clean the brush compartment.
- Reinsert the main brush and secure the cover.
۷.۲ د غاړې برشونه پاکول
Periodically check the side brushes for tangled hair or debris. If necessary, remove them by gently pulling upwards and clean them. Replace worn or damaged brushes with the spare ones provided.
۵.۵ د موپ پیډ او د اوبو ټانک پاکول
After each mopping session, remove the mop pad and wash it thoroughly. Empty any remaining water from the water tank and rinse it. Allow both to air dry completely before storing or reusing.
۷.۶ د پاکولو سینسرونه
Wipe the anti-drop sensors, bumper sensors, and charging contacts on the robot and charging station with a clean, dry cloth to ensure proper function.
7. ستونزه حل کول
If your robot vacuum cleaner encounters an issue, refer to the following common problems and solutions:
| ستونزه | احتمالي لامل | د حل لاره |
|---|---|---|
| روبوټ نه چالانیږي | د بیټرۍ ټیټوالی؛ د بریښنا بندول | روبوټ چارج کړئ؛ ډاډ ترلاسه کړئ چې د بریښنا سویچ فعال دی |
| روبوټ چارج نه کوي | Charging contacts dirty; Charging station unplugged | Clean charging contacts; Ensure charging station is plugged in |
| د پاکولو ضعیف فعالیت | د کثافاتو ډبې ډکې دي؛ برشونه ګډوډ دي؛ فلټر بند دی | Empty dust bin; Clean brushes; Clean/replace filter |
| روبوټ ډېر ځله بندېږي | په فرش کې خنډونه؛ سینسرونه چټل دي | Clear floor of cables/small items; Clean sensors |
| Virtual wall not working | Virtual wall batteries low; Incorrect placement | Replace batteries; Adjust virtual wall position |
که چیرې د دې حل لارو هڅه کولو وروسته هم ستونزه دوام ومومي، مهرباني وکړئ د پیرودونکو ملاتړ سره اړیکه ونیسئ.
8. مشخصات
Technical specifications for the ETA Falco Smart Robot Vacuum Cleaner (Model ETA251590000):
| فیچر | تفصیل |
|---|---|
| جوړونکی | ETA |
| د محصول ابعاد (L x W x H) | 32.5 x 33.5 x 7.5 سانتي متره |
| وزن | 250 ګرامه |
| د توکي ماډل شمیره | ETA251590000 (T2261) |
| د ماډل رنګ | آبي |
| مواد | پلاستیک |
| د بریښنا ډول | د بیټرۍ چلول |
| والیtage | 3 Volts (14.4V Li-ion battery, 2400 mAh) |
| په کڅوړه کې د توکو شمیر | 1 |
| ځانګړي ځانګړتیاوې | Pet brush compatibility, Smart App control, Floating brush system, HEPA filter, Virtual wall |
| شاملې برخې | Battery, Filter, Charging station, Adapter, Remote control, Side brushes, Rotary brush, Cleaning cloths, Mop attachment, Virtual wall |
| د بیټرۍ جوړښت | لیتیم آیون |
| د بیټرۍ ژوند | تر 120 دقیقو پورې |
| د چارج کولو وخت | نږدې 5 ساعته |
| د سطحې سپارښتنه | لامینټ |
| د کنټرولر ډول | د اپلیکیشن کنټرول |
| د پرزو شتون | د پرزو په اړه معلومات شتون نلري |
9. تضمین او ملاتړ
For warranty information, product support, or to inquire about spare parts, please refer to the warranty card included with your purchase or visit the official ETA webسایټ. د تضمین ادعاوو لپاره د پیرود ثبوت وساتئ.


