پیژندنه
This manual provides essential instructions for the safe and efficient operation, setup, and maintenance of your Proster GR030-PST Pneumatic Rivet Nut Gun. This tool is designed for installing rivet nuts in various materials, offering a labor-saving and durable solution for assembly tasks. Its ergonomic design ensures comfortable use during prolonged periods.
The Proster GR030-PST is suitable for a wide range of applications, including the decoration industry, automobile manufacturing, container production, electrical and electronic manufacturing, luggage manufacturing, and general machinery manufacturing.
د خوندیتوب معلومات
- Always wear appropriate personal protective equipment, including safety glasses, gloves, and hearing protection, when operating the tool.
- Ensure the air supply is disconnected before performing any maintenance, changing mandrels, or when the tool is not in use.
- Do not operate the tool if it is damaged or malfunctioning. Refer to the troubleshooting section or contact support.
- Keep hands and body parts clear of moving parts during operation.
- Use the tool only for its intended purpose: installing rivet nuts of specified sizes.
- Maintain a stable footing and balance when operating the tool.
- ډاډ ترلاسه کړئ چې د کار ساحه پاکه، ښه روښانه او له خنډونو څخه پاکه ده.
- Do not exceed the recommended air pressure for the tool.
د بسته محتويات
The Proster GR030-PST Pneumatic Rivet Nut Gun kit includes the following items:
- Pneumatic Rivet Nut Gun
- Interchangeable Mandrels (M4, M5, M6, M8, M10)
- Rivet Nuts (100 pieces, various sizes)
- Wrenches for Mandrel Replacement
- Air Pump Pipe Connector (1/4")
- Robust Plastic Storage Case

Image: Complete kit contents, showing the pneumatic rivet nut gun, interchangeable mandrels, a selection of rivet nuts, wrenches for maintenance, and the protective storage case.
محصول پای ته ورسیدview او اجزا
Familiarize yourself with the main components of the Proster Pneumatic Rivet Nut Gun:

Image: Labeled diagram of the pneumatic rivet nut gun, highlighting key parts for identification and function.
- Screw Sleeve: Contains a leak-proof rubber ring to ensure air tightness.
- Mandrel Part: The interchangeable component that holds the rivet nut. Choose the correct M4-M10 mandrel based on your specific needs.
- Nut Push Out Knob: Used to separate the mandrel stem from the riveted nut after installation.
- پیل سویچ: A simple trigger mechanism to initiate the riveting process.
- وینټ: An exhaust port for air during operation.
- Oil Filling Hole: Located at the bottom of the product. The bottom cover needs to be removed to access this for lubrication.
- Air Pump Pipe Connector (1/4"): Connects the air hose from your compressor to the tool. This connector is fixed and does not rotate.
مشخصات
| فیچر | مشخصات |
|---|---|
| برانډ | پروسټر |
| ماډل | GR030-PST |
| د توکي وزن | 2.8 کیلوګرامه |
| د کڅوړې ابعاد | 32.7 x 23.5 x 12.2 سانتي متره |
| Rivet Nut Capacity | M4, M5, M6, M8, M10 |
| د ډرایو ډول | Pneumatic Hydraulic |

Image: Details on interchangeable mandrels and compatible rivet nut quantities and materials.
چمتو کول
۱. د هوا رسولو سره نښلول
- Ensure your air compressor is off and the air hose is depressurized.
- Connect the 1/4" air pump pipe connector on the tool to your air hose.
- Set your air compressor to the recommended operating pressure (refer to tool specifications or manufacturer guidelines for pneumatic tools).
- د هوا کمپرسور چالان کړئ.
2. Selecting and Installing Mandrels
The tool comes with interchangeable mandrels for different rivet nut sizes (M4, M5, M6, M8, M10). Always select the mandrel that matches the rivet nut you intend to use.
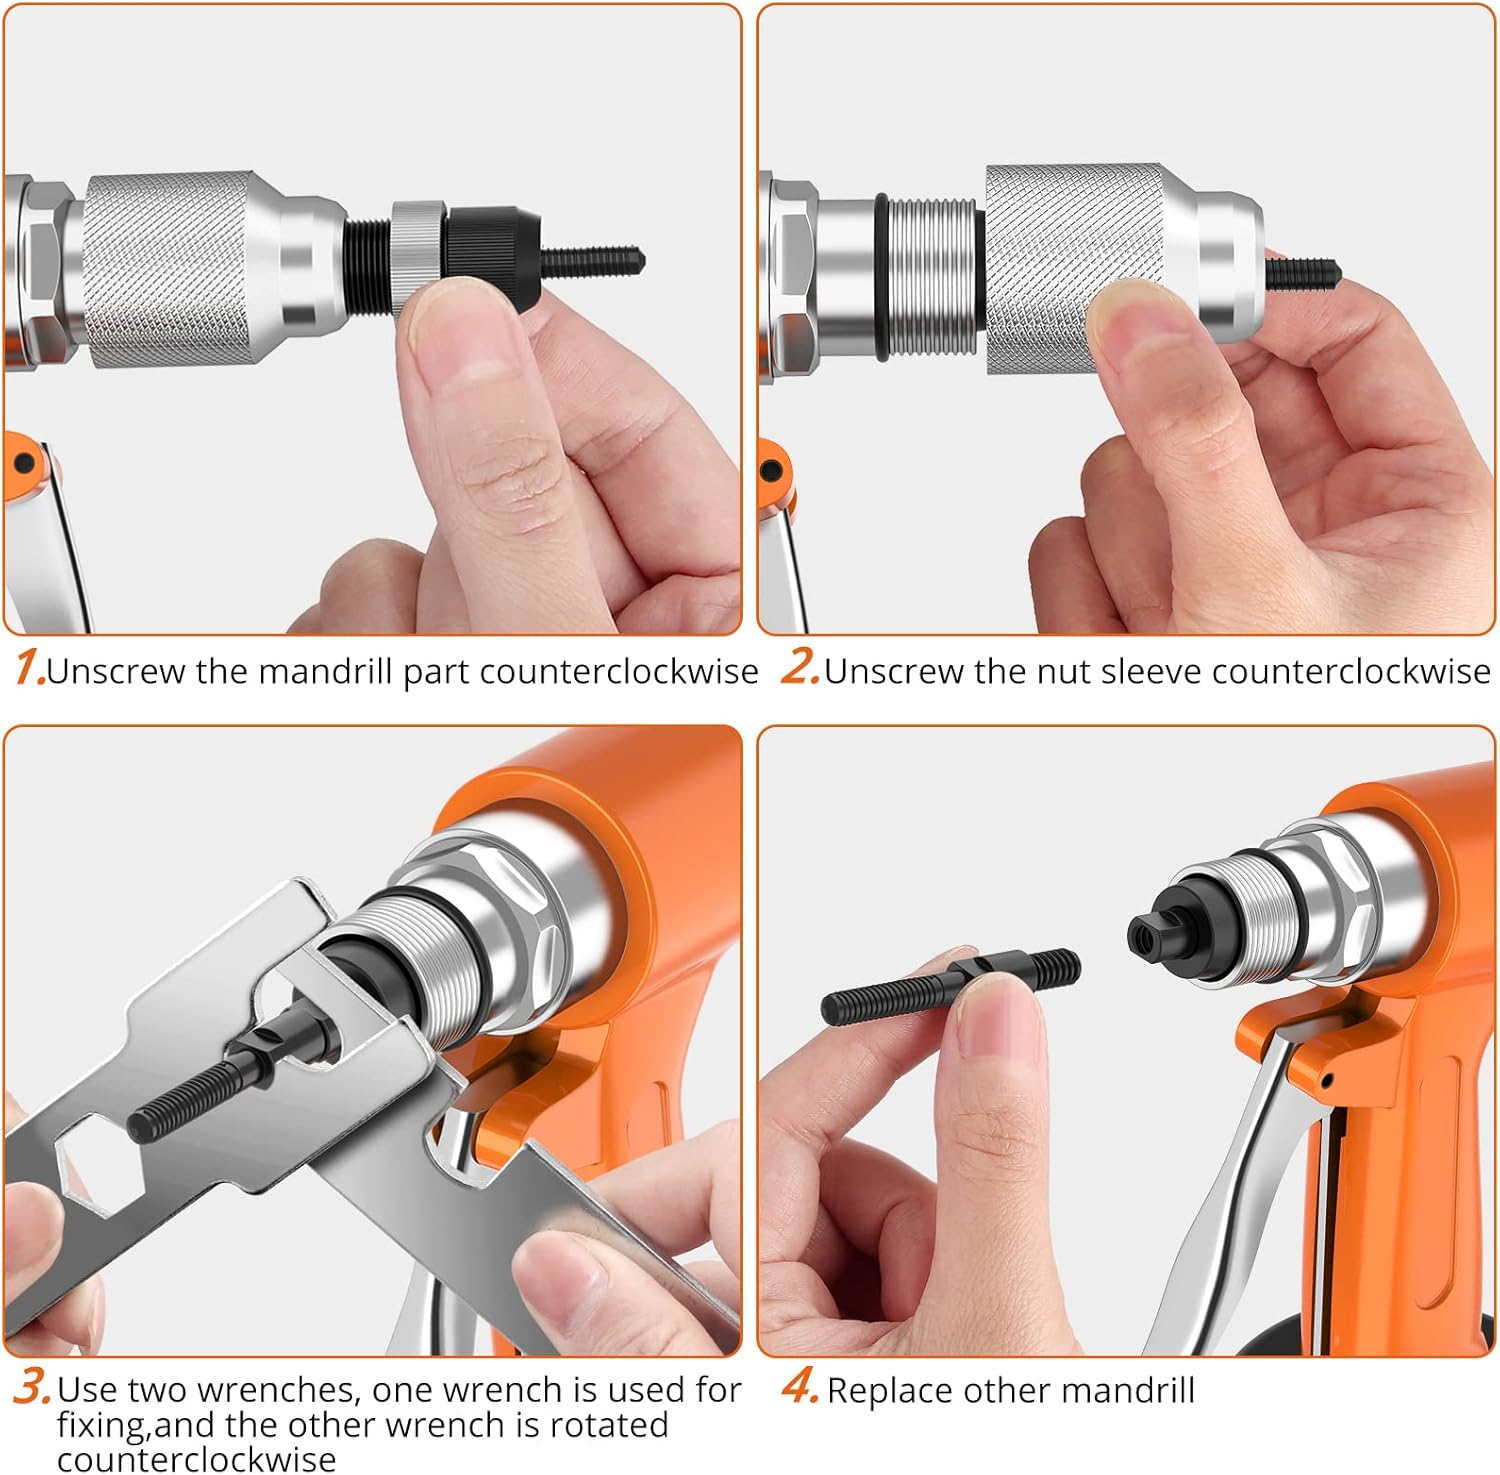
Image: Step-by-step guide for replacing the mandrel.
- Unscrew the Mandrel Part: Rotate the existing mandrel part counter-clockwise to remove it.
- Unscrew the Nut Sleeve: Rotate the nut sleeve counter-clockwise to detach it.
- Use Wrenches: If necessary, use the provided wrenches to loosen or tighten the mandrel components. One wrench is used for fixing the mandrel part, and the other wrench is rotated counter-clockwise to loosen the nut sleeve.
- Replace Mandrel: Insert the desired mandrel (M4-M10) into the tool and tighten all components securely by rotating clockwise. Ensure the nut sleeve is firmly attached.
عملیاتي لارښوونې
Follow these steps for proper operation of the pneumatic rivet nut gun:
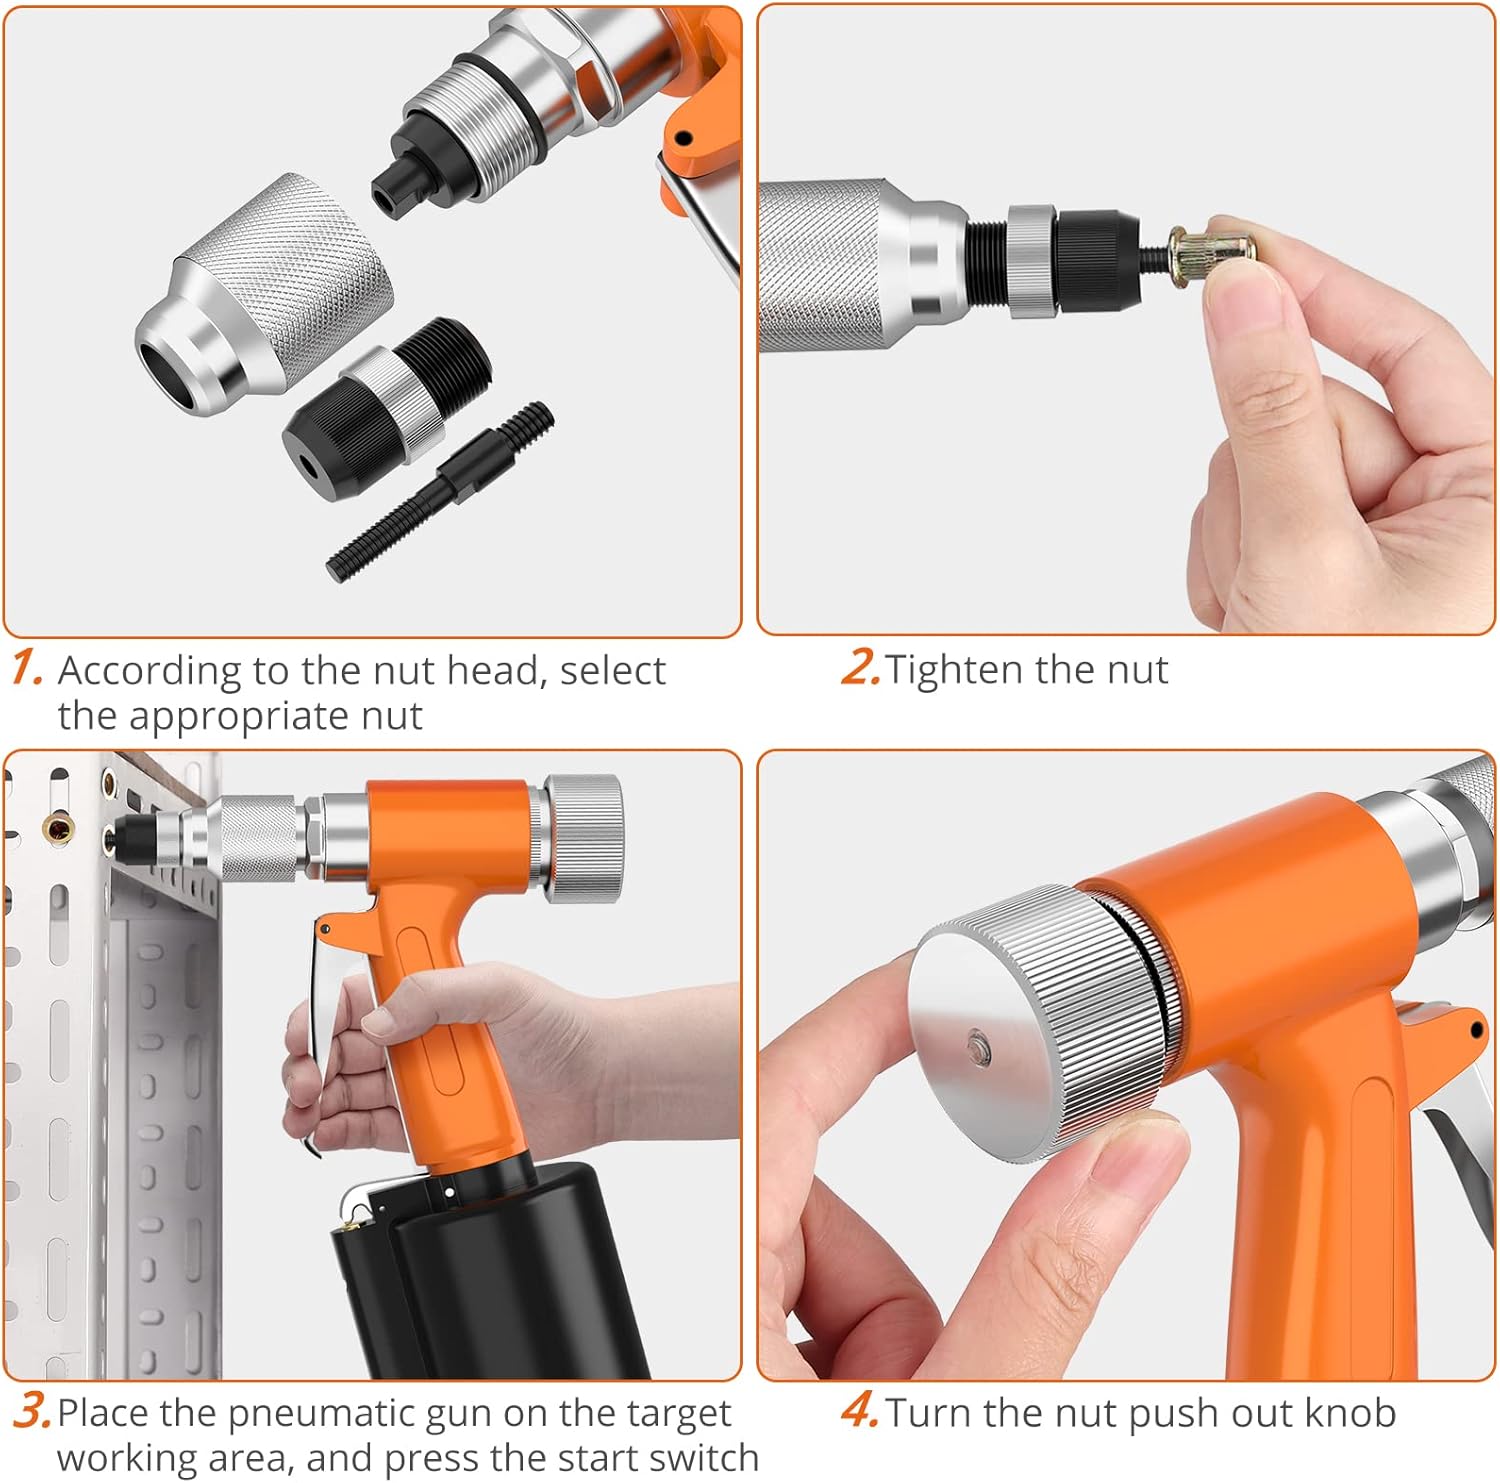
Image: Step-by-step guide for operating the rivet nut gun.
- Select Rivet Nut: Choose the appropriate rivet nut size that matches the installed mandrel and your application.
- Load Rivet Nut: Thread the selected rivet nut onto the mandrel until it is snug.
- د موقعیت وسیله: Place the pneumatic gun on the target workpiece, ensuring the rivet nut is properly seated in the pre-drilled hole.
- Initiate Riveting: Press the start switch (trigger) to activate the pneumatic mechanism. The tool will pull the mandrel, deforming the rivet nut to create a secure fastening. The quick-release air valve ensures rapid cylinder return for efficient operation.
- Release Riveted Nut: Once the rivet nut is installed, turn the nut push-out knob to separate the mandrel stem from the riveted nut.
- تکرار کړئ: For subsequent installations, repeat steps 2-5.
ساتنه
Regular maintenance ensures the longevity and optimal performance of your pneumatic rivet nut gun.
- پاکول: Keep the tool clean and free from debris. Wipe down the exterior with a clean, dry cloth after each use.
- Lubrication (Oil Filling): Periodically lubricate the internal pneumatic components. To access the oil filling hole, remove the bottom cover of the tool. Use a few drops of pneumatic tool oil. Refer to the 'Product Overview' section for the location of the oil filling hole.
- Mandrel Inspection: Regularly inspect mandrels for wear or damage. Replace worn mandrels to ensure proper rivet nut installation and prevent damage to the tool.
- Air Line Maintenance: Ensure your air supply line is clean and dry. Use an air filter/regulator/lubricator (FRL unit) to prevent moisture and contaminants from entering the tool.
- ذخیره کول: Store the tool in its plastic case in a dry, clean environment when not in use.
د ستونزو حل کول
If you encounter issues with your Proster Pneumatic Rivet Nut Gun, refer to the following common problems and solutions:
| ستونزه | احتمالي لامل | د حل لاره |
|---|---|---|
| وسیله کار نه کوي یا ټیټ بریښنا لري. | Insufficient air pressure or air supply. | Check air compressor pressure and ensure adequate air flow. Verify air hose connections are secure. |
| Rivet nut does not install correctly or strips. | Incorrect mandrel size or worn mandrel. | Ensure the mandrel matches the rivet nut size. Replace worn or damaged mandrels. |
| Air leakage from the tool. | خلاصې اړیکې یا زیانمن شوي مهرونه. | Check all air connections for tightness. Inspect the screw sleeve for damage to the rubber ring. |
| Mandrel stem gets stuck in the riveted nut. | Nut push-out knob not used correctly or internal mechanism issue. | Ensure the nut push-out knob is fully turned after riveting. If the problem persists, internal lubrication may be needed. |
If the problem persists after attempting these solutions, please contact Proster customer support.
تضمین او ملاتړ
Proster products are manufactured to high-quality standards. For warranty information, please refer to the documentation included with your purchase or visit the official Proster website. For technical support, replacement parts, or any inquiries not covered in this manual, please contact Proster customer service through their official channels.


