پیژندنه
This manual provides detailed instructions for the setup, operation, and maintenance of your Gioteck SC3 Wireless Pro Controller. Designed for use with Nintendo Switch, PC, and mobile devices, this controller features programmable back buttons, customizable RGB lighting, and changeable magnetic thumb sticks for an enhanced gaming experience.
1. ترتیب کول
1.1 د بسته محتويات
- Gioteck SC3 Wireless Pro Controller
- د USB چارج کیبل
- Additional Magnetic Thumb Sticks (if included)
- د کارونکي لارښود (دا لاسوند)
1.2 د کنټرولر چارج کول
Before initial use, fully charge the controller. Connect the supplied USB charging cable to the controller's charging port and the other end to a USB power source (e.g., Nintendo Switch dock, PC USB port, or USB wall adapter).
- د LED شاخص به د چارج حالت وښیې.
- بشپړ چارج معمولا شاوخوا ۲-۳ ساعته وخت نیسي.
انځور: ښکته view of the Gioteck SC3 controller, highlighting the USB-C charging port located between the two textured grips.
۳.۲ د نینټینډو سویچ سره جوړه کول
- د نینټینډو سویچ کور مینو څخه، غوره کړئ کنټرولونکي، بیا گرفت / نظم بدل کړئ.
- On the SC3 controller, press and hold the د جوړه کولو تڼۍ (usually a small button on the top or back) for a few seconds until the LED indicators begin to flash rapidly.
- Once the controller is recognized by the Switch, the player LED(s) on the controller will illuminate solid, indicating successful pairing.
- فشار ورکړئ یو تڼۍ تصدیق کول.
Note: For subsequent uses, the controller should automatically reconnect to the last paired Switch console when powered on.
1.4 Connecting to PC/Mobile (Bluetooth)
- Ensure Bluetooth is enabled on your PC or mobile device.
- On the SC3 controller, press and hold the د جوړه کولو تڼۍ for a few seconds until the LED indicators flash rapidly.
- On your PC/mobile device, navigate to Bluetooth settings and search for new devices.
- Select "Gioteck SC3" or similar from the list of available devices to pair.
- The controller's LED will become solid upon successful connection.
1.5 Installing Magnetic Thumb Sticks
The SC3 controller features changeable magnetic thumb sticks. To replace them:
- Gently pull the existing thumb stick straight up to remove it.
- Align the desired magnetic thumb stick with the base and gently push it down until it snaps into place.

انځور: مخکینۍ برخه view of the Gioteck SC3 controller, showcasing the magnetic thumb sticks and button layout.
2. عملیاتي لارښوونې
2.1 د تڼۍ ترتیب
The SC3 controller features a traditional button layout. Refer to the image below for button identification.

انځور: زاویه لرونکی مخ view of the Gioteck SC3 controller, displaying the full button layout including face buttons, D-pad, analog sticks, and shoulder buttons.
- کیڼ/ښي انلاګ سټیکونه: د حرکت او کیمرې کنټرول لپاره.
- D-pad: لارښوونه.
- د A/B/X/Y تڼۍ: د عمل تڼۍ.
- L/R/ZL/ZR تڼۍ: د اوږو او ټریګر تڼۍ.
- +/- تڼۍ: Start/Select equivalents.
- د کور تڼۍ: Returns to the console's home menu.
- د نيولو تڼۍ: Takes screenshots.
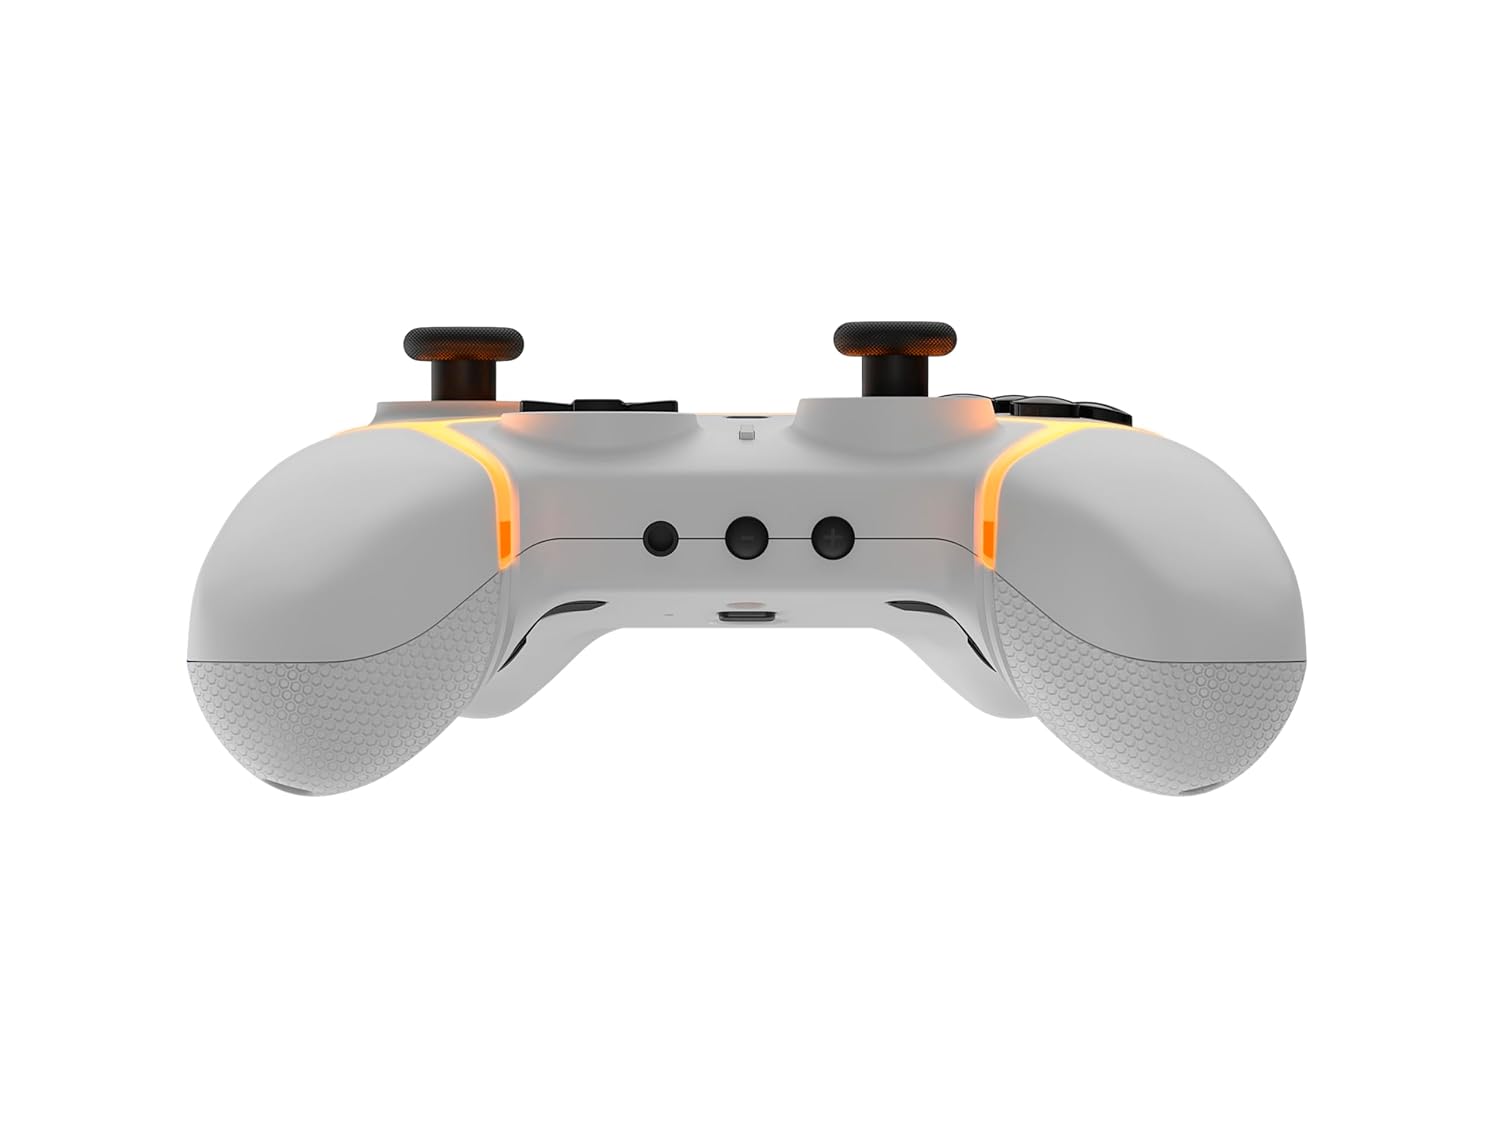
۴.۳ د پروګرام وړ شاته تڼۍ
The SC3 controller includes programmable back buttons (M1, M2, M3, M4) for custom assignments.

انځور: شاته view of the Gioteck SC3 controller, clearly showing the four programmable back buttons (M1, M2, M3, M4) and textured grips.
د پروګرام کولو مرحلې:
- فشار ورکړئ او ونیسئ د پروګرام تڼۍ (refer to diagram if available, usually a small button on the back) until the LED indicator flashes.
- فشار ورکړئ د شا تڼۍ (M1, M2, M3, or M4) you wish to program. The LED will flash slowly.
- فشار ورکړئ د ننوتلو تڼۍ (e.g., A, B, X, Y, L, R, ZL, ZR, D-pad direction) you want to assign to the back button.
- فشار ورکړئ د پروګرام تڼۍ again to save the assignment. The LED will stop flashing.
- Repeat for other back buttons as desired.
To clear a programmed button, follow steps 1-2, then press the Program Button again without pressing an input button.
۳.۲ د RGB رڼا تنظیمول
The controller features customizable RGB lighting. Specific instructions for changing colors or effects are typically found in the product's quick start guide or by pressing a dedicated button combination (e.g., Function + R3).
Consult the quick start guide included with your controller for precise button combinations to adjust RGB lighting.
۳.۲ د حرکت کنټرولونه
The SC3 controller supports motion controls, allowing for immersive gameplay in compatible Nintendo Switch titles. No special setup is usually required; motion controls activate automatically when supported by the game.
2.5 Audio Headset Jack
A 3.5mm audio headset jack is located on the controller for connecting compatible headsets. It includes dedicated mute and volume control buttons.
- حجم پورته / ښکته: د آډیو محصول تنظیم کړئ.
- تteۍ غږول: Mute/unmute microphone input.

انځور: پورته view of the Gioteck SC3 controller, highlighting the 3.5mm audio jack, volume controls, and mute button.
3. ساتنه
3.1 پاکول
د خپل کنټرولر پاکولو لپاره، یو نرم، وچ ټوکر وکاروئ. د سختې خاورې لپاره، یو څه کمampټوکر د اوبو سره ومینځئ. د سختو کیمیاوي موادو، خړوبونکو پاکوونکو یا محلولونو کارولو څخه ډډه وکړئ، ځکه چې دا کولی شي د کنټرولر پای او داخلي برخو ته زیان ورسوي.
- Do not immerse the controller in water or any other liquid.
- Ensure all ports are dry before charging or connecting devices.
3.2 ذخیره کول
کنټرولر په یخ او وچ ځای کې د مستقیم لمر وړانګو او سختې تودوخې څخه لرې وساتئ. د زیان مخنیوي لپاره په کنټرولر باندې د درنو شیانو له ایښودلو څخه ډډه وکړئ.
3.3 د بیټرۍ پاملرنه
The controller contains a rechargeable battery. To prolong battery life:
- د بیټرۍ په مکرر ډول د بشپړ چارج کولو څخه ډډه وکړئ.
- Charge the controller regularly, even if not in use for extended periods (e.g., once every 3-6 months).
- Do not expose the controller to temperatures above 60°C (140°F).
4. ستونزه حل کول
۵.۱ کنټرولر نه نښلي/جوړه کوي
- بیټرۍ چیک کړئ: ډاډ ترلاسه کړئ چې کنټرولر په کافي اندازه چارج شوی دی.
- بیا جوړه: Follow the pairing instructions in Section 1.3 or 1.4.
- لاسوهنه: Move closer to the console/device and away from potential sources of wireless interference (e.g., Wi-Fi routers, other Bluetooth devices).
- Reset Controller: Locate a small reset button (often a pinhole) on the back of the controller. Use a paperclip to press and hold it for a few seconds. Then attempt to re-pair.
- Update Console/Device Software: Ensure your Nintendo Switch, PC, or mobile device's operating system is up to date.
4.2 Buttons/Sticks Not Responding
- بیا همغږي کول: کنټرولر منحل او بیا وصل کړئ.
- پاکول: ډاډ ترلاسه کړئ چې د تڼیو یا لرګیو شاوخوا هیڅ کثافات نه وي.
- Test in another game/menu: Determine if the issue is specific to a game or system-wide.
- Reset Controller: Perform a hard reset as described above.
4.3 Motion Controls Not Working
- د لوبې مطابقت: Verify that the game you are playing supports motion controls.
- بیا حساب کول: On Nintendo Switch, you can recalibrate motion controls in the system settings.
- Reset Controller: سخت ری سیٹ ترسره کړئ.
5. مشخصات
| ماډل: | Gioteck SC3 Wireless Pro Controller |
| مطابقت: | Nintendo Switch (Original, Lite, OLED), PC, Mobile Devices |
| ارتباط: | بلوتوث بې سیم |
| ابعاد (تقریبا): | 2.87 x 5.35 x 6.34 انچه (7.29 x 13.59 x 16.1 سانتي متره) |
| وزن (نږدې): | 10.6 اونس (300 ګرامه) |
| آډیو جیک: | 3.5mm with mute and volume controls |
| ځانګړي ځانګړتیاوې: | Programmable back buttons, Magnetic thumb sticks, RGB lighting, Motion controls |
6. د تضمین معلومات
The Gioteck SC3 Wireless Pro Controller comes with a manufacturer's warranty. For specific details regarding warranty coverage, duration, and claims process, please refer to the warranty card included with your product or visit the official Gioteck webسایټ
مهرباني وکړئ د تضمین موخو لپاره د پیرود ثبوت وساتئ.
7. د پیرودونکي ملاتړ
If you encounter any issues or have questions not covered in this manual, please contact Gioteck customer support. Contact information can typically be found on the product packaging or the official Gioteck webسایټ
Gioteck Official Webسایټ: www.gioteck.com


