1. پیژندنه
This manual provides detailed instructions for the IINE Wireless Pro Controller, designed for use with Nintendo Switch, Switch OLED, and Switch Lite consoles. Please read this manual carefully before use to ensure proper operation and to maximize your gaming experience.

Image 1: The IINE Wireless Pro Controller, featuring a gold and green design with various buttons and joysticks.
2. د بسته محتويات
مهرباني وکړئ د بکس خلاصولو پر مهال د کڅوړې محتويات وګورئ ترڅو ډاډ ترلاسه کړئ چې ټول توکي شتون لري:
- 1 x IINE Wireless Pro Controller
- 1 X USB-C چارج کیبل
- ۱ x لارښود لارښود (دا سند)

Image 2: Visual representation of the controller and its packaging, indicating the included items.
۳. د کنټرولر ترتیب
Familiarize yourself with the buttons and features of your IINE Wireless Pro Controller:
- کیڼ انالوګ سټیک: د حرکت او کیمرې کنټرول لپاره.
- ښي انلاګ سټیک: For camera control and aiming.
- لارښود پیډ (ډي-پیډ): For menu navigation and specific in-game actions.
- د A/B/X/Y تڼۍ: د عمل تڼۍ.
- د L/R تڼۍ: د اوږو تڼۍ.
- د ZL/ZR تڼۍ: د محرک تڼۍ.
- منفي (-) تڼۍ: Select/Back button.
- جمع (+) تڼۍ: د پیل / بندولو تڼۍ.
- د کور تڼۍ: Returns to the Switch Home menu.
- د سکرین شاټ تڼۍ: سکرین شاټونه نیسي.
- Turbo (T) Button: Activates/deactivates Turbo function.
- NFC Sensor: For Amiibo functionality (located near the center of the controller).
- د USB-C پورټ: د چارج کولو او تار لرونکي اتصال لپاره.
- د شاخص څراغونه: د اتصال حالت او د بیټرۍ کچه ښکاره کړئ.
4. تنظیم او پیوستون
4.1 Initial Pairing with Nintendo Switch
- ستاسو د نینټینډو سویچ کنسول کې، د کور مینو ته لاړ شئ.
- Select "Controllers" > "Change Grip/Order".
- While on the "Change Grip/Order" screen, press and hold the د کور تڼۍ on the IINE Pro Controller for 3-5 seconds until the indicator lights start flashing rapidly.
- Once the controller is successfully paired, the corresponding player indicator light(s) on the controller will remain solid.
4.2 Reconnecting to Nintendo Switch
If the controller has been previously paired, simply press the د کور تڼۍ to wake it up. It will automatically attempt to reconnect to the last paired Switch console.
د بریښنا پيوستون
You can connect the controller to your Nintendo Switch dock using the provided USB-C cable. Ensure "Pro Controller Wired Communication" is enabled in the Switch System Settings (System > Controllers and Sensors > Pro Controller Wired Communication).
4.4 PC Steam Connection
The controller also supports PC Steam. Connect the controller to your PC via the USB-C cable. Your PC should recognize it as a gamepad. You may need to configure controller settings within Steam's Big Picture Mode or specific game settings.

Image 3: The controller shown alongside various Nintendo Switch models and a PC monitor, illustrating its broad compatibility.
5. عملیاتي لارښوونې
5.1 Wake Up Function
When the Switch console is in sleep mode, press the د کور تڼۍ on the controller to wake up the console and automatically reconnect the controller.
۷.۹ ټربو فعالیت
The Turbo function allows for rapid, automatic pressing of a button. It supports both auto-fire and manual fire dual modes.
- To set Manual Turbo: فشار ورکړئ او ونیسئ د T تڼۍ, then press any of the A/B/X/Y/L/R/ZL/ZR buttons once. The button will now activate Turbo when held down.
- To set Auto Turbo: فشار ورکړئ او ونیسئ د T تڼۍ, then press the desired A/B/X/Y/L/R/ZL/ZR button twice. The button will now continuously activate Turbo without needing to be held.
- To cancel Turbo for a specific button: فشار ورکړئ او ونیسئ د T تڼۍ, then press the desired A/B/X/Y/L/R/ZL/ZR button a third time.
- To cancel all Turbo functions: فشار ورکړئ او ونیسئ د T تڼۍ د 5 ثانیو لپاره.
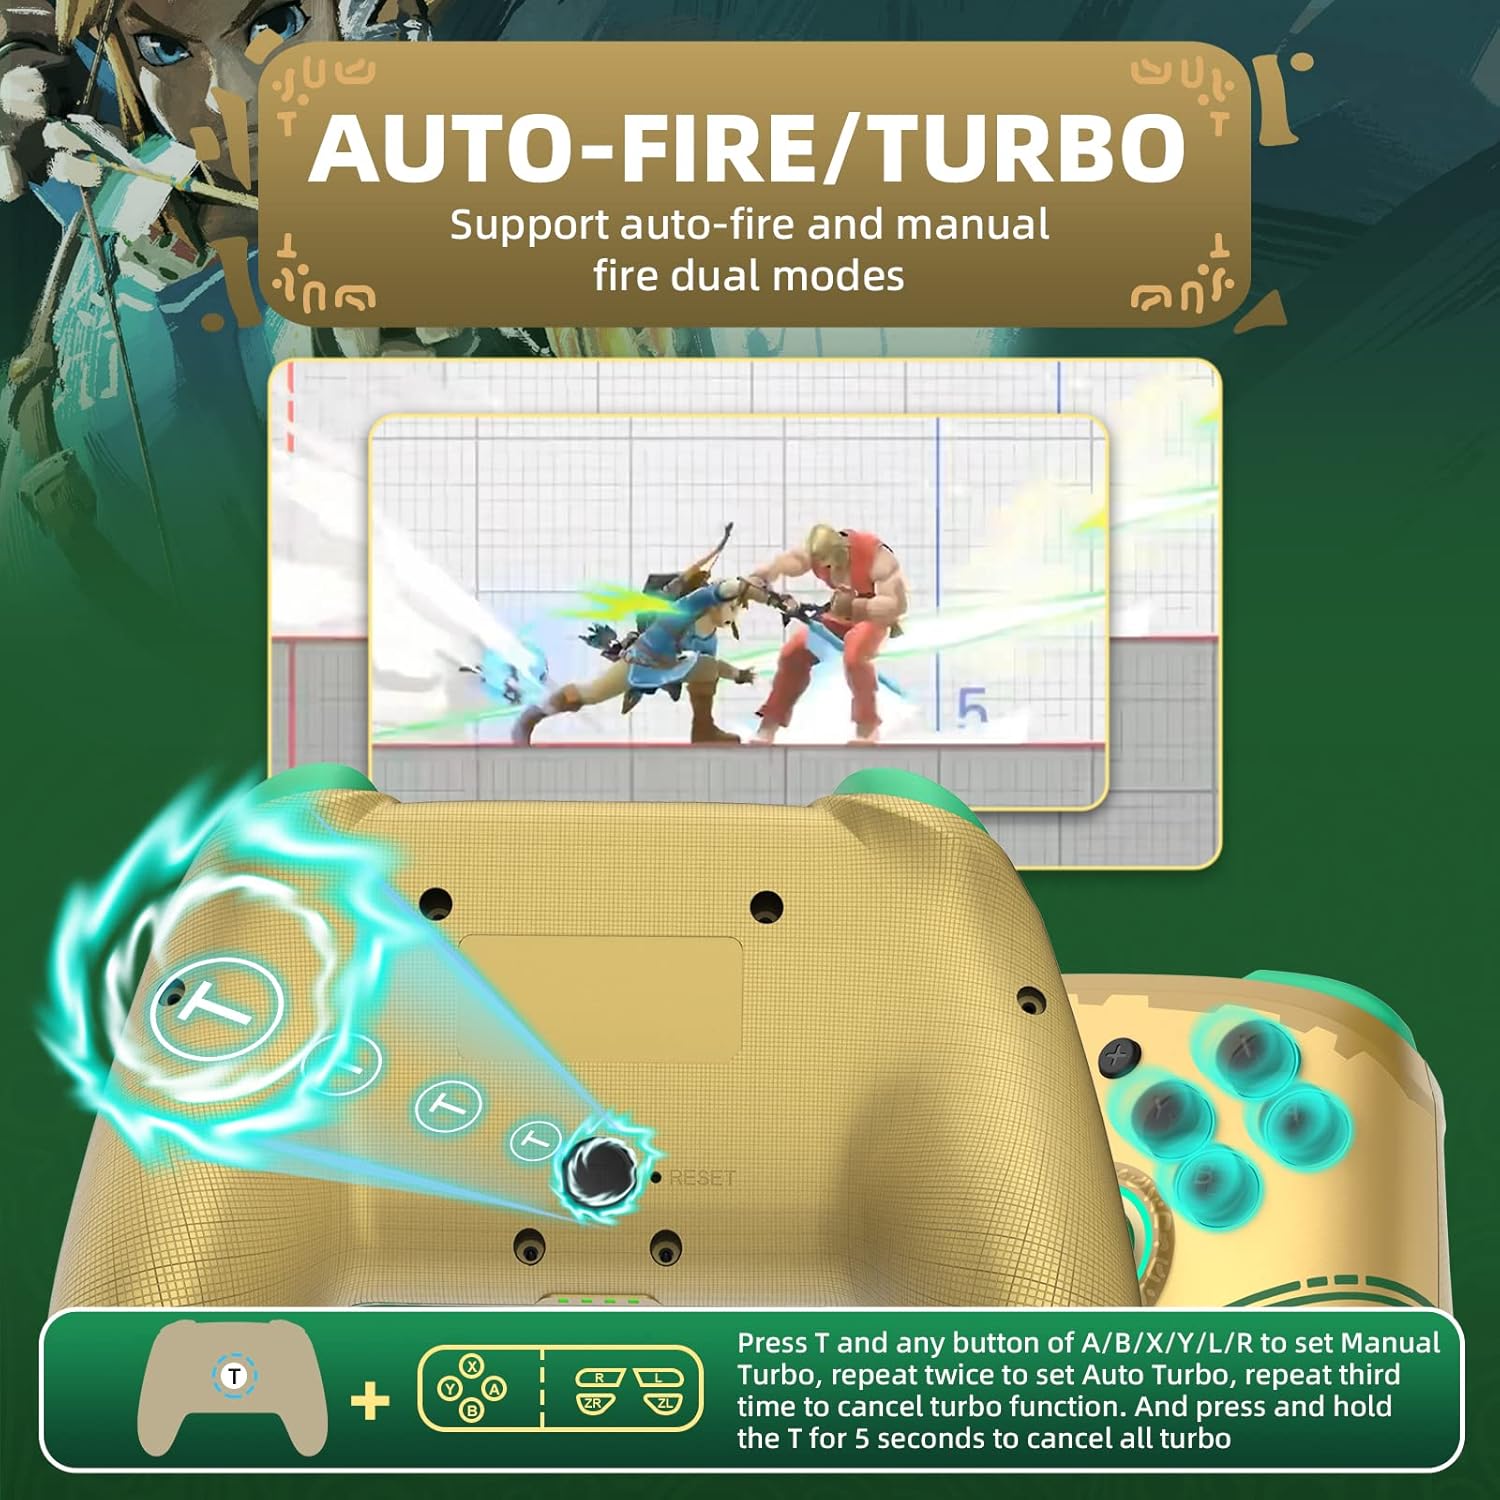
Image 4: Diagram illustrating the button combinations for setting and canceling the Turbo function on the controller.
5.3 د وایبریشن تنظیم کول
The controller features dual vibration feedback with 5 adjustable levels (0%, 30%, 50%, 70%, 100%).
- To adjust vibration intensity: فشار ورکړئ او ونیسئ د T تڼۍ، بیا فشار ورکړئ Directional Button Up to increase vibration or Directional Button Down to decrease vibration.
- د ډیفالټ وایبریشن کچه 50٪ ده.

Image 5: Graphic showing the T button and directional buttons used to adjust the vibration intensity, with a scale from 0% to 100%.
۶.۱ د RGB رڼا تنظیم کول
The controller features RGB lighting around the analog sticks, which can be customized.
- To change monochromatic light color: فشار ورکړئ او ونیسئ د T تڼۍ، بیا فشار ورکړئ کی Anې انلاګ چپک (L3) once. Repeat to cycle through colors.
- To activate colorful light mode: فشار ورکړئ او ونیسئ د T تڼۍ, then double-press the کی Anې انلاګ چپک (L3).
- د روښانتیا تنظیمولو لپاره: فشار ورکړئ او ونیسئ د T تڼۍ، بیا فشار ورکړئ ښي انلاګ چپک (R3) د روښانتیا کچه تنظیمولو لپاره.

Image 6: Instructions for changing the RGB light color and adjusting brightness using the T button and analog stick presses.
5.5 NFC/Amiibo Function
The controller supports NFC functionality for scanning Amiibo figures and cards.
- Ensure the NFC function is enabled in your game or Switch system settings.
- Place your Amiibo figure or card over the NFC sensor area, typically located near the center of the controller, between the analog sticks.
- The console will register the Amiibo data.

Image 7: Graphic highlighting the NFC area on the controller, indicating support for Amiibo scanning.
۴.۵ د حرکت کنټرول (۶-محور ګیرو)
The built-in 6-axis gyroscope provides precise motion control for compatible games, enhancing gameplay through features like visual angle adjustment, direction control, and aim shooting.

Image 8: Illustrations demonstrating the 6-axis gyro functionality for visual angle adjustment, direction control, and aim shooting in games.
6. د کنټرولر چارج کول
The controller is equipped with a 600mAh high-capacity rechargeable battery.
- Connect the provided USB-C charging cable to the USB-C port on the controller.
- د کیبل بل پای د USB بریښنا سرچینې سره وصل کړئ (د مثال په توګه، د نینټینډو سویچ ډاک، د USB دیوال اډاپټر، د کمپیوټر USB پورټ).
- The indicator lights on the controller will show charging status. They will typically blink while charging and turn solid or off when fully charged.
- بشپړ چارج معمولا شاوخوا ۲-۳ ساعته وخت نیسي.
7. ساتنه
- Keep the controller dry and away from moisture.
- Avoid exposing the controller to extreme temperatures.
- کنټرولر د نرم او وچ ټوکر سره پاک کړئ. سخت کیمیاوي مواد یا کثافات مه کاروئ.
- کنټرولر په خوندي ځای کې وساتئ ترڅو د څاڅکو یا اغیزو څخه د زیان مخه ونیول شي.
8. ستونزه حل کول
- Controller does not connect:
- ډاډ ترلاسه کړئ چې کنټرولر چارج شوی.
- Repeat the initial pairing process (Section 4.1).
- Ensure the Switch console is updated to the latest firmware.
- Try connecting the controller via USB-C cable to the Switch dock.
- Reset the controller by inserting a thin object into the small reset hole (if present, usually on the back).
- Buttons or joysticks are unresponsive:
- وګورئ که کنټرولر په سمه توګه وصل دی.
- Test the controller in Switch's "Calibrate Control Sticks" or "Test Input Devices" settings.
- Ensure no debris is obstructing the buttons or sticks.
- Vibration is not working:
- Check the vibration adjustment settings (Section 5.3) to ensure it's not set to 0%.
- ډاډ ترلاسه کړئ چې هغه لوبه چې تاسو یې لوبوئ د وایبریشن فیډبیک ملاتړ کوي.
- NFC/Amiibo not detected:
- Ensure the Amiibo is placed correctly over the NFC sensor.
- Verify that the game or Switch system settings have NFC enabled.
9. مشخصات
| فیچر | تفصیل |
|---|---|
| د ماډل شمیره | کنټرولر |
| مطابقت | Nintendo Switch, Switch OLED, Switch Lite, PC (Steam) |
| ارتباط | Wireless (Bluetooth), Wired (USB-C) |
| د بیټرۍ ظرفیت | ۴۰۰mAh (د چارج وړ) |
| د چارج کولو بندر | USB-C |
| ځانګړي ځانګړتیاوې | NFC, Turbo, Adjustable Vibration, RGB Lighting, Wake Up Function, 6-Axis Gyro Motion Control |
| ابعاد | ۷۱.۲ x ۲۷.۶ x ۴۵.۹ سانتي متره (تقریبا) |
| وزن | 280 ګرامه (نږدې) |
10. تضمین او ملاتړ
For warranty information or technical support, please refer to the official IINE webسایټ ته مراجعه وکړئ یا مستقیم د دوی د پیرودونکو خدماتو سره اړیکه ونیسئ. د پیرود ثبوت په توګه د پیرود رسید وساتئ.
For further assistance, you may visit the IINE Store on Amazon: IINE Official Store


