1. پیژندنه
This manual provides detailed instructions for the installation, operation, and maintenance of your NexiGo 3 Channel Dash Cam D621. Please read this manual thoroughly before using the device to ensure proper functionality and safety. Keep this manual for future reference.
۲. په بکس کې څه دي؟
Verify that all items are present and in good condition upon unboxing.
- NexiGo D621 Dash Cam
- 128GB SD کارت
- سکشن ماونټ
- Auxiliary Power Cable (11.5 ft)
- Rear Camera with Extension Cable (21.3 ft)
- د پری وسیلې
- د جامو پاکول
- د کارن لارښود

Image: NexiGo D621 Dash Cam and its components, including the main unit, suction mount, cables, and SD card.
3. محصول ختم شوview
The NexiGo D621 is a 3-channel dash cam designed to record front, interior, and rear views simultaneously. It features a rotatable interior/front camera for flexible recording options.
کلیدي ځانګړتیاوې:
- Rotatable Interior/Front Camera: Allows the interior camera to be rotated to face forward, providing dual front-facing recording.
- High Resolution Recording: Front camera records in 4K/2K, interior and rear cameras in 1080P.
- Sony STARVIS Sensors: Enhanced low-light performance for clear night vision.
- جوړ شوی وائی فای: Supports 5.0 GHz and 2.4 GHz for fast file transfer and app connectivity.
- مربوط GPS: Records real-time trip data including location and speed.
- د ۲۴ ساعتونو د پارکینګ حالت: Monitors your vehicle when parked (requires hard-wire kit, sold separately).
- جی سینسر: Automatically locks emergency footage upon impact detection.
- لوپ ثبتول: زوړ foo له سره لیکيtage کله چې SD کارت ډک وي.

Image: Diagram illustrating the three-channel recording capability of the NexiGo D621, showing simultaneous front, interior, and rear views.

Image: Visual representation of the optimized field of view for the front (88°) and interior (132°) cameras of the NexiGo D621.
4. ترتیب کول
4.1. ابتدايي نصب کول
- د سکشن ماونټ سره ضمیمه کړئ: Slide the suction cup mount into the slot on the top of the dash cam until it clicks securely into place.
- SD کارت داخل کړئ: If not already inserted, gently push the provided 128GB Micro SD card into the TF slot on the side of the dash cam until it clicks. The dash cam supports up to 256GB.
- د ډش کیم ماونټ: Clean the desired area on your windshield. Attach the suction mount firmly to the windshield, ensuring it does not obstruct your view.
- بریښنا وصل کړئ: Plug the auxiliary power cable into the dash cam and then into your vehicle's 12V auxiliary power outlet.
- شاته کیمره نصب کړئ: Connect the rear camera to the main unit using the extension cable. Route the cable neatly along the vehicle's interior trim using the pry tool. Mount the rear camera on the rear windshield or above the license plate.
Video: Official NexiGo D621 User Guide demonstrating the physical installation of the dash cam and its components.
۳. د بریښنا فعالول او لومړني ترتیبات
- یوځل چې بریښنا سره وصل شي، د ډشبورډ کیم به په اوتومات ډول فعال شي او ثبت کول به پیل کړي.
- Use the physical buttons below the screen to navigate the menu.
- Access "Settings" (gear icon) to configure basic settings like date, time, and time zone.
- Ensure the date and time are correct for accurate timestampد ثبتونو ثبتول.
5. عملیاتي لارښوونې
۲.۲. د ثبت طریقې
- نورمال ثبت کول: Automatically starts when the vehicle is powered on. Footage is saved in continuous loops.
- د بیړني حالت ثبتول: Activated by the G-sensor upon detecting an impact. This footage is locked and will not be overwritten.
- د پارکینګ حالت: When connected to a hard-wire kit (ASIN: B0C5RYDBBD, sold separately), the dash cam can monitor your vehicle for impacts or motion while parked.
5.2. Adjusting Camera Views
The interior camera can be rotated to face forward, effectively providing two front-facing cameras. To do this:
- Physically rotate the interior camera lens until it faces forward.
- Navigate to "Camera Settings" in the menu.
- Toggle "Rear Camera: Flip Horizontally" to ON if needed to correct the image orientation.
- Set "Interior Camera Recording" to "Front" to ensure it records the forward view.
Video: Official NexiGo D621 User Guide demonstrating how to rotate the interior camera and adjust settings for dual front-facing recording.
5.3. Night Vision and Exposure
The D621 features Sony STARVIS sensors and infrared LED lights for enhanced night vision. You can adjust the exposure level for optimal clarity in low-light conditions, especially for capturing license plates.
- Press and hold the OK button to quickly access the front camera's special exposure settings.
- Use the up and down buttons to adjust the exposure level until license plates are clearly visible.
- To automate this, go to "Camera Settings" and select "Set special exposure time" to define a time range (e.g., sunset to sunrise) for automatic exposure adjustments.

Image: Comparison showing a default image versus an image with Manual Highlight Compensation (HLC) enabled, demonstrating improved readability of license plates at night.
۳. د وای فای اتصال او د اپلیکیشن کارول
The NexiGo D621 features built-in Wi-Fi (2.4 GHz and 5.0 GHz) for seamless connection to the NexiGo app on your iOS or Android device.
- اپلیکیشن ډاونلوډ کړئ: لټون "NexiGo Dash Cam" in your device's app store and install it.
- Enable Wi-Fi on Dash Cam: On the dash cam, navigate to "Settings" > "Wi-Fi Settings" > "Wi-Fi Information" to view the Wi-Fi SSID and password.
- Connect Phone to Dash Cam Wi-Fi: On your smartphone, go to Wi-Fi settings, find the NexiGo dash cam's SSID, and connect using the provided password.
- اپلیکیشن وکاروئ:
- ژوندی View: په ریښتیني وخت کې foo جریان کړئtage from the dash cam to your phone.
- Playback & Download: Access recorded videos and photos stored on the SD card. You can stream them directly or download them to your phone.
- ترتیبات: Adjust dash cam settings directly from the app, including video resolution, loop recording duration, G-sensor sensitivity, and Wi-Fi password.

Image: Illustration of the NexiGo D621 Dash Cam wirelessly transferring data to a smartphone via Wi-Fi, showing different transfer speeds for 5G and 2.4G Wi-Fi.
Video: Official NexiGo D621 User Guide demonstrating the process of connecting the dash cam to the mobile app and navigating its features.
7. ساتنه
- د عینکو پاکول: Regularly clean the camera lenses with the provided cleaning cloth to ensure clear recordings.
- د SD کارت ب Forه: Format the Micro SD card periodically (e.g., once a month) to prevent data corruption and ensure optimal performance. This can be done via the dash cam's settings menu.
- د فرم ویئر تازه معلومات: Check the NexiGo webد فعالیت ښه کولو او نوي ځانګړتیاو اضافه کولو لپاره د هر ډول شته فرم ویئر تازه معلوماتو لپاره سایټ یا اپلیکیشن وګورئ.
- دحرارت درجه: The dash cam is designed to operate in temperatures from -4°F (-20°C) to 158°F (70°C). Avoid prolonged exposure to extreme temperatures outside this range.
Video: Official NexiGo D621 User Guide demonstrating how to format the Micro SD card.
8. ستونزه حل کول
- ډش کیم نه فعالیږي:
- Ensure the power cable is securely connected to both the dash cam and the vehicle's 12V outlet.
- Check the vehicle's 12V outlet for power.
- Try a different power cable or outlet if available.
- Recording Issues (e.g., blurry footage, missing files):
- د کیمرې لینزونه پاک کړئ.
- د SD کارت ب .ه کړئ.
- Ensure the SD card is properly inserted and not full. Replace the SD card if it's old or damaged.
- Check video resolution settings in the menu.
- د وای فای اتصال ستونزې:
- ډاډ ترلاسه کړئ چې په ډشبورډ او ستاسو سمارټ فون کې وای فای فعال دی.
- Verify the correct SSID and password are being used.
- په خپل تلیفون کې د ډشبورډ کیم وای فای شبکه هیره کړئ او بیا وصل شئ.
- ډشبورډ کیم او خپل سمارټ فون دواړه بیا پیل کړئ.
- GPS Data Not Displaying Correctly:
- ډاډ ترلاسه کړئ چې د GPS ماډل په سمه توګه وصل دی او روښانه دی view د آسمان
- Check time zone settings in the dash cam menu.
- For full GPS data, download the DVPlayer app from nexigo.com/dashcam او view footage په کمپیوټر کې.
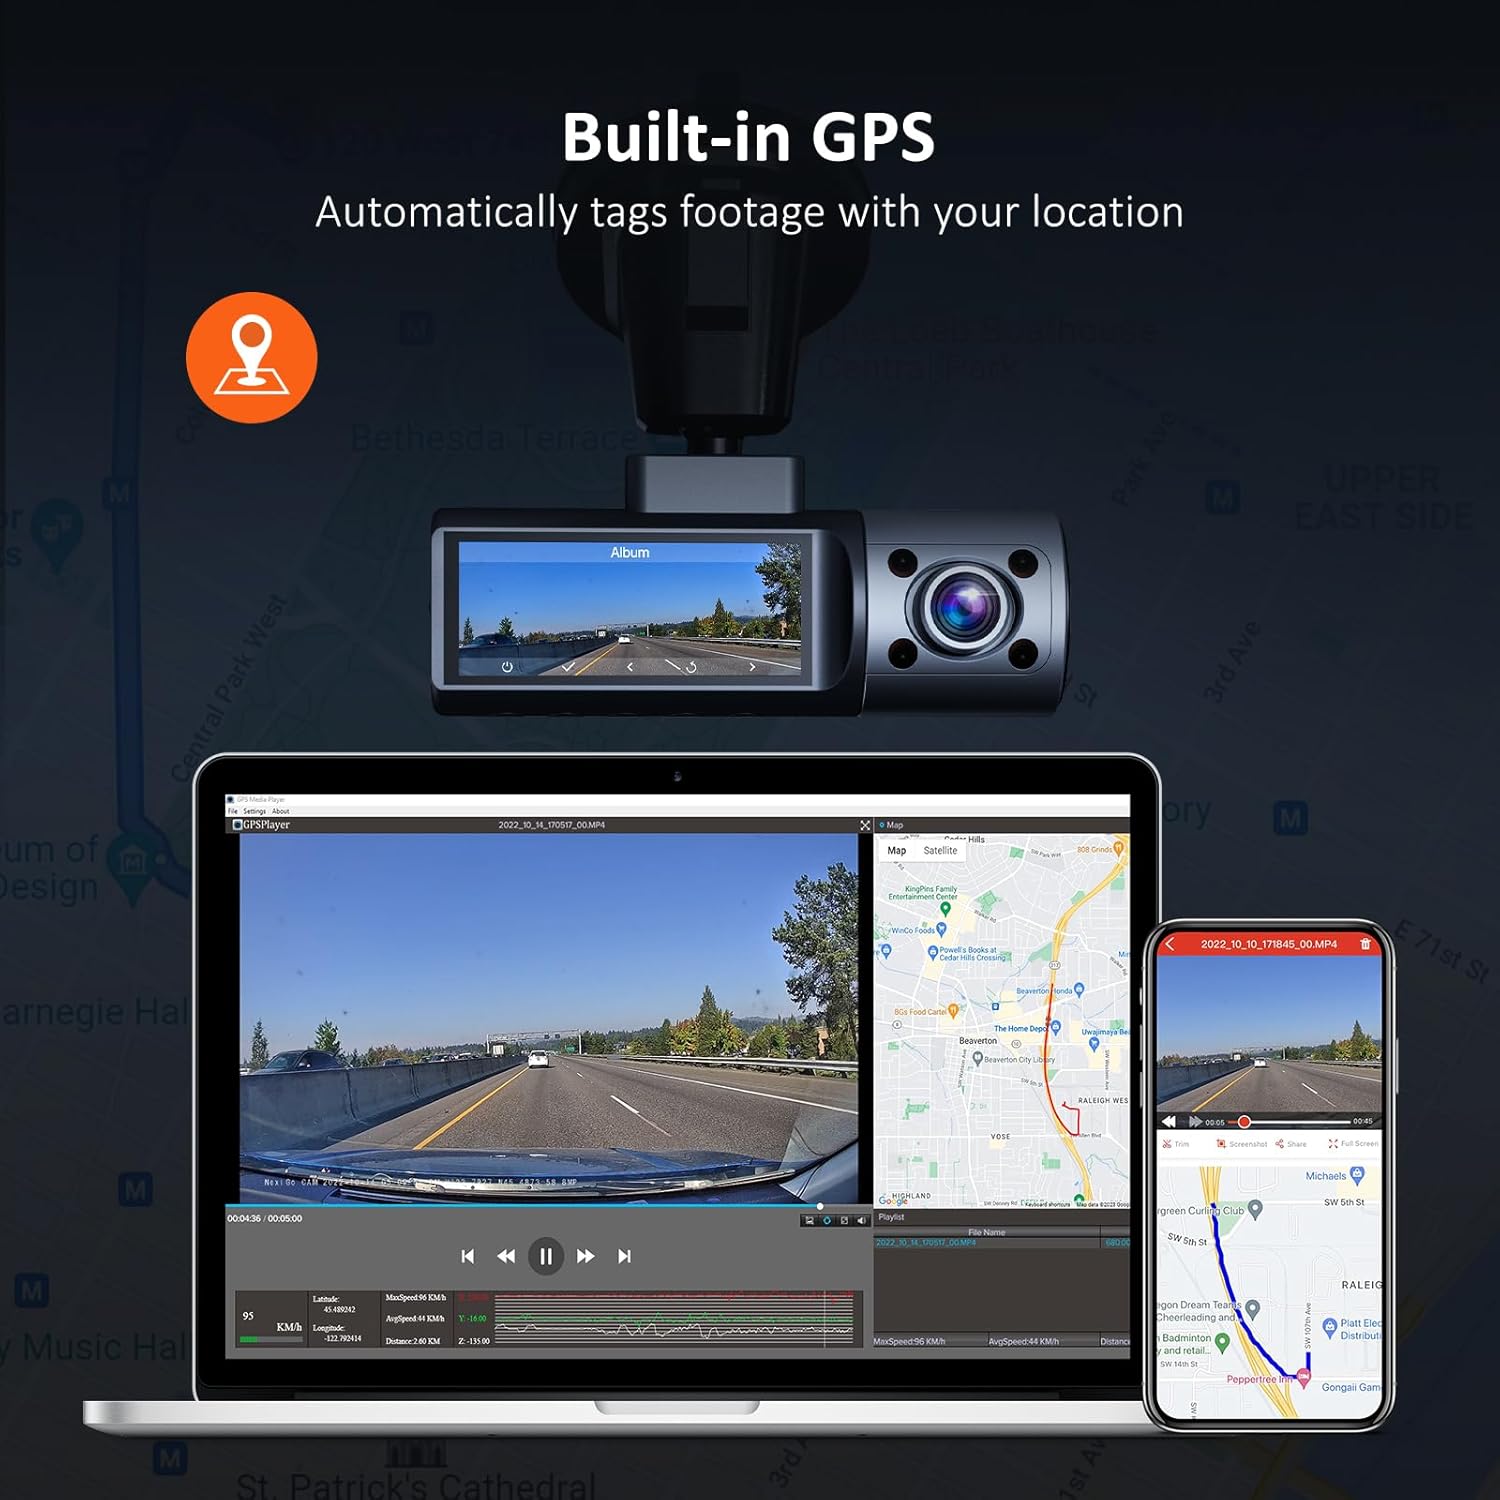
Image: Illustration of the NexiGo D621 Dash Cam's built-in GPS, showing how it tags footage with location data, viewable on a map via the app or desktop software.
9. مشخصات
| ماډل | D621 |
| د ویډیو حل | Front: 4K/2K (1440P), Interior: 1080P, Rear: 1080P |
| د ډګر View (FOV) | Front: 88°, Interior: 132°, Rear: 132° |
| سینسرونه | Sony STARVIS IMX335 & IMX307 |
| ارتباط | Wi-Fi (2.4 GHz & 5.0 GHz), GPS |
| ذخیره کول | Supports up to 256GB Micro SD Card (128GB included) |
| د عملیاتي حرارت درجه | -4 °F څخه تر 158 °F (-20 ° C څخه تر 70 ° C) |
| د بریښنا سرچینه | سوپر کاپسیټر |
| ابعاد | 5 x 4 x 2 انچه |
| وزن | ۲.۴۵ پونډه |
10. تضمین او ملاتړ
NexiGo products come with a standard manufacturer's warranty. For specific warranty details, product registration, or technical support, please visit the official NexiGo webسایټ یا د دوی پیرودونکي خدمت سره اړیکه ونیسئ.
- رسمي Webسایټ: www.nexigo.com
- د ملاتړ بریښنالیک: د خپل محصول بسته بندۍ یا رسمي ته مراجعه وکړئ webد اړیکو معلوماتو لپاره سایټ.
د اضافي محافظت لپاره، د پیرودلو په اړه فکر وکړئasing an extended protection plan. Options may include 2-Year or 3-Year Protection Plans, or a Complete Protect plan for broader coverage.


