1. پیژندنه
The GVDA GD128PLUS Smart Rechargeable Digital Multimeter is an advanced, versatile tool designed for accurate and reliable electrical measurements. Featuring a 10000-count display, auto-ranging capabilities, and True RMS functionality, it is suitable for professionals and electronics enthusiasts alike. This manual provides essential information for safe and effective operation, setup, maintenance, and troubleshooting of your multimeter.
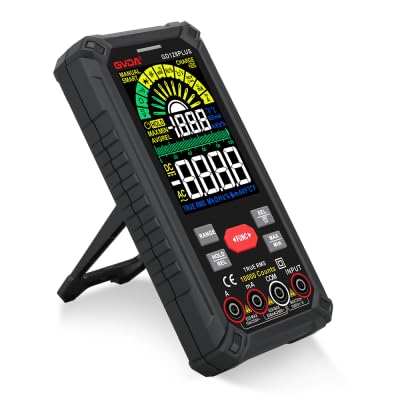
Figure 1.1: GVDA GD128PLUS Digital Multimeter with its integrated kickstand.
2. د خوندیتوب معلومات
د ملټي میټر د شخصي ټپي کیدو یا زیان څخه د مخنیوي لپاره تل لاندې خوندیتوب احتیاطي تدابیر په پام کې ونیسئ:
- Do not exceed the maximum input limits for any measurement range.
- د حجم سره کار کولو پرمهال خورا احتیاط وکړئtagد 30V AC RMS، 42V چوکۍ، یا 60V DC څخه پورته. دا حجمونهtagد شاک خطر رامنځته کوي.
- تل د سرکټ سره بریښنا قطع کړئ او ټول لوړ ولټ خارج کړئtagد مقاومت، دوام، یا ډایډ ازموینې ترسره کولو دمخه د e capacitors.
- ډاډ ترلاسه کړئ چې د ازموینې لیډونه په ښه حالت کې دي، پرته له کوم زیانمن شوي موصلیت څخه.
- که ملټي میټر خراب ښکاري یا کیس خلاص وي، نو مه یې چلوئ.
- د هرې اندازې لپاره سم فعالیت او حد وکاروئ.
- د اندازه کولو پرمهال ګوتې د ازموینې پروبونو کې د ګوتو ساتونکو شاته وساتئ.
- ملټي میټر په لوند چاپیریال کې یا د چاودیدونکو ګازونو یا دوړو په شتون کې مه کاروئ.
- د غیر اړیکه والیتtage (NCV) function is for indication only; always verify voltage presence with direct measurement.
3. د بسته محتويات
د خلاصولو پر مهال، ډاډ ترلاسه کړئ چې لاندې لیست شوي ټول توکي شتون لري او په ښه حالت کې دي:
- 1 x GVDA GD128PLUS Digital Multimeter
- د ټیسټ لیډونو 1 x جوړه (سور او تور)
- 1 x د USB چارج کیبل
- 1 x K-type Thermocouple Probe
- 1 x Cloth Carrying Bag
- ۱ x د کارونکي لارښود (دا سند)
- ۱ x ډالۍ بکس (بسته بندي)
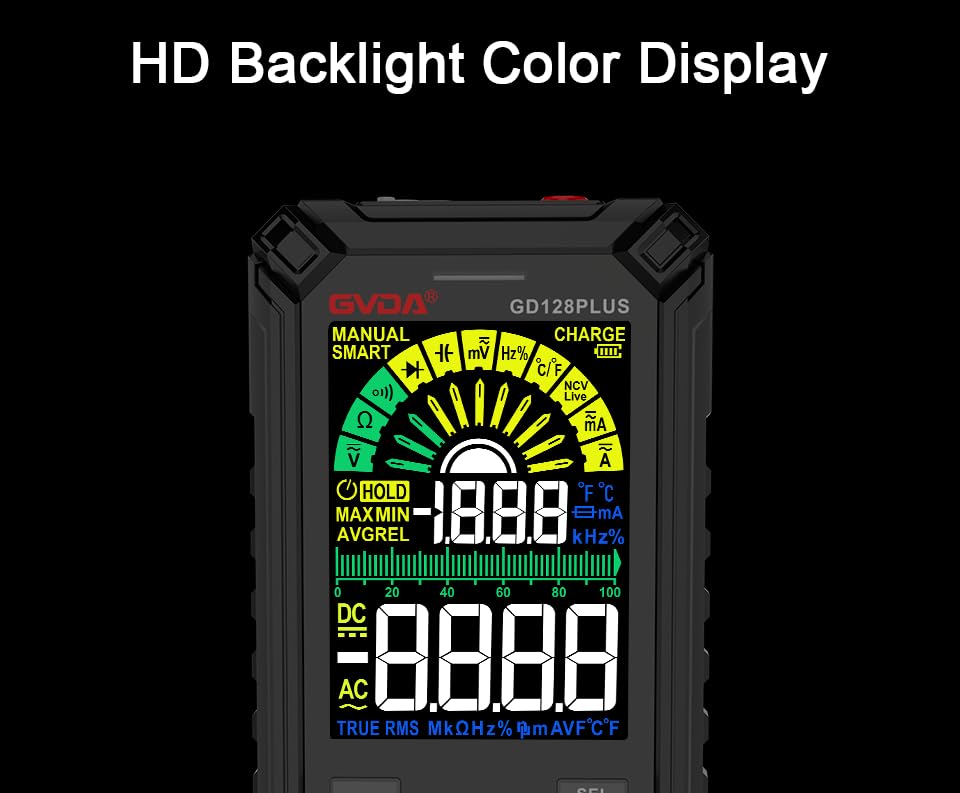
Figure 3.1: All components included in the GVDA GD128PLUS Multimeter package.
4. د محصول ځانګړتیاوې او اجزا
The GD128PLUS multimeter is equipped with a range of features for comprehensive electrical testing:
- د 10000 شمېرو ښودنه: د دقیق اندازه کولو لپاره لوړ ریزولوشن چمتو کوي.
- د موټرو لړۍ: په اتوماتيک ډول د اندازه کولو مناسب حد غوره کوي، عملیات ساده کوي.
- ریښتینی RMS: Ensures accurate readings for non-sinusoidal AC waveforms.
- د چارج وړ لیتیم بیټرۍ: Built-in 3.7V battery for convenience and portability.
- HD Backlight Color Display: Clear and easy-to-read display in various lighting conditions.
- غیر تماس والیtagد (NCV) کشف: Safely detects the presence of AC voltagد مستقیم تماس پرته.
- LED فلش لائټ: د تیاره کاري ساحو د روښانه کولو لپاره مدغم رڼا.
- د معلوماتو ساتل (HOLD): په ښودنه کې اوسنی لوستل کنګل کوي.
- نسبي اندازه (REL): Displays the difference between a stored reference value and the current reading.
- اعظمي/منځني اندازه کول: د اندازه کولو د ناستې په جریان کې اعظمي او لږترلږه ارزښتونه ثبتوي.
- Input Jack LED Indication: Guides correct test lead connection for selected function.
- د اوورلوډ محافظت: Protects the device from damage due to excessive input.
4.1. Multimeter Layout

Figure 4.1: Key components and input jacks of the GVDA GD128PLUS Multimeter.
Refer to Figure 4.1 for the location of the following components:
- ښکاره کول: HD Backlight Color LCD for readings and indicators.
- د فعالیت تڼۍ: RANGE, HOLD/REL, FUNC, SEL, MAX/MIN.
- داخله جیکونه:
- COM جیک: د ټولو اندازه کولو لپاره عام (منفي) ان پټ.
- VΩHzCap°C/°F Jack: Positive input for Voltage, Resistance, Frequency, Capacitance, and Temperature measurements.
- د mAμA جیک: Positive input for milliampمخکې او کوچنيampد اوسني اندازه کولو دمخه.
- ۱۰ الف جک: Positive input for 10 Ampد اوسني اندازه کولو دمخه.
- د بریښنا / بند تtonۍ: په پورتنۍ څنډه کې موقعیت لري.
- چارج جیک: د داخلي بیټرۍ د چارجولو لپاره د USB-C پورټ.
- د فلش لائټ کیلي: Button to activate the integrated LED flashlight.
- د خبرتیا شاخص: LED light for safety alerts.
- بریکٹ: Integrated kickstand on the back for hands-free viewing.
5. ترتیب کول
۱. ابتدايي چارج کول
Before first use, it is recommended to fully charge the multimeter's internal lithium battery. Connect the provided USB charging cable to the multimeter's charge jack and to a standard USB power adapter (not included) or a computer USB port. The display will indicate charging status. A full charge typically takes a few hours.

Figure 5.1: The multimeter's rechargeable lithium battery can be charged directly using a USB cable.
5.2. Attaching Test Leads
For most measurements, connect the black test lead to the COM jack and the red test lead to the appropriate positive input jack (VΩHzCap°C/°F, mAμA, or 10A) depending on the desired measurement function. The input jack LED indicators will illuminate to guide correct connection.
6. عملیاتي لارښوونې
6.1. بریښنا فعال/بند
فشار ورکړئ او ونیسئ پاور آن/بند button (located on the top edge) to turn the multimeter on or off. The device features an auto-power-off function to conserve battery life after a period of inactivity.
6.2. د اندازه کولو طریقې
The GD128PLUS offers various measurement modes, accessible via the rotary dial and function buttons:
6.2.1. والtagد e اندازه کول (AC/DC)
- روټری ډیل ته وګرځوئ V position. The multimeter will automatically detect AC or DC voltage.
- د تور ټیسټ مشرتابه ته COM جیک او سور ټیسټ د VΩHzCap°C/°F جیک
- د ازموینې پروبونه د ازموینې لاندې سرکټ یا برخې سره موازي سره وصل کړئ.
- ټوک ولولئtage ارزښت په نندارتون کې.
۶.۲. د اوسني اندازه کول (AC/DC)
- روټری ډیل ته وګرځوئ mA/μA or 10A position depending on the expected current.
- د تور ټیسټ مشرتابه ته COM جیک. سور ټیسټ لیډ د mAμA د کوچنیو جریانونو لپاره جیک یا 10A jack for larger currents.
- Connect the multimeter in series with the circuit. Ensure the circuit is de-energized before connecting.
- په سرکټ کې بریښنا واچوئ او اوسنی ارزښت ولولئ.
- احتیاط: Never connect the multimeter in parallel for current measurement, as this can damage the device and the circuit.
۵.۶. د مقاومت اندازه کول (Ω)
- روټری ډیل ته وګرځوئ Ω موقعیت
- د تور ټیسټ مشرتابه ته COM جیک او سور ټیسټ د VΩHzCap°C/°F جیک
- د مقاومت اندازه کولو دمخه ډاډ ترلاسه کړئ چې سرکټ غیر انرژي شوی او ټول کپیسیټرونه خارج شوي دي.
- د ازموینې پروبونه د اندازه کولو لپاره د برخې په اوږدو کې وصل کړئ.
- د مقاومت ارزښت ولولئ.
۵.۶. د ظرفیت اندازه کول (F)
- روټری ډیل ته وګرځوئ کیپ موقعیت
- د تور ټیسټ مشرتابه ته COM جیک او سور ټیسټ د VΩHzCap°C/°F جیک
- د پروبونو سره د نښلولو دمخه ډاډ ترلاسه کړئ چې کپیسیټر په بشپړ ډول خارج شوی دی.
- د کیپسیټر په اوږدو کې د ازموینې تحقیقات وصل کړئ.
- د ظرفیت ارزښت ولولئ.
۶. د فریکونسۍ اندازه کول (Hz)
- روټری ډیل ته وګرځوئ Hz موقعیت
- د تور ټیسټ مشرتابه ته COM جیک او سور ټیسټ د VΩHzCap°C/°F جیک
- د ازموینې پروبونه د سیګنال سرچینې سره موازي سره وصل کړئ.
- د فریکونسۍ ارزښت ولولئ.
۵.۸. د ډایډ ازموینه او دوام ازموینه
- روټری ډیل ته وګرځوئ ډایډ/دوام موقعیت د کارولو SEL د ډایډ ټیسټ او تسلسل ټیسټ ترمنځ د بدلولو لپاره تڼۍ.
- د تور ټیسټ مشرتابه ته COM جیک او سور ټیسټ د VΩHzCap°C/°F جیک
- د ډایډ ټیسټ: سور پروب د انود سره او تور پروب د ډایډ کیتوډ سره وصل کړئ. یو مخکینۍ حجمtagد e ډراپ به ښکاره شي. پروبونه برعکس کړئ؛ یو خلاص سرکټ (OL) باید ښکاره شي.
- د دوام ازموینه: Connect the probes across the circuit or component. A continuous beep indicates a low resistance (continuity).
6.2.7. غیر اړیکه والیومtage (NCV) کشف
- روټری ډیل ته وګرځوئ NCV موقعیت
- Move the top end of the multimeter near the conductor suspected of having AC voltage.
- The multimeter will emit an audible beep and the warning indicator will flash, with the display showing signal strength, if AC voltage کشف شوی دی.
- یادونه: This function is for preliminary detection only. Always use direct contact measurement for precise voltage تصدیق.
۵.۹. د تودوخې اندازه کول (°C/°F)
- روټری ډیل ته وګرځوئ ° سي / ° ف موقعیت
- د K-ډول ترموکوپل پروب سره وصل کړئ COM او VΩHzCap°C/°F jacks، د قطبيتوب څارنه.
- Place the tip of the thermocouple on or near the object whose temperature is to be measured.
- Read the temperature on the display. Use the SEL د سیلسیس او فارنهایټ ترمنځ د بدلولو لپاره تڼۍ.
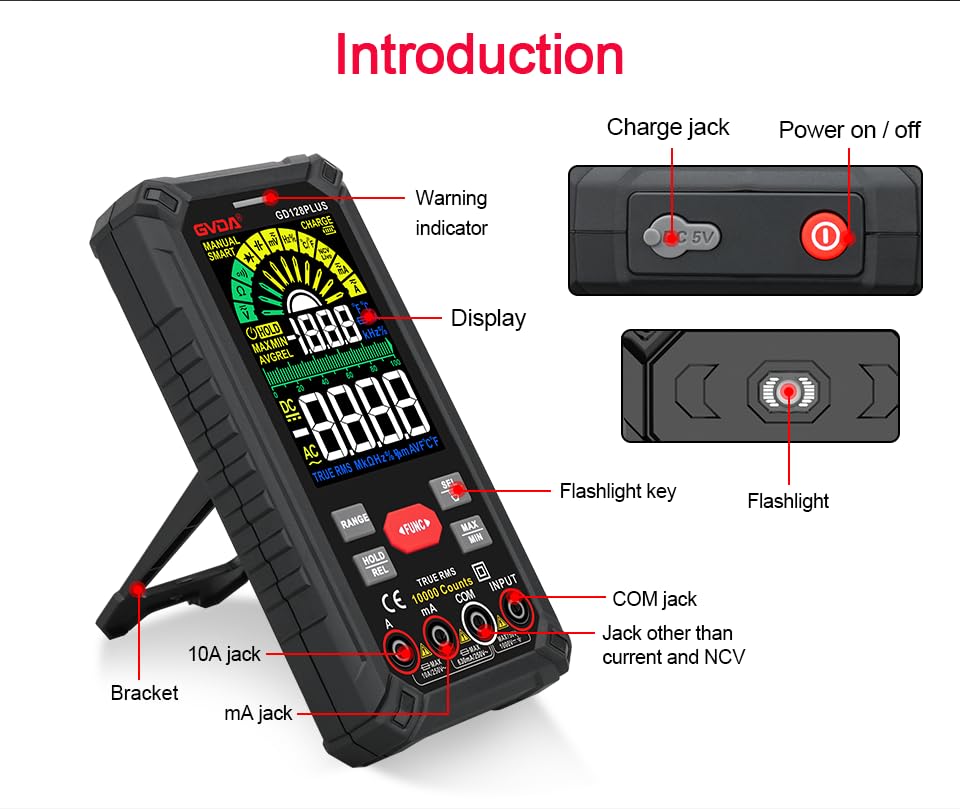
Figure 6.1: The multimeter can perform temperature tests using the included K-type thermocouple probe.
6.3. ځانګړي فعالیتونه
- د رینج تڼۍ: In manual range mode, press to cycle through available ranges. In auto range mode, press to switch to manual range.
- د هولډ / ریل تڼۍ:
- Short press: Activates Data Hold, freezing the current reading. Press again to release.
- Long press: Activates Relative Measurement (REL). The current reading becomes the reference, and subsequent readings show the difference from this reference. Long press again to exit.
- MAX/MIN تڼۍ: Press to enter MAX/MIN recording mode. The display will show the maximum, minimum, and average values detected since activation. Press again to cycle through MAX, MIN, AVG. Long press to exit.
- د فعالیت تڼۍ: Used to switch between different functions within the same rotary dial position (e.g., AC/DC voltage, Diode/Continuity).
- رڼا: Press the dedicated flashlight key on the side to turn the LED flashlight on or off.

Figure 6.2: The multimeter features a convenient LED flashlight for illuminating work areas.
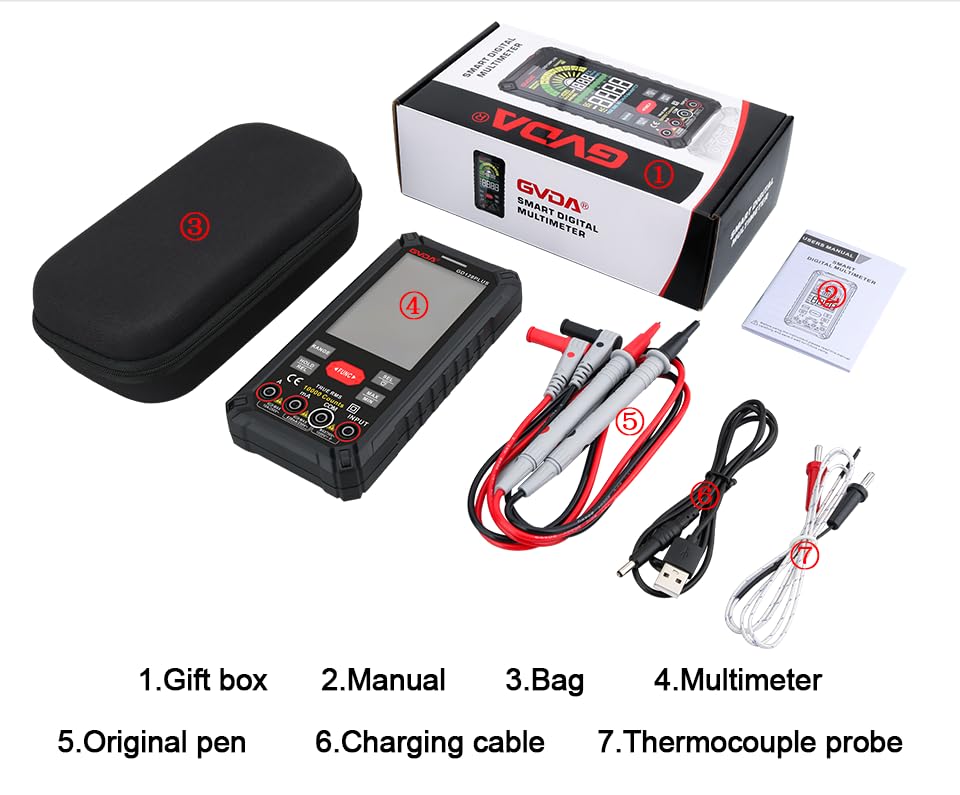
Figure 6.3: The HD Backlight Color Display provides clear and comprehensive measurement information.
7. ساتنه
7.1. پاکول
قضیه د اعلان سره پاک کړئamp cloth and mild detergent. Do not use abrasives or solvents. Ensure the multimeter is off and disconnected from any circuits before cleaning.
.7.2... د بیټرۍ چارج کول
The multimeter is equipped with a rechargeable lithium battery. When the low battery indicator appears on the display, connect the multimeter to a USB power source using the provided charging cable. Avoid fully discharging the battery frequently to prolong its lifespan.
7.3. ذخیره کول
When not in use for extended periods, store the multimeter in a cool, dry place, away from direct sunlight and extreme temperatures. It is advisable to charge the battery periodically (e.g., every 3-6 months) to maintain its health.
8. ستونزه حل کول
| ستونزه | احتمالي لامل | د حل لاره |
|---|---|---|
| ملټي میټر نه چالانېږي. | ټیټ یا ختم شوی بیټرۍ. | Charge the multimeter using the USB cable. |
| "OL" (اوورلوډ) ښودل شوی. | اندازه کول د ټاکل شوي حد یا میټر له اعظمي ظرفیت څخه ډیر دي. | Switch to a higher range (if in manual range) or ensure the measurement is within the meter's specifications. |
| ناسم لوستل. | Incorrect function/range selected; poor test lead connection; external interference. | Verify function and range; ensure test leads are securely connected; move away from strong electromagnetic fields. |
| د دوام غږ نشته. | Circuit is open; multimeter not in continuity mode. | Check the circuit for breaks; ensure the multimeter is set to continuity mode (use SEL button if necessary). |
9. مشخصات
| پیرامیټر | ارزښت |
|---|---|
| ښودل | 10000 Counts, HD Backlight Color LCD |
| رنګارنګ | د ګا Autoو / لاسي لړۍ |
| ریښتیا RMS | هو |
| DC Voltage حد | تر 1000V پورې |
| AC Voltage حد | تر 750V پورې |
| د DC اوسنی سلسله | تر 10A پورې |
| د AC اوسنی لړۍ | تر 10A پورې |
| د مقاومت سلسله | Yes (Ohm) |
| د ظرفیت اندازه | Yes (Farad) |
| د فریکونسی رینج | Yes (Hz) |
| د حرارت درجه | -40°C ته 1000°C / -40°F ته 1832°F |
| د ډایډ ټیسټ | هو |
| د دوام ازموینه | هو (د بزر سره) |
| NCV (غیر تماس والی جلدtage) | هو |
| د بریښنا رسول | 3.7V د چارج وړ لیتیم بیټرۍ |
| Sampد نرخ کچه | نږدې په یوه ثانیه کې 3 ځله |
| ابعاد | ۱۵۰ ملي متره x ۱۸ ملي متره x ۲۴ ملي متره (تقریبا ۵.۹ x ۰.۷ x ۰.۹ انچه) |
| وزن | تقریبا ۱.۱ پونډه (۰.۵ کیلوګرامه) |
| عملیاتي چاپیریال | 0-40°C, relative humidity <80% |
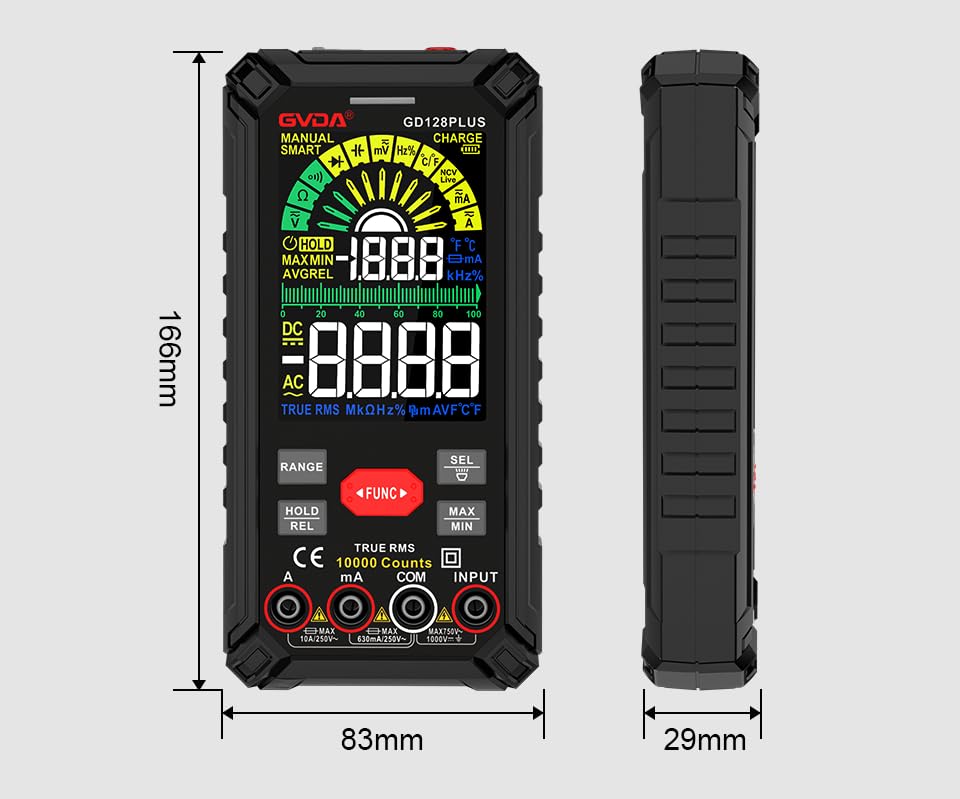
Figure 9.1: Physical dimensions of the GVDA GD128PLUS Multimeter.
10. تضمین او ملاتړ
This GVDA GD128PLUS Digital Multimeter is designed for reliability and performance. For warranty information, technical support, or service inquiries, please refer to the contact details provided by your retailer or visit the official GVDA webسایټ. مهرباني وکړئ د تضمین ادعاوو لپاره د پیرود ثبوت وساتئ.


