د بلیټز وولف BW-VT2 مینی پروجیکٹر کارونکي لارښود
Your comprehensive guide to setting up, operating, and maintaining your BlitzWolf BW-VT2 Mini Projector.
1. محصول ختم شوview
1.1 د بسته محتويات
مهرباني وکړئ تصدیق کړئ چې ټول توکي ستاسو په کڅوړه کې شتون لري:
- BlitzWolf BW-VT2 Mini Projector
- ریموټ کنټرول
- د بریښنا اډاپټر
- HDMI کیبل
- د کارونکي لارښود (دا لاسوند)
1.2 وسیله وسیله
Familiarize yourself with the various parts and ports of your projector.
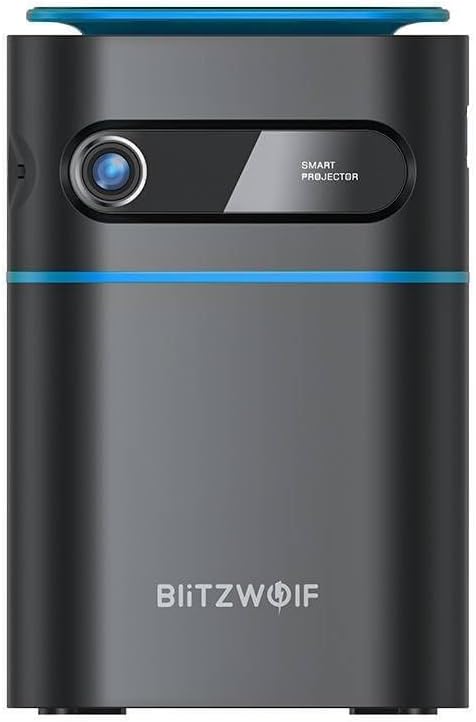
شکل 1.1: مخکی View. This image displays the front of the BlitzWolf BW-VT2 Mini Projector, highlighting the projection lens and the 'SMART PROJECTOR' branding.

Figure 1.2: Projector with Remote Control. This image shows the BlitzWolf BW-VT2 Mini Projector alongside its dedicated remote control, illustrating the compact size of both devices.
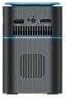
شکل 1.3: شاته View. The rear of the projector is shown, featuring ventilation grilles and various input/output ports.

شکل 1.4: اړخ View. This image highlights the side of the projector where additional connectivity options such as USB and HDMI ports are located.

شکل 1.5: پورته View. The top surface of the projector is visible, featuring the integrated touch control panel for direct interaction.
۳.۲ بندرونه او کنټرولونه
- د HDMI پورټ: Connect to laptops, game consoles, Blu-ray players, etc.
- USB پورټ: د میډیا پلې بیک لپاره USB فلش ډرایوونه وصل کړئ.
- Audio Out (3.5mm) Port: بهرني سپیکرې یا هیډفونونه وصل کړئ.
- په بندر کې DC: د بریښنا اډاپټر سره وصل کړئ.
- د بریښنا تڼۍ: پروجیکټر آن/بندوي.
- د تمرکز څرخ: د انځور وضاحت تنظیموي.
- د ټچ کنټرول پینل: Navigate menus and control playback directly on the device.
2. د تنظیم کولو لارښود
2.1 فعالول
- د بریښنا اډاپټر په پروجیکټر کې د DC IN پورټ سره وصل کړئ.
- د بریښنا اډاپټر په دیوال کې ولګوئ.
- Press and hold the Power Button on the projector or the remote control until the device powers on.
۳.۱ لومړنی ځای پرځای کول
د غوره لپاره viewing experience, consider the following:
- پروجیکټر په یوه مستحکم او فلیټ سطحه کېږدئ.
- Ensure there is adequate ventilation around the projector to prevent overheating.
- Position the projector perpendicular to the projection surface (wall or screen) for a rectangular image.
- Adjust the distance to achieve your desired screen size.
2.3 د تمرکز تنظیم کول
After powering on, adjust the focus to ensure a clear image:
- Rotate the focus wheel located near the lens until the projected image appears sharp and clear.
د ریموټ کنټرول تنظیم
Insert batteries into the remote control before first use:
- د ریموټ کنټرول شاته د بیټرۍ کمپارټ پوښ خلاص کړئ.
- دوه AAA بیټرۍ دننه کړئ (شامل نه دي)، د سم قطبیت ډاډ ترلاسه کول (+/-).
- د بیټرۍ کمپارټ پوښ وتړئ.
3. عملیاتي لارښوونې
3.1 نیویګیشن
You can navigate the projector's interface using either the remote control or the touch control panel on top of the device.
- ریموټ کنټرول: Use the directional buttons (up, down, left, right) to move through menus and the 'OK' button to select.
- د ټچ کنټرول پینل: Swipe and tap on the touch-sensitive surface to navigate.
3.2 د نښلولو وسایل
The BW-VT2 supports various input sources:
- د HDMI آله: Connect your laptop, game console, or other HDMI-enabled devices using an HDMI cable. Select the HDMI input source from the projector's menu.
- د USB آله: Insert a USB flash drive into the USB port. The projector's media player will typically detect the drive automatically, allowing you to browse and play supported media files (ویډیوګانې، عکسونه، موسیقي).
- د وای فای اتصال: Navigate to the 'Settings' menu, then 'Network' or 'Wi-Fi'. Select your Wi-Fi network and enter the password to connect the projector to the internet. This enables access to online streaming apps and updates.
3.3 Android OS Features
As an Android-powered projector, the BW-VT2 offers smart functionalities:
- اپلیکیشن ته لاسرسی: Download and install various streaming apps (e.g., Netflix, YouTube) directly from the pre-installed app store or by sideloading APKs.
- ترتیبات: Customize display settings, audio output, network configurations, and system preferences through the Android settings menu.
- د سکرین عکس العمل: Utilize built-in screen mirroring features (e.g., Miracast, AirPlay compatible apps) to project content from your smartphone or tablet wirelessly.
3.4 د آډیو تولید
The projector has built-in speakers, but you can also connect external audio devices:
- 3.5mm آډیو آوټ: Connect headphones or external speakers via the 3.5mm audio jack for enhanced sound.
4. ساتنه
مناسب ساتنه ستاسو د پروجیکټر اوږد عمر او غوره فعالیت تضمینوي.
۶.۱ د لینز پاکول
To maintain clear image quality, clean the projector lens regularly:
- د نظري لینزونو لپاره په ځانګړي ډول ډیزاین شوی نرم، لینټ نه لرونکی ټوکر وکاروئ.
- په نرمۍ سره لینز په ګرد حرکت سره پاک کړئ.
- د کثافاتو پاکوونکو یا ډیر ځواک کارولو څخه ډډه وکړئ، کوم چې کولی شي لینز سکریچ کړي.
4.2 وینټیلیشن
Ensure proper airflow to prevent overheating:
- Do not block the ventilation vents on the projector.
- پروجیکټر په ښه هوا لرونکي ځای کې وکاروئ.
- Periodically clean dust from the vents using a soft brush or compressed air.
4.3 ذخیره کول
When not in use, store your projector properly:
- Store the projector in a cool, dry place, away from direct sunlight and extreme temperatures.
- Use the original packaging or a protective case to prevent dust accumulation and physical damage.
5. ستونزه حل کول
د عامو ستونزو او د هغوی د حل لارو لپاره دې برخې ته مراجعه وکړئ.
| ستونزه | احتمالي لامل | د حل لاره |
|---|---|---|
| پروجیکټر نه چالانېږي. | د برېښنا اتصال نشته؛ د برېښنا اډاپټر خراب دی. | Ensure power adapter is securely connected to both projector and outlet. Try a different outlet. |
| هیڅ انځور نه دی وړاندې شوی. | Incorrect input source selected; loose HDMI/USB cable. | Verify the correct input source is selected in the menu. Check cable connections. |
| انځور تیاره دی. | Focus not adjusted; projector too close/far. | Rotate the focus wheel until the image is clear. Adjust projection distance if necessary. |
| غږ نشته. | Volume too low; external audio device not connected properly. | Increase volume. Check connections to external speakers/headphones. Ensure audio output is set correctly in settings. |
| د وای فای اتصال ستونزې. | غلط پټنوم؛ د روټر ستونزې؛ د سیګنال مداخله. | Re-enter Wi-Fi password. Restart router. Move projector closer to router. |
| ریموټ کنټرول کار نه کوي. | مړه بیټرۍ؛ خنډ؛ ریموټ نه دی جوړ شوی. | Replace batteries. Ensure no obstruction between remote and projector. |
6. تخنیکي مشخصات
Key specifications of the BlitzWolf BW-VT2 Mini Projector:
| فیچر | مشخصات |
|---|---|
| برانډ | BlitzWolf |
| د ماډل شمیره | BW-VT2EU |
| رنګ | تور |
| د ارتباط ټیکنالوژي | HDMI, USB, VGA, Wi-Fi |
| د ښودلو ریزولوشن | 1920 x 1080 (بشپړ HD) |
| د ښودلو ډول | LCD، LED |
| د فارم فکتور | د پورټ وړ |
| ځانګړي ځانګړتیاوې | Portable, Android OS, Wi-Fi, HDMI, USB, VGA |
| مطابقت لرونکې وسیلې | Laptops, Smartphones, Game Consoles, Blu-ray Players, Media Players, Wi-Fi enabled devices |
| وړاندیز شوي استعمالونه | کور سینما |
7. تضمین او ملاتړ
۸.۱ د جوړونکي تضمین
The BlitzWolf BW-VT2 Mini Projector comes with a د جوړونکي دوه کلن تضمین. دا تضمین د عادي استعمال لاندې موادو او کاریګرۍ نیمګړتیاوې پوښي. مهرباني وکړئ د تضمین ادعاوو لپاره د پیرود ثبوت وساتئ.
7.2 د پیرودونکي ملاتړ
If you encounter issues not covered in the troubleshooting section or require further assistance, please contact BlitzWolf customer support. Refer to the product packaging or the official BlitzWolf webد اړیکو د تازه معلوماتو لپاره سایټ.