1. پیژندنه
This manual provides comprehensive instructions for the safe and effective operation of the ZOYI ZT303 Digital Multimeter. The ZT303 is a high-precision, auto-ranging measurement tool designed for professionals and enthusiasts, capable of measuring voltage, current, resistance, capacitance, frequency, and duty cycle. Please read this manual thoroughly before use to ensure proper operation and to prevent potential hazards.
2. د خوندیتوب معلومات
د میټر خوندي عملیات او خدمت ډاډ ترلاسه کولو لپاره ، دا لارښوونې تعقیب کړئ. د دې اخطارونو په نه لیدو کې پاتې راتلل د سخت ټپ یا مرګ لامل کیدی شي.
- تل ډاډ ترلاسه کړئ چې میټر په سمه توګه فعالیت او حد کې دی مخکې له دې چې اندازه یې کړئ.
- که چیرې میټر خراب ښکاري یا د ازموینې لیډونه زیانمن شوي وي نو مه کاروئ.
- د ټاکل شوي حجم څخه ډیر مه پلي کوئtage، لکه څنګه چې په میټر کې نښه شوې، د ترمینل یا د هر ترمینل او ځمکې ځمکې ترمنځ.
- د حجم سره کار کولو پرمهال خورا احتیاط وکاروئtagد 30V AC RMS، 42V چوکۍ، یا 60V DC څخه پورته. دا حجمونهtagد شاک خطر رامنځته کوي.
- Disconnect the test leads from the circuit before changing functions.
- Remove the test leads from the meter before opening the battery cover.
- Do not operate the meter with the battery cover removed.
- د محلي او ملي خوندیتوب کوډونو ته غاړه کیږدئ.
3. محصول ختم شوview
The ZOYI ZT303 Digital Multimeter features a clear display, a rotary switch for function selection, and various input jacks for test leads.

شکل 3.1: مخکی view of the ZOYI ZT303 Digital Multimeter, showing the display, rotary switch, and input terminals.
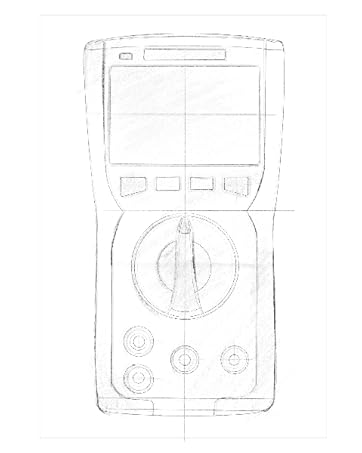
Figure 3.2: Technical drawing illustrating the internal layout or design elements of the ZOYI ZT303 Digital Multimeter.
3.1. اجزاء
- د LCD نندارې: د اندازه کولو لوستل، واحدونه، او د فعالیت شاخصونه ښیې.
- د فعالیت تڼۍ: For selecting specific modes (e.g., RANGE, REL, MAX/MIN, Hz, SELECT, HOLD).
- روټري سویچ: Used to select the desired measurement function (e.g., V~, V-, A~, A-, Ω, NCV).
- داخله جیکونه:
- COM جیک: Common terminal for all measurements. Connect the black test lead here.
- VHzΩCAP Diode Jack: د حجم لپاره داخلولtage, frequency, resistance, capacitance, and diode/continuity tests. Connect the red test lead here for these functions.
- mAµA Jack: د ملی لپاره ان پټampمخکې او کوچنيampere current measurements. Connect the red test lead here for these functions.
- ۱۰ الف جک: د ۱۰ لپاره ان پټ Ampere current measurements. Connect the red test lead here for high current measurements.
4. ترتیب کول
4.1. د بیټرۍ نصب کول
- Ensure the multimeter is powered off and disconnect all test leads.
- د بیټرۍ د برخې پوښ د واحد په شا کې ومومئ.
- د ساتلو سکرو خلاص کړئ او پوښ لرې کړئ.
- Insert new batteries (e.g., 2 x AAA or 9V, refer to the battery compartment for specific type) observing the correct polarity.
- د بیټرۍ پوښ بدل کړئ او د سکرو سره یې خوندي کړئ.
۲. د ازموینې لیډونو نښلول
Always connect the black test lead to the COM jack. Connect the red test lead to the appropriate input jack based on the measurement function:
- د والی لپارهtage، مقاومت، ظرفیت، فریکونسي، ډایډ، او دوام: سره لیډ د VHzΩCAP Diode جیک
- For mA/µA Current: Connect the red lead to the mAµA جیک
- For 10A Current: Connect the red lead to the 10A جیک
5. عملیاتي لارښوونې
5.1. بریښنا فعال/بند
Turn the rotary switch from the "OFF" position to any desired measurement function to power on the meter. To power off, turn the rotary switch back to the "OFF" position.
۲. اتوماتیک رینج کول
The ZT303 features auto-ranging, which automatically selects the appropriate measurement range. For manual range selection, press the بدل کړئ تڼۍ
5.3. DC/AC حجمtage اندازه کول (V)
- ته د څرخېدو سویچ وټاکئ V~ (AC جلدtage) یا V- (DC Voltage) موقف.
- Connect the black test lead to the COM jack and the red test lead to the VHzΩCAP Diode jack.
- د ازموینې پروبونه د سرکټ یا برخې په اوږدو کې وصل کړئ ترڅو اندازه شي.
- ټوک ولولئtagد LCD نندارې ارزښت.
5.4. DC/AC Current Measurement (A, mA, µA)
احتیاط: هیڅکله میټر د حجم سره موازي مه نښلوئ.tage source when measuring current. This can damage the meter and the circuit.
- Set the rotary switch to the appropriate current range (A~, A-, mAµA~, mAµA-).
- Connect the black test lead to the COM jack. Connect the red test lead to the mAµA jack for low current or the 10A jack for high current.
- Open the circuit where current is to be measured and connect the meter in series with the load.
- په LCD نندارې کې اوسنی ارزښت ولولئ.
۶.۳. د مقاومت اندازه کول (Ω)
احتیاط: د مقاومت اندازه کولو دمخه ډاډ ترلاسه کړئ چې سرکټ غیر انرژي شوی او ټول کپیسیټرونه خارج شوي دي.
- ته د څرخېدو سویچ وټاکئ اومه موقعیت
- Connect the black test lead to the COM jack and the red test lead to the VHzΩCAP Diode jack.
- Connect the test probes across the component to be measured.
- په LCD ډسپلې کې د مقاومت ارزښت ولولئ.
5.6. Capacitance Measurement (F)
احتیاط: ډاډ ترلاسه کړئ چې د اندازه کولو دمخه کپیسیټر په بشپړ ډول خارج شوی ترڅو میټر ته زیان ونه رسوي.
- ته د څرخېدو سویچ وټاکئ CAP position (often shared with Ω or Diode, use SELECT button if needed).
- Connect the black test lead to the COM jack and the red test lead to the VHzΩCAP Diode jack.
- Connect the test probes across the capacitor terminals.
- په LCD نندارې کې د ظرفیت ارزښت ولولئ.
5.7. Frequency/Duty Cycle Measurement (Hz/%)
- ته د څرخېدو سویچ وټاکئ هرز /٪ position (often shared with voltage or other functions, use SELECT button if needed).
- Connect the black test lead to the COM jack and the red test lead to the VHzΩCAP Diode jack.
- د سیګنال سرچینې په اوږدو کې د ازموینې پروبونه وصل کړئ.
- په LCD ډسپلې کې د فریکونسۍ یا دندې دورې ارزښت ولولئ.
5.8. Diode Test and Continuity Test
- ته د څرخېدو سویچ وټاکئ ډایډ/دوام موقعیت د کارولو انتخاب button to toggle between diode test and continuity test.
- Connect the black test lead to the COM jack and the red test lead to the VHzΩCAP Diode jack.
- د ډایډ ټیسټ: سور پروب د انود سره او تور پروب د ډایډ کیتوډ سره وصل کړئ. یو مخکینۍ حجمtage drop will be displayed. Reverse the probes; an "OL" (Overload) reading indicates a good diode.
- د دوام ازموینه: Connect the probes across the circuit or component. A continuous beep and a low resistance reading indicate continuity.
5.9. غیر اړیکه والیومtage (NCV) کشف
- ته د څرخېدو سویچ وټاکئ NCV موقعیت
- Move the top part of the meter close to the conductor or outlet.
- The meter will emit an audible beep and/or flash an LED indicator when AC voltage کشف شوی دی.
۱۰. د معلوماتو ساتلو دنده
فشار ورکړئ هوډ button to freeze the current reading on the display. Press it again to release the hold function.
5.11. MAX/MIN Function
فشار ورکړئ MAX/MIN button to enter MAX/MIN recording mode. The meter will display the maximum or minimum reading detected since the mode was activated. Press again to cycle between MAX, MIN, and current reading. Hold to exit.
5.12. Relative Measurement (REL)
فشار ورکړئ REL button to store the current reading as a reference value. Subsequent measurements will be displayed as the difference from this reference value. Press again to exit relative mode.
6. ساتنه
6.1. پاکول
قضیه د اعلان سره پاک کړئamp ټوکر او نرم صابون. د کثافاتو یا محلولونو څخه کار مه اخلئ. ډاډ ترلاسه کړئ چې میټر د کارولو دمخه په بشپړه توګه وچ دی.
6.2. د بیټرۍ بدلول
When the low battery indicator appears on the display, replace the batteries as described in Section 4.1. Prompt replacement ensures accurate readings and proper operation.
6.3. د فیوز بدلول
If the current measurement function fails, the fuse may need replacement. Refer to the specific fuse ratings printed near the input jacks or inside the battery compartment. Fuse replacement typically involves opening the back case (after removing batteries) and carefully replacing the blown fuse with one of the identical type and rating. If unsure, consult a qualified technician.
7. ستونزه حل کول
| ستونزه | احتمالي لامل | د حل لاره |
|---|---|---|
| هیڅ ښودنه نشته یا تیاره ښودنه نشته | ټیټ یا مړه بیټرۍ | Replace batteries (Section 4.1) |
| "OL" (اوورلوډ) ښودل شوی | اندازه کول د ټاکل شوي حد یا میټر اعظمي ظرفیت څخه ډیر دي | Select a higher range (if in manual range) or ensure measurement is within meter's limits. |
| غلط لوستل | Incorrect function selected, poor test lead connection, or damaged test leads | Verify function, check lead connections, inspect and replace damaged leads. |
| اوسنی اندازه کول کار نه کوي | فلج شوی فیوز | Replace fuse (Section 6.3) |
8. مشخصات
| فیچر | تفصیل |
|---|---|
| برانډ | ZOYI |
| د ماډل شمیره | ZT303 |
| د محصول ابعاد | 4.53 x 1.97 x 7.68 انچه |
| د توکي وزن | ۰.۹۸۶ اونس (۲۷.۹۴ ګرامه) |
| د بریښنا سرچینه | د بیټرۍ چلول |
| رنګ | آبي |
| ښودل | Digital LCD, 19999 Counts (typical for ZT303 series) |
| رنګارنګ | اتومات / لاسي رینج |
| ځانګړي ځانګړتیاوې | True RMS, NCV, Data Hold, Backlight, MAX/MIN, REL |
یادونه: تفصيلي بریښنایی مشخصات (د مثال په توګه، حجمtage/current ranges, accuracy) are typically printed on the device or included in a separate specification sheet.
9. تضمین او ملاتړ
Warranty information for the ZOYI ZT303 Digital Multimeter is typically provided at the point of purchase or within the product packaging. For specific warranty terms, technical support, or service inquiries, please refer to the official ZOYI webسایټ ته مراجعه وکړئ یا خپل مجاز پلورونکي سره اړیکه ونیسئ.
د نورو مرستو لپاره، لیدنه وکړئ: ZOYI Official Flagship Store on Amazon


