1. پیژندنه
The Mastech MS8233B is a compact, handheld digital multimeter designed for measuring AC/DC voltage, DC current, resistance, diode, continuity, and temperature. It features a 2000-count display, data hold function, and low battery indication, making it suitable for various electrical testing applications in domestic and electronics environments.
2. د خوندیتوب معلومات
To ensure safe operation and service of the meter, please read this manual thoroughly before use. Failure to observe safety warnings can result in severe injury or death.
- تل ډاډ ترلاسه کړئ چې میټر د کارولو دمخه په ښه کاري حالت کې دی.
- د ټاکل شوي حجم څخه ډیر مه پلي کوئtage, which is 600V CAT III.
- د حجم سره کار کولو پر مهال له احتیاط څخه کار واخلئtagد 30V AC RMS، 42V پیک، یا 60V DC څخه پورته، ځکه چې دا د شاک خطر رامینځته کوي.
- تل د دندو بدلولو دمخه د ازموینې لیډونه له سرکټ څخه جلا کړئ.
- کله چې د ټیټ بیټرۍ شاخص څرګند شي سمدلاسه بیټرۍ بدله کړئ.
- Do not operate the meter if the battery cover is not properly closed.
- د محلي او ملي خوندیتوب کوډونو ته غاړه کیږدئ.
3. محصول ختم شوview
The Mastech MS8233B Digital Multimeter features a clear display, a rotary function switch, and dedicated input jacks for various measurements.

شکل 3.1: مخکی view of the Mastech MS8233B Digital Multimeter. This image displays the LCD screen, rotary function switch, input jacks, and control buttons.
3.1 اجزا
- د LCD نندارې: د اندازه کولو لوستل، واحدونه، او د فعالیت شاخصونه ښیې.
- د روټري سویچ فعالیت: Used to select the desired measurement function (e.g., V~, V-, A-, Ω, Diode, Continuity, Temp).
- تڼۍ ونیسئ: په ښودنه کې اوسنی لوستل کنګل کوي.
- د شاته رڼا تڼۍ: د ټیټ رڼا په شرایطو کې د ښه لید لپاره د ښودنې بیک لایټ فعالوي.
- VΩmA Input Jack: د حجم لپاره مثبت ان پټtage, resistance, diode, continuity, and current measurements up to 200mA.
- د COM ان پټ جیک: د ټولو اندازه کولو لپاره عام (منفي) ان پټ.
- ۱۰A ان پټ جیک: د لوړ جریان اندازه کولو لپاره مثبت ان پټ (تر 10A پورې).
4. ترتیب کول
4.1 د بیټرۍ نصب کول
The MS8233B requires 2 LR44 batteries for operation. Ensure the batteries are installed correctly before first use or when replacing them.
- ملټي میټر بند کړئ او د ازموینې ټولې لیډونه جلا کړئ.
- د میټر په شا کې د بیټرۍ کڅوړه ومومئ.
- د بیټرۍ کمپارټ پوښ خلاصولو لپاره سکرو ډرایور وکاروئ.
- Insert the 2 LR44 batteries, observing the correct polarity (+ and -).
- د بیټرۍ کمپارټ پوښ بدل کړئ او د سکرو سره یې خوندي کړئ.
5. عملیاتي لارښوونې
د هر ډول اندازه کولو دمخه، ډاډ ترلاسه کړئ چې د ازموینې لیډونه په سمه توګه د میټر او د ازموینې لاندې سرکټ سره وصل دي.
5.1 عمومي عملیات
- Turn the rotary switch from the "OFF" position to the desired measurement function.
- Connect the test leads to the appropriate input jacks and the circuit.
- د اندازه کولو ارزښت په LCD ډسپلې کې ولولئ.
- To turn off the meter, rotate the switch back to the "OFF" position.
5.2 DC Voltagد e اندازه کول (V-)
- د روټري سویچ مطلوب DC حجم ته تنظیم کړئtagد e رینج (د مثال په توګه، 200mV، 2V، 20V، 200V، 600V).
- د سور ټیسټ لیډ د VΩmA جیک سره وصل کړئ او تور ټیسټ لیډ COM جیک ته وصل کړئ.
- د ازموینې لیډونه د هغه برخې یا سرکټ په اوږدو کې وصل کړئ چې اندازه کیږي.
5.3 AC Voltagد e اندازه کول (V~)
- د روټري سویچ مطلوب AC حجم ته تنظیم کړئtagد e رینج (د مثال په توګه، 200V، 600V).
- د سور ټیسټ لیډ د VΩmA جیک سره وصل کړئ او تور ټیسټ لیډ COM جیک ته وصل کړئ.
- د ازموینې لیډونه د AC حجم په اوږدو کې وصل کړئtage سرچینه.
۴.۲ د ډي سي اوسني اندازه کول (A-)
- د روټري سویچ مطلوب DC اوسني حد ته تنظیم کړئ (د مثال په توګه، 200µA، 2mA، 20mA، 200mA، 10A).
- For currents up to 200mA, connect the red test lead to the VΩmA jack. For currents up to 10A, connect the red test lead to the 10A jack. Always connect the black test lead to the COM jack.
- Connect the meter in series with the circuit to measure the current.
- احتیاط: Do not attempt to measure currents exceeding 200mA through the VΩmA jack or 10A through the 10A jack.
۴.۶ د مقاومت اندازه کول (Ω)
- د روټري سویچ مطلوب مقاومت حد ته تنظیم کړئ (د مثال په توګه، 200Ω، 2kΩ، 20kΩ، 200kΩ، 2MΩ).
- د سور ټیسټ لیډ د VΩmA جیک سره وصل کړئ او تور ټیسټ لیډ COM جیک ته وصل کړئ.
- Connect the test leads across the resistor or component to be measured. Ensure the circuit is de-energized.
5.6 د ډایډ ټیسټ
- د روټري سویچ د ډایډ سمبول ته تنظیم کړئ.
- د سور ټیسټ لیډ د VΩmA جیک سره وصل کړئ او تور ټیسټ لیډ COM جیک ته وصل کړئ.
- سور ټیسټ لیډ د انود سره او تور ټیسټ لیډ د ډایډ کیتوډ سره وصل کړئ. ښودنه به د مخکینۍ حجم وښیېtage غورځول.
- Reverse the leads. An open circuit (OL) reading indicates a good diode. A reading in both directions or no reading indicates a faulty diode.
5.7 د دوام ازموینه
- د روټري سویچ د دوام سمبول ته تنظیم کړئ.
- د سور ټیسټ لیډ د VΩmA جیک سره وصل کړئ او تور ټیسټ لیډ COM جیک ته وصل کړئ.
- Connect the test leads across the circuit or component. If the resistance is less than approximately 60Ω, the buzzer will sound, indicating continuity.
5.8 دحرارت اندازه کول
While the product title mentions temperature, the MS8233B model's detailed specifications do not explicitly list a temperature function. If your specific unit includes this feature, typically you would:
- Set the rotary switch to the Temperature function (usually marked with °C or °F).
- Connect a K-type thermocouple (if included) to the VΩmA and COM jacks, observing polarity.
- Place the thermocouple probe at the point where temperature needs to be measured.
5.9 د ډیټا هولډ فعالیت
- Press the "HOLD" button to freeze the current reading on the display.
- Press the "HOLD" button again to release the reading and resume live measurements.
۷.۶ د شاته رڼا فعالیت
- Press the backlight button (often marked with a sun symbol) to turn on the display backlight.
- Press the button again to turn off the backlight.
6. ساتنه
6.1 د بیټرۍ بدلول
When the low battery indicator appears on the display, replace the batteries as described in Section 4.1. Always use 2 new LR44 batteries.
6.2 پاکول
قضیه د اعلان سره پاک کړئamp ټوکر او نرم صابون. د کثافاتو یا محلولونو څخه کار مه اخلئ. ډاډ ترلاسه کړئ چې میټر د کارولو دمخه په بشپړه توګه وچ دی.
7. ستونزه حل کول
- نه ښودنه/کمزور ښودنه: د بیټرۍ نصب او چارج وګورئ. که اړتیا وي نو بیټرۍ بدل کړئ.
- "OL" یا "1" په ښودنه کې: Indicates an over-range condition or open circuit. Select a higher range or check connections.
- ناسم لوستل: Ensure correct function selection, proper lead connection, and that the circuit is de-energized for resistance/diode tests.
- No Continuity Buzzer: Check if the resistance is above 60Ω or if the function is correctly selected.
8. مشخصات
The following table outlines the technical specifications for the Mastech MS8233B Digital Multimeter.
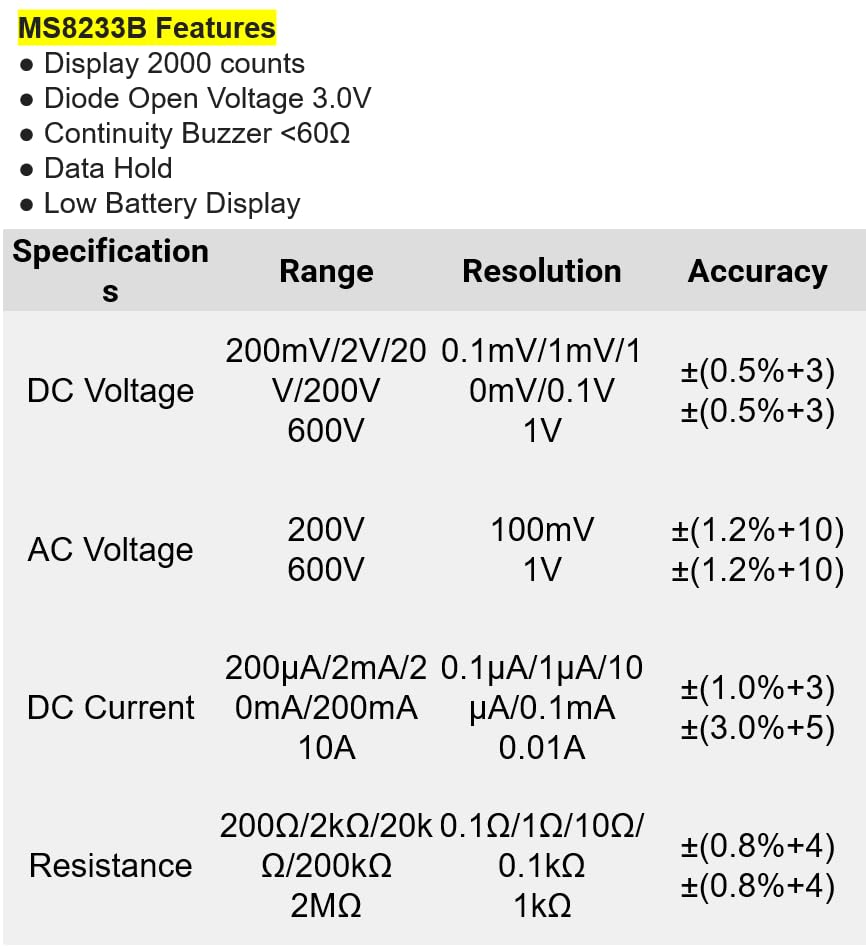
شکل 8.1: Detailed specifications for the Mastech MS8233B, including ranges, resolutions, and accuracies for various measurements.
| مشخصات | ارزښت |
|---|---|
| ښودل | د 2000 شمیره |
| ډایډ خلاص والیومtage | 3.0V |
| دوامدار بجر | <60Ω |
| د معلوماتو ساتل | هو |
| د ټیټ بیټرۍ ښودنه | هو |
| DC Voltage حد | 200mV، 2V، 20V، 200V، 600V |
| AC Voltage حد | 200V، 600V |
| د DC اوسنی سلسله | ۲۰۰µA، ۲mA، ۲۰mA، ۲۰۰mA، ۱۰A |
| د مقاومت سلسله | 200Ω, 2kΩ, 20kΩ, 200kΩ, 2MΩ |
| د خوندیتوب درجه | کیټ III 600V |
| د بریښنا سرچینه | 2 x LR44 Batteries (included) |
| د محصول ابعاد | 20 x 15 x 25 سانتي متره |
| د توکي وزن | 1 کیلوګرامه |
| جوړونکی | ماسټر |
| د توکي ماډل شمیره | YQ-MS8233B |
| د اصلي هیواد | تایوان |

شکل 8.2: A comparison table showing features across various Mastech digital multimeter models, including the MS8233B.
9. تضمین او ملاتړ
For warranty information, technical support, or service inquiries, please refer to the documentation provided with your purchase or contact your retailer. Keep your purchase receipt as proof of purchase for any warranty claims.


