1. د خوندیتوب مهمې لارښوونې
Please read and save these instructions before operating your humidifier. Failure to follow these instructions may result in electric shock, fire, or serious injury.
- تل د رطوبت ضد مایع په یوه کلک، فلیټ، د اوبو په وړاندې مقاومت لرونکي سطحه کېږدئ چې لږترلږه ۱۲ انچه (۳۰ سانتي متره) د دیوالونو او وسایلو څخه لرې وي.
- د رطوبت ورکوونکی اساس په اوبو یا نورو مایعاتو کې مه ډوبوئ.
- د ډکولو، پاکولو، او کله چې په کارولو کې نه وي، وسیله خلاص کړئ.
- رطوبت د خراب شوي تار یا پلګ سره مه چلوئ.
- Use only clean, cool tap water, or preferably distilled/filtered water. Do not use hot water.
- Do not add essential oils directly into the water tank. Use the dedicated essential oil tray.
- د ماشومانو او څارویو د لاسرسي څخه لرې وساتئ.
- د هوا داخلې یا بهر مه بندوئ.
2. محصول ختم شوview
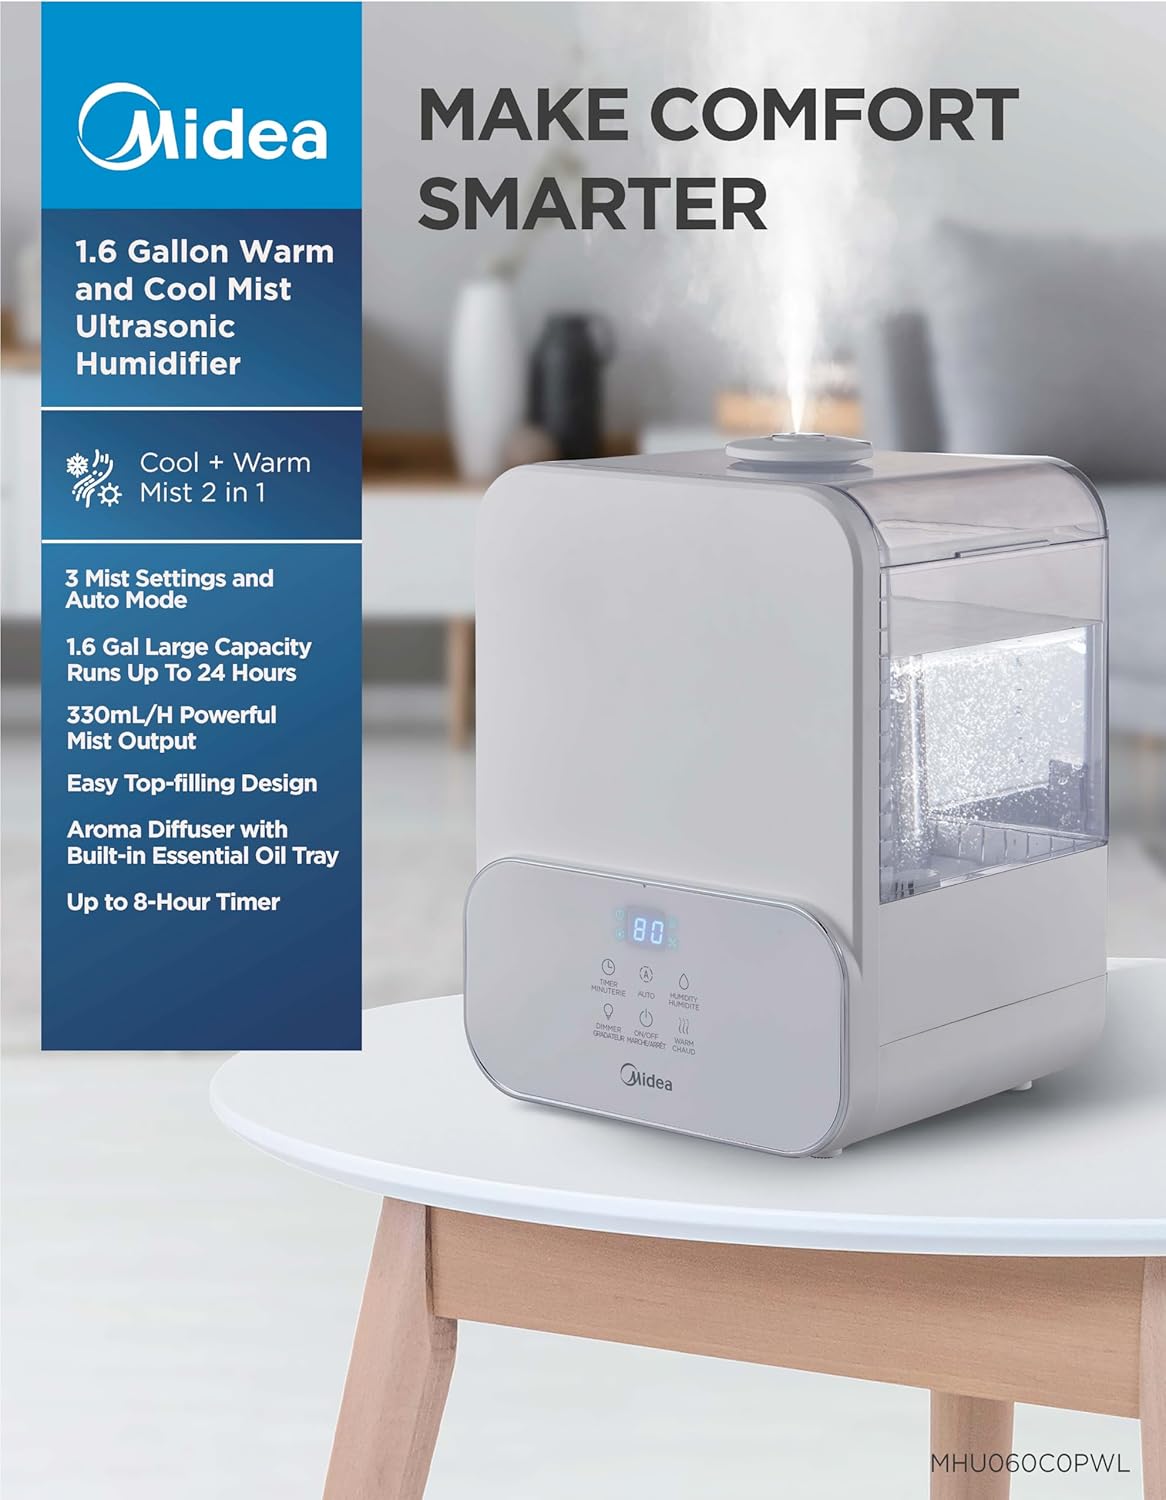
Familiarize yourself with the components and controls of your Midea SCK-3Q60B Humidifier.

شکل 2.1: مخکی view of the Midea SCK-3Q60B Humidifier, highlighting the digital control panel and water tank. The display shows the current humidity level.

شکل 2.2: تفصيلي view of the humidifier's intuitive touch control panel, displaying all function icons and the digital humidity readout.
2.1 اجزا
- د اوبو ټانک: د اوبو د ذخیره کولو لپاره شفاف ټانک.
- د بنسټ واحد: Contains the ultrasonic transducer, fan, and control electronics.
- د دوړو نوزل: Directs mist output.
- د تضمین اداره: Touch-sensitive interface with digital display.
- د اړینو تیلو ټری: Small compartment for adding essential oils.
- د پاکولو برش: د ساتنې لپاره شامل دي.
2.2 د کنټرول پینل دندې
- د ټایمر تڼۍ: Sets operating time (0/1/2/4/8 hours).
- د اتومات تtonۍ: Activates Smart Humidity Control to maintain a set humidity level.
- د رطوبت تtonۍ: Adjusts target humidity level in Auto Mode.
- د ډیمر تڼۍ: Controls the brightness of the display and night light.
- آن/بند تڼۍ: واحد فعال یا بندوي.
- Warm Mist Button: Toggles warm mist function.
- ډیجیټل ډیزاین: Shows current humidity, timer settings, and other indicators.
3. ترتیب کول
Follow these steps for initial setup of your humidifier.
شکل 3.1: The Midea SCK-3Q60B Humidifier in operation, releasing a fine mist. This image illustrates the unit's compact size and how it appears in a typical home setting.
- خلاص کړئ: Carefully remove the humidifier from its packaging. Retain packaging for future storage.
- ځای په ځای کول: Place the humidifier on a flat, stable, water-resistant surface. Ensure it is at least 12 inches (30 cm) away from walls, furniture, and electronic devices. Do not place it on carpet or near heat sources.
- د اوبو ټانک ډک کړئ:
- د رطوبت کونکي پورتنۍ پوښ لرې کړئ.
- Pour clean, cool tap water into the tank. For best performance and to reduce mineral buildup, distilled or filtered water is recommended. Do not exceed the maximum fill line.
- پورته پوښ په خوندي ډول بدل کړئ.

شکل 3.2: Illustration of the easy top-fill design, showing water being poured directly into the humidifier's water tank from above.
- بریښنا وصل کړئ: Plug the power cord into a standard 120V~ 60Hz electrical outlet. The unit will beep once, and the display will briefly illuminate.
4. عملیاتي لارښوونې
Learn how to use the various functions of your Midea humidifier.
4.1 Power On/Off and Mist Level
- فشار ورکړئ آن/بند button to turn the humidifier on. It will start operating at the default mist level.
- فشار ورکړئ آن/بند button repeatedly to cycle through 3 mist levels (Low, Medium, High).
- فشار ورکړئ او ونیسئ آن/بند button for 2 seconds to turn the humidifier off.
4.2 Warm Mist Function
- فشار ورکړئ ګرمه دوړه button to activate the warm mist function. The warm mist indicator will illuminate on the display.
- فشار ورکړئ ګرمه دوړه button again to turn off the warm mist function.
- Note: It may take several minutes for the warm mist to reach its full temperature.

شکل 4.1: A visual representation highlighting the dual warm and cool mist capabilities of the humidifier, indicating its suitability for different seasonal needs.
4.3 Smart Humidity Control (Auto Mode)
- فشار ورکړئ اتومات button to activate Auto Mode. The humidifier will automatically adjust mist output to maintain a comfortable humidity level (default 55% RH).
- To set a target humidity, press the رطوبت button while in Auto Mode. Each press will increase the target humidity by 5% (from 40% to 90% RH). The humidifier will stop misting once the target humidity is reached and resume when it drops below the target.
- فشار ورکړئ اتومات button again to exit Auto Mode.
4.4 د ټیمر فعالیت
- فشار ورکړئ ټایمر button to set an operating duration. Each press cycles through 0, 1, 2, 4, and 8 hours.
- د ټاکل شوي وخت له تېرېدو وروسته به رطوبت کوونکی په اتوماتيک ډول بند شي.
- To cancel the timer, cycle through the options until '0' hours is displayed.
4.5 د شپې رڼا
- فشار ورکړئ ډیمر تڼۍ د شپې رڼا فعاله کړئ.
- فشار ورکړئ ډیمر button repeatedly to cycle through 3 color options (e.g., blue, green, red) or turn it off.
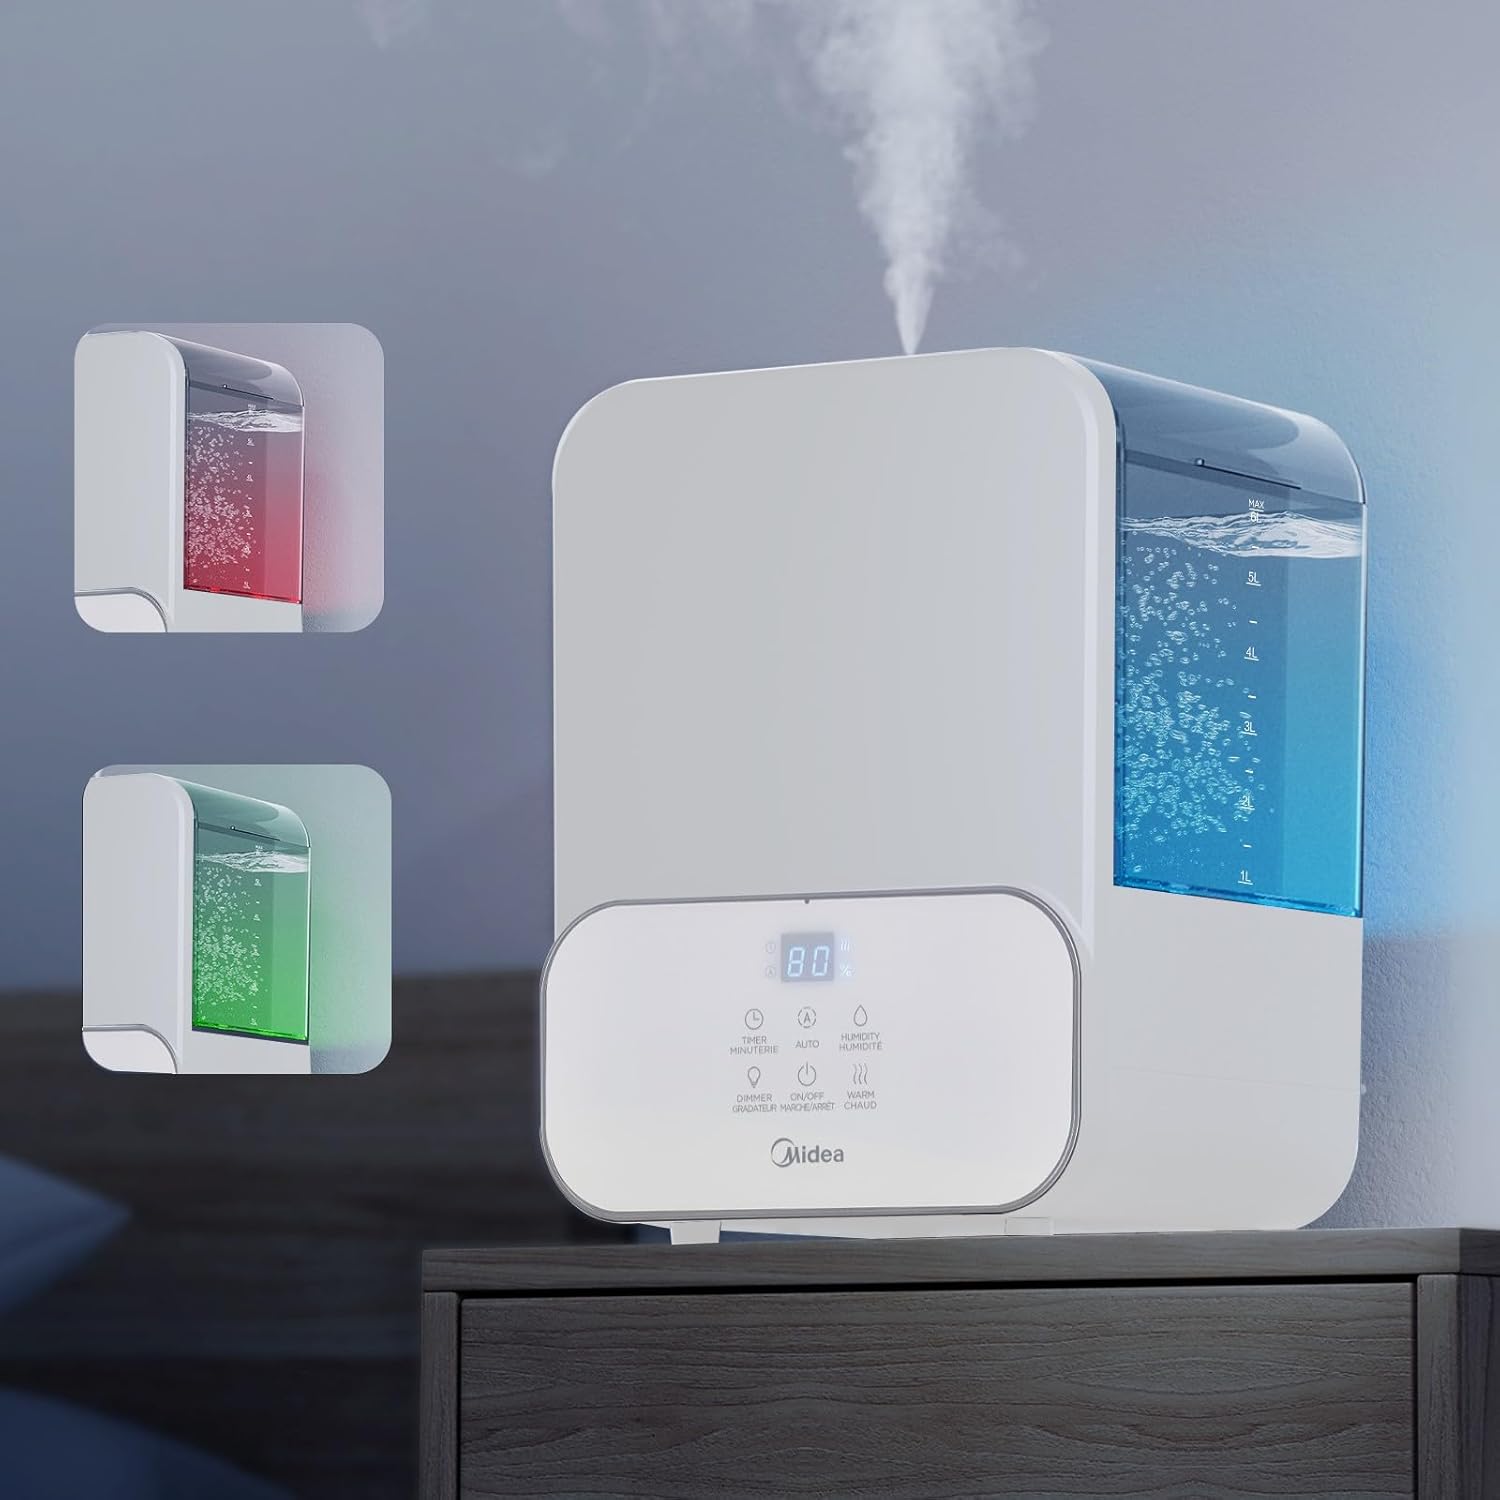
شکل 4.2: This image demonstrates the humidifier's integrated 3-color night light feature, showing the unit illuminated with blue and red ambient lighting.
۵.۳ د ضروري تیلو ټری
- د لازمي غوړو ټری د رطوبت کونکي بیس په اړخ یا شا کې ومومئ.
- ټری راوباسئ او د خپلې خوښې د ضروري تیلو څو څاڅکي د خوشبو په پیډ کې واچوئ.
- Slide the tray back into place. The mist will carry the fragrance into the air.
- Caution: Do not add essential oils directly into the water tank, as this can damage the unit and void the warranty.
5. ساتنه
منظم پاکول د غوره فعالیت او حفظ الصحې لپاره اړین دي.
5.1 ورځنی ساتنه
- Unplug the humidifier before refilling.
- د ټانک او بیس څخه پاتې اوبه خالي کړئ.
- ټانک او اساس د پاک ټوکر سره وچ کړئ.
5.2 په اونۍ کې پاکول
- واحد خلاص کړئ.
- د اوبو ټانک پاک کړئ: Remove the top cover and tank. Wipe the inside of the tank with a soft cloth. For mineral buildup, fill the tank with a mixture of 1 teaspoon of white vinegar and 1 gallon of water. Let it stand for 30 minutes, then rinse thoroughly.
- د بنسټ واحد پاک کړئ: Carefully pour out any water from the base. Add 1/2 cup of white vinegar to the base and let it soak for 30 minutes. Use the included cleaning brush to gently clean the ultrasonic transducer (the small disc) and heating element (for warm mist). Do not scrub aggressively. Rinse the base thoroughly under tap water, ensuring no water enters the air outlet.
- Clean the Essential Oil Tray: Remove the aroma pad and wash it with mild soap and water. Rinse and dry completely before reinserting.
- د بیا یوځای کولو دمخه ټولې برخې په بشپړه توګه وچ کړئ.
5.3 ذخیره کول
- Before storing, perform a thorough cleaning as described in Section 5.2.
- ډاډ ترلاسه کړئ ټولې برخې په بشپړه توګه وچې دي.
- Store the humidifier in its original packaging in a cool, dry place.
6. ستونزه حل کول
د عامو ستونزو او د هغوی د حل لارو لپاره دې برخې ته مراجعه وکړئ.
| ستونزه | احتمالي لامل | د حل لاره |
|---|---|---|
| نه دوړې او نه کمزورې دوړې | Low water level; Water tank not properly seated; Transducer dirty; Air inlet/outlet blocked. | Refill water tank; Ensure tank is seated correctly; Clean transducer (see Maintenance); Check for obstructions. |
| د رطوبت ورکونکي شاوخوا سپینه دوړې | سختې اوبه کارول کیږي. | Use distilled or filtered water. Clean the unit regularly to remove mineral buildup. |
| غیر معمولي شور | Humidifier not on a flat surface; Water tank not seated correctly; Foreign object in base. | Place on a flat surface; Reseat water tank; Check and remove any foreign objects (unplug first). |
| Warm mist not warm | Insufficient time for heating; Heating element malfunction. | Allow several minutes for the heating element to warm up. If issue persists, contact customer support. |
| د رطوبت ناسمه مطالعه | Sensor obstructed or dirty; Placement too close to mist output. | Ensure the sensor area is clean and unobstructed. Reposition the humidifier if it's too close to the mist output. Note that internal sensors may vary slightly from external hygrometers. |
7. مشخصات
| ماډل | SCK-3Q60B |
| ظرفیت | 6 لیټر (1.6 ګیلن) |
| ځواک | 105W |
| والیtage/فریکونسي | 120V ~ 60Hz |
| اعظمي دوړې محصول | 330 ملی لیتر/ه |
| ابعاد (L×W×H) | 9.25 × 8.07 × 12.80 انچه |
| خالص وزن | 5.07 پونډه |
| وړاندیز شوی د خونې ساحه | تر 400 مربع فوټ پورې |
8. تضمین او ملاتړ
دا محصول د جوړونکي تضمین لخوا پوښل شوی. مهرباني وکړئ د ځانګړو شرایطو او مقرراتو لپاره ستاسو د پیرود سره شامل شوي تضمین کارت ته مراجعه وکړئ.
For technical assistance, troubleshooting beyond this manual, or warranty claims, please contact Midea Customer Support. Contact information can typically be found on the Midea official webپه سایټ یا ستاسو د محصول په بسته بندۍ کې.


