1. پیژندنه
The Tecmojo 42U Server Rack Network Cabinet is designed to house and organize 19-inch server, networking, AV, and IT equipment. It features a robust alloy steel construction, a clear front door, and includes essential accessories such as a Power Distribution Unit (PDU), cooling fans, rack rails, and a shelf. This cabinet provides a secure and organized environment for your valuable equipment.
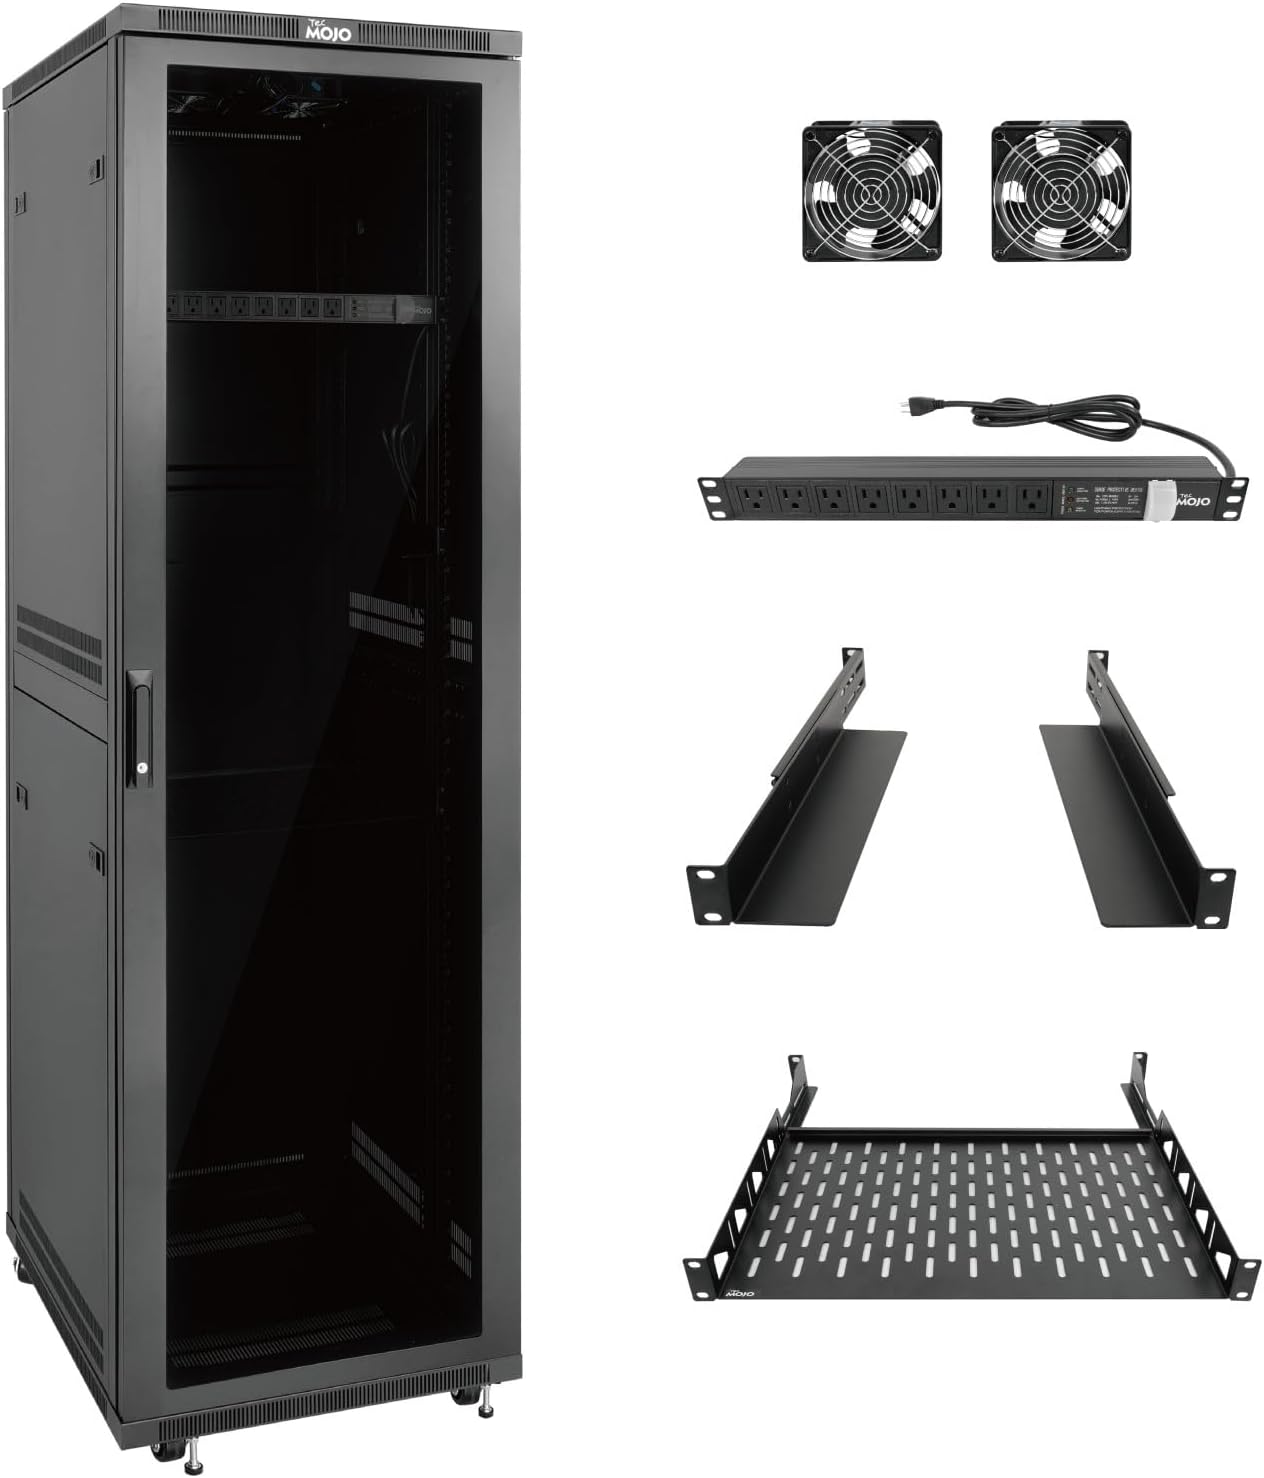
Image 1: Tecmojo 42U Server Rack Network Cabinet with PDU, cooling fans, rack rails, and shelf.
2. د خوندیتوب معلومات
Please read all safety instructions before installation and operation to prevent injury or damage to equipment.
- Ensure the cabinet is placed on a stable, level surface capable of supporting its weight and the weight of all installed equipment (up to 1800 lbs / 816 kg).
- Always use appropriate lifting techniques or assistance when moving the cabinet, especially when loaded.
- Do not overload the cabinet or individual shelves. Refer to the specifications for weight limits.
- Ensure proper grounding for all electrical components, including the PDU.
- Keep all ventilation openings clear to prevent overheating.
- Only qualified personnel should perform electrical connections and maintenance.
- Use caution when handling tools and hardware during assembly to prevent injury.
- Secure all equipment within the rack using appropriate mounting hardware to prevent accidental dislodgement.
3. د بسته محتويات
Verify that all components listed below are present and undamaged. If any items are missing or damaged, contact Tecmojo customer support.

انځور ۲: تفصیلي view په بسته کې شامل ټول اجزا.
| توکي | مقدار |
|---|---|
| د 42U سرور ریک کابینې | 1 |
| 1U ریک ماونټ PDU | 1 |
| د یخولو پرستار | 2 |
| 1U Half Rack Rails | 1 جوړه |
| 1U Cantilever Shelf | 1 |
| Rack Shelf Back Support | 2 |
| 12-24 Cage Nut | 70 |
| 12-24 Cross Screw | 70 |
| کلید | 4 |
| Anti-slip Stop | 2 |
| د ویلکرو کیبل ټای | 10 |
Note: The quantity of some small hardware items may be slightly higher than required for assembly to provide spares.
4. تنظیم او مجلس
The Tecmojo 42U Server Rack Network Cabinet is designed for efficient assembly. Follow these steps carefully.
4.1. د بسته بندۍ او ابتدايي تفتیش
Carefully remove the cabinet and all components from the packaging. Inspect for any shipping damage. If the cabinet arrived unassembled, ensure all parts listed in the "Package Contents" section are present.
4.2. Attaching Casters and Leveling Feet
The cabinet comes with pre-installed casters and leveling feet. Ensure they are properly secured. The casters allow for mobility, while the leveling feet provide stability once the cabinet is in its final position.
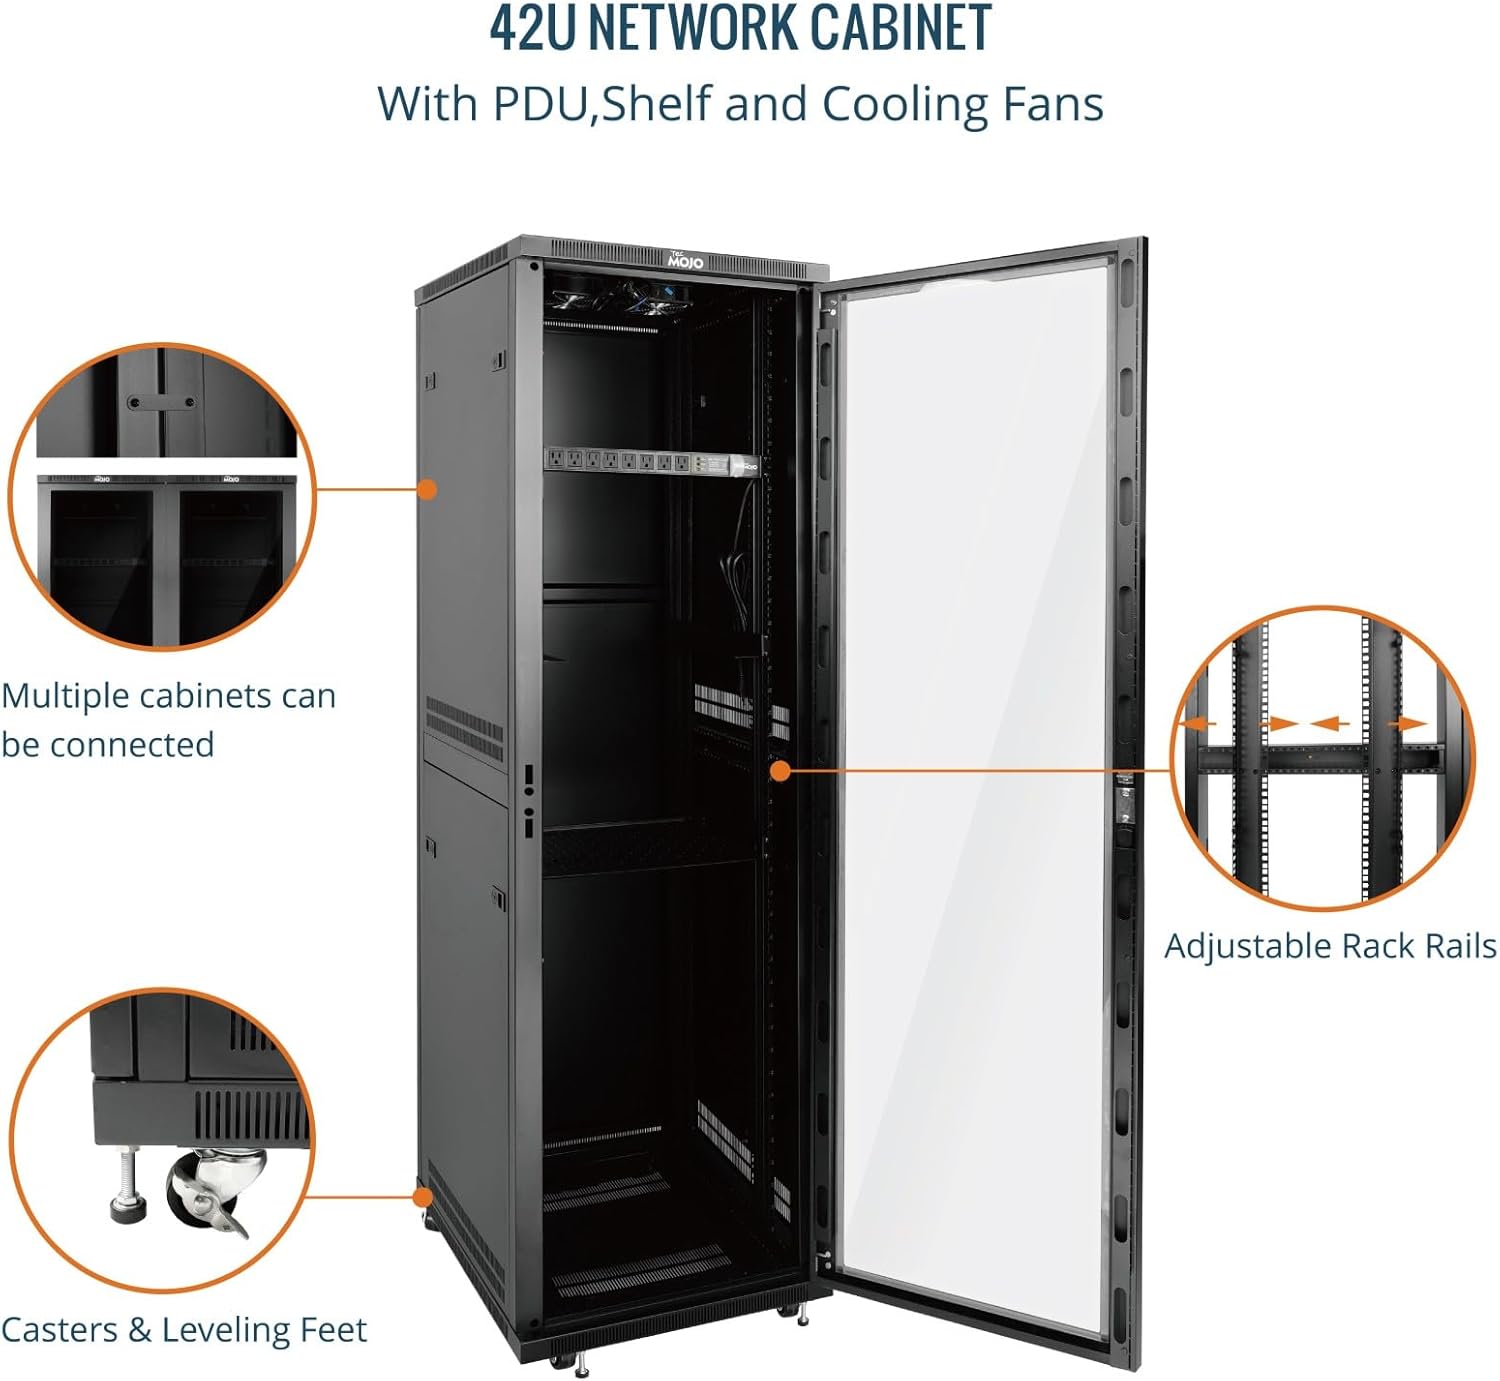
Image 3: Casters and leveling feet for mobility and stability.
4.3. Installing Rack Rails
The rack rails are adjustable to accommodate various equipment depths. The maximum mountable depth is 18.5 inches.
- Determine the required depth for your equipment.
- Use the provided cage nuts and cross screws to secure the rack rails to the vertical mounting posts at the desired depth.
- Ensure both front and rear rails are aligned and at the same height.

Image 4: Interior of the cabinet showing adjustable rack rails and maximum rail depth.
4.4. Installing the Shelf
Install the 1U cantilever shelf using cage nuts and screws at the desired height. Ensure it is level and securely fastened.
4.5. Installing Cooling Fans
The two cooling fans are designed for top-mounting to facilitate airflow.
- Locate the designated fan mounting area on the top panel of the cabinet.
- Secure the fans using the provided hardware.
- Connect the fan power cables to the PDU or an appropriate power source.

Image 5: Top-mounted cooling fans for heat dissipation.
4.6. Installing the PDU
Mount the 1U rack mount PDU to the rack rails at a convenient location, typically near the top or bottom, using cage nuts and screws. Connect the PDU to a suitable grounded power outlet.
4.7. د کیبل مدیریت
Utilize the top and bottom brush panels for cable routing to maintain an organized and dust-free environment. Use the provided Velcro cable ties to bundle and secure cables.
Image 6: Top brush panel for organized cable management.
4.8. Installing Side Panels and Doors
The side panels are removable for easy access during installation and maintenance. Ensure they are securely latched after equipment installation. The front door is fully lockable and can be reversed if needed. Use the provided keys to secure the door.
Image 7: Removable side panels for easy access.
۴.۵. د غونډې ویډیو لارښود
For a visual guide on assembly, please refer to the official Tecmojo assembly video. (Note: An official assembly video was not available at the time of manual creation. Please check the Tecmojo webد تازه معلوماتو لپاره سایټ.)
5. عملیاتي لارښوونې
5.1. Powering On Equipment
After all equipment is securely installed and cabled, connect the PDU to a grounded power outlet. Power on your equipment according to their individual instructions.
5.2. Monitoring and Cooling
The integrated cooling fans help maintain optimal operating temperatures within the cabinet. Ensure the fans are operational and that airflow is not obstructed. Regularly monitor the temperature of your equipment to prevent overheating.
5.3. امنیت
Always lock the front door of the cabinet using the provided keys to secure your equipment from unauthorized access.
6. ساتنه
- پاکول: Periodically clean the exterior of the cabinet with a soft, damp ټوکر د کثافاتو پاکونکو څخه ډډه وکړئ.
- د دوړو لرې کول: Regularly check and clean the cooling fans and any air filters (if present) to ensure efficient airflow. Use compressed air to remove dust from equipment.
- د کیبل مدیریت: په دوره توګه بیاview and reorganize cables to ensure proper airflow and prevent accidental disconnections.
- د هارډویر معاینه: Annually inspect all screws, bolts, and mounting hardware for tightness. Re-tighten as necessary. Pay particular attention to rack rail screws and equipment mounting screws.
- Door and Lock: Lubricate door hinges and locks annually with a suitable lubricant to ensure smooth operation.
7. ستونزه حل کول
7.1. Equipment Overheating
احتمالي لامل: Obstructed airflow, fan malfunction, or excessive equipment density.
حل لاره:
- Ensure cooling fans are operating correctly.
- Verify that cabinet ventilation openings are not blocked.
- Check for proper cable management to avoid airflow obstruction.
- Consider reducing equipment density or adding additional cooling solutions if necessary.
۷.۱. د کابینې بې ثباتي
احتمالي لامل: Uneven floor, loose leveling feet, or improperly distributed weight.
حل لاره:
- Adjust the leveling feet to ensure the cabinet is stable and level.
- Verify that equipment weight is evenly distributed within the rack.
- Ensure all casters are locked when the cabinet is in its final position.
7.3. Difficulty with Assembly (e.g., missing parts, hardware issues)
احتمالي لامل: Manufacturing defect or shipping error.
حل لاره:
- Double-check the package contents against the provided list.
- Contact Tecmojo customer support immediately with details of the issue and any missing or damaged components. Provide your purchase information.
8. د محصول مشخصات

Image 8: Visual representation of cabinet dimensions and specifications.
| صفت | ارزښت |
|---|---|
| برانډ | ټیکموجو |
| ماډل | 42U |
| د محصول ابعاد (د x څلویښتم x څلویښتم) | ۷.۰" x ۲.۰" x ۷.۰" (۱۷۸ ملي متره x ۵۱ ملي متره x ۱۷۸ ملي متره) |
| د توکي وزن | ۲.۴۵ پونډه |
| مواد | د الماس فولاد |
| د وزن ظرفیت | ۱۱.۵۷ پونډه (۵.۲۵ کیلو ګرامه) |
| Maximum Mountable Depth | 18.5 انچه |
| د ریک فضا | 42U |
| د دروازې ډول | Clear Door (Polycarbonate) |
| موافقت | EIA/ECA-310-E Compliant |
| لوازم شامل دي | PDU, Cooling Fans, Rack Rails, Shelf, Casters, Leveling Feet, Cable Management Panels, Locking Door |
9. تضمین او ملاتړ
For warranty information and technical support, please visit the official Tecmojo webسایټ یا زموږ د پیرودونکي خدماتو څانګې سره اړیکه ونیسئ.
Visit the Tecmojo Store on Amazon
Please have your model number (42U) and purchase date available when contacting support.


