1. محصول ختم شوview
This manual provides detailed instructions for the safe and efficient use of your Fanttik F2 Master Mini Cordless Rotary Tool Kit and TS2 PRO Torque Screwdriver Wrench Set. Please read this manual thoroughly before operation and retain it for future reference.
د بسته محتويات:
- Fanttik F2 Master Mini Cordless Rotary Tool
- Fanttik TS2 PRO Torque Screwdriver
- 35 x 3/32" (2.3mm) Rotary Tool Accessories
- 12 x S2 Screwdriver Bits
- د کارن لارښود

Image: The Fanttik F2 Master Mini Cordless Rotary Tool (left) and the TS2 PRO Torque Screwdriver (right) as included in the kit.
2. Fanttik F2 Master Mini Cordless Rotary Tool
2.1 کلیدي ځانګړتیاوې
- Brushless Hollow Cup Motor: Reduces noise by 30% compared to standard motors, offering stronger performance and less heat.
- لوړ سرعت: Maximum 25,000 RPM for efficient operation.
- د تنظیم وړ سرعت: 5 adjustable speed settings to handle various precision tasks.
- د بیاکتنې مرکز: Features a 360° rotating magnetic stand with 35 organized accessories (3/32" / 2.3mm).
- وړ وړ ډیزاین: Weighs 0.22 lb, with a durable aluminum case and a one-click pop-out design for quick tool access.
2.2 اجزا
Familiarize yourself with the main components of the F2 Master rotary tool:
- Rotary Tool Body
- د بریښنا تڼۍ / د سرعت کنټرول
- کولیټ نټ
- Accessory Storage Case (Revostor Hub)
- د چارج کولو بندر
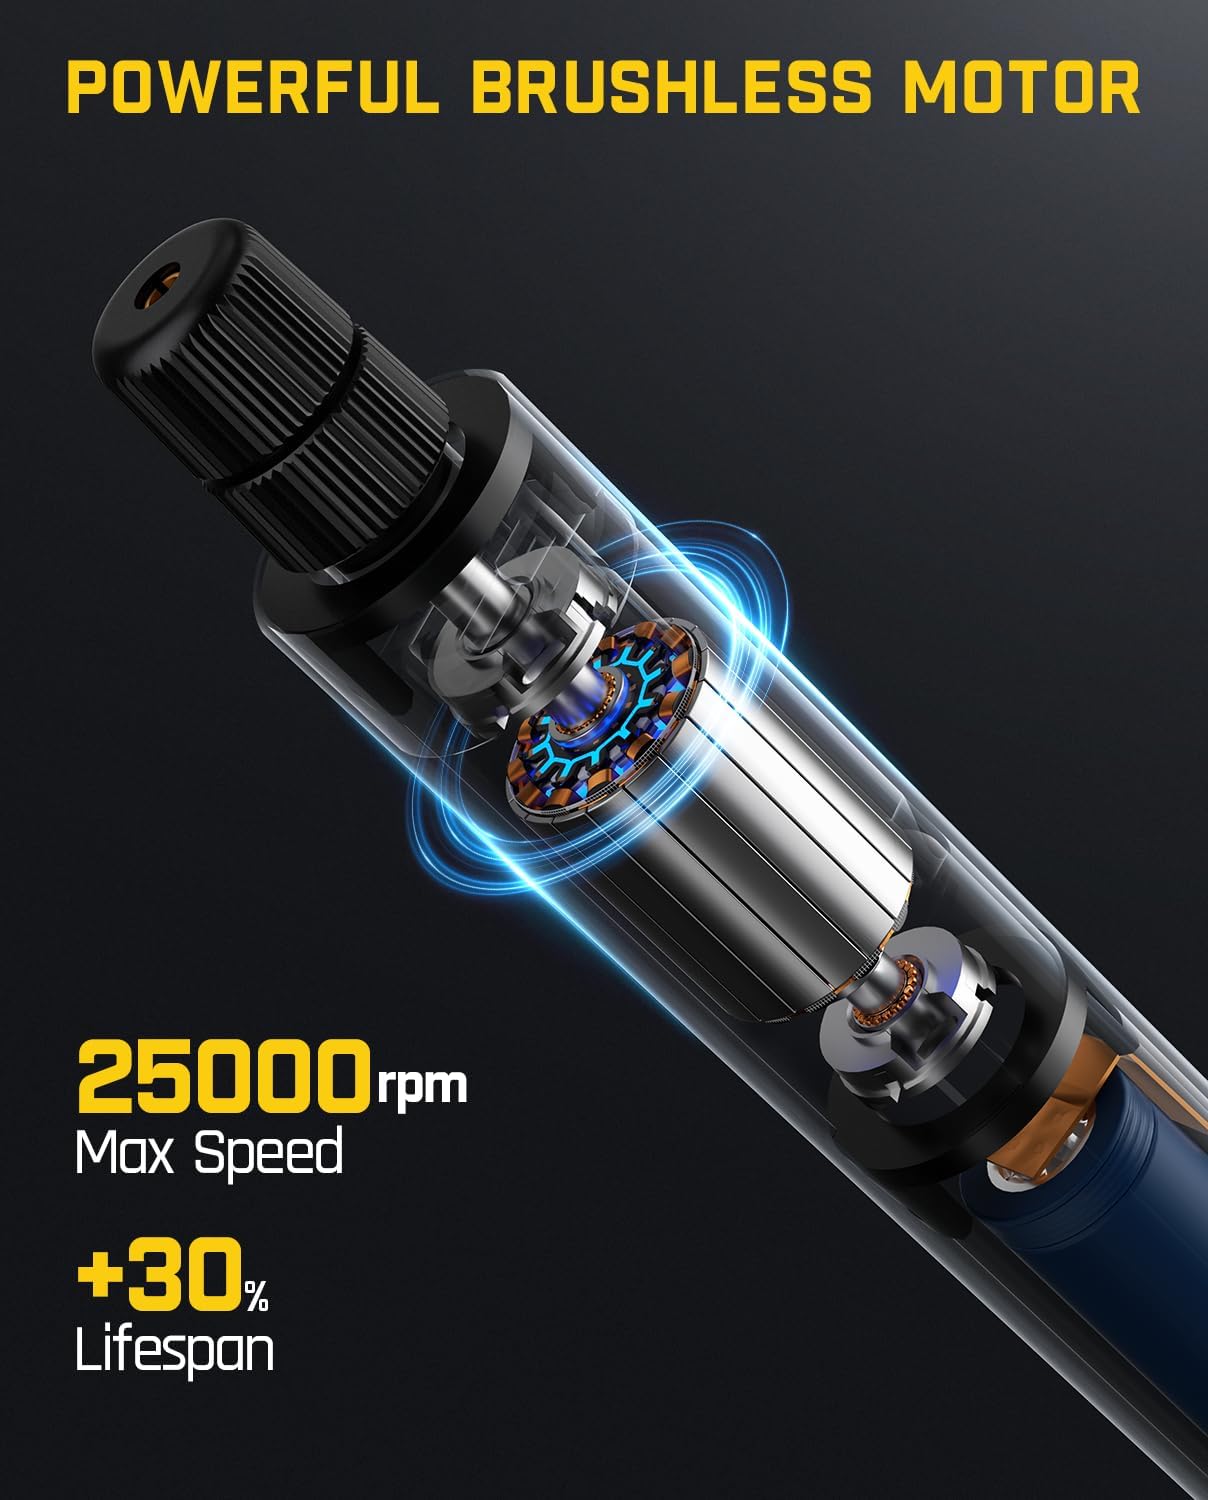
Image: An internal diagram of the F2 Master rotary tool, illustrating the brushless motor and its capability of reaching 25,000 RPM.

Image: A user operating the F2 Master rotary tool for engraving, highlighting its quiet operation at 32 dB when idle.

Image: The F2 Master's Revostor Hub, demonstrating its 360-degree rotating design for organized storage and easy access to various accessories.

Image: The F2 Master's aluminum alloy case, showing the one-click pop-up mechanism for quick and convenient tool access.
3. Fanttik TS2 PRO Torque Screwdriver
3.1 کلیدي ځانګړتیاوې
- T-Handle Design: Substantially enhances leverage and provides an ergonomic grip, minimizing fatigue during prolonged use.
- Portable All-in-One Storage: Innovative hidden bit storage design within the handle for 12 commonly used S2 bits.
- High Torque Accuracy: Wide torque range of 15-75 in-lbs with 1 in-lb precision for superior protection against over-tightening.
3.2 اجزا
Familiarize yourself with the main components of the TS2 PRO torque screwdriver:
- T-Handle Body
- Torque Adjustment Mechanism
- د بټ ذخیره کولو کمپارټمنټ
- 1/4" Hex Magnetic Bit Holder
- 12 S2 Screwdriver Bits

Image: The Fanttik TS2 PRO Torque Screwdriver in use, demonstrating the ergonomic T-handle design for improved leverage.

Image: The TS2 PRO Torque Screwdriver showcasing its hidden, all-in-one bit storage compartment within the handle for convenient access.

Image: A visual guide demonstrating the three steps to set the torque on the TS2 PRO: 1. Slide and pull to unlock, 2. Rotate to reset, 3. Slide and push to lock.

Image: A close-up of the TS2 PRO's torque scale, indicating a wide range of 15-75 in-lbs and 1 in-lb precision for accurate torque application.
۱. تنظیم او لومړنی کارول
4.1 F2 Master Rotary Tool Setup
- چارج کول: Before first use, fully charge the F2 Master rotary tool. Connect the charging cable to the tool and a suitable USB power source. The indicator light will show charging status.
- د لوازمو نصب کول:
- Open the Revostor Hub by pressing the pop-out mechanism.
- Select the desired 3/32" (2.3mm) accessory.
- Unscrew the collet nut on the rotary tool.
- د لوازمو شانک په کولټ کې دننه کړئ.
- Tighten the collet nut securely. Ensure the accessory is firmly seated.
4.2 TS2 PRO Torque Screwdriver Setup
- د بټ انتخاب:
- Locate the hidden bit storage compartment in the handle. Slide the cover to open.
- Select the appropriate S2 screwdriver bit for your task.
- Insert the chosen bit into the 1/4" hex magnetic bit holder at the end of the screwdriver. The magnetic holder will secure the bit.
- د تورک تنظیم کول:
- To adjust the torque, slide and pull the adjustment ring to unlock it.
- Rotate the ring to align the desired torque value (in-lbs) with the indicator mark. The main scale provides integer values, and a fine increment ring allows for precise adjustments.
- Once the desired torque is set, slide and push the adjustment ring back to lock it in place.
5. عملیاتي لارښوونې
5.1 Using the F2 Master Rotary Tool
- پاور آن/بند: Press and hold the power button to turn the tool on or off.
- د سرعت تنظیمول: Briefly press the power button to cycle through the 5 available speed settings. The indicator lights will show the current speed level.
- عملیات:
- Hold the tool firmly and maintain a stable grip.
- Apply gentle pressure to the workpiece. Avoid excessive force, which can damage the tool or accessory.
- Allow the tool to reach full speed before making contact with the workpiece.
- For best results, move the tool smoothly and consistently across the work surface.
- د خوندیتوب احتیاطونه:
- Always wear appropriate personal protective equipment (PPE), such as safety glasses, gloves, and a dust mask, especially when grinding or cutting.
- Ensure your workspace is well-lit and clear of obstructions.
- وسیله د اور اخیستونکو موادو سره نږدې مه چلوئ.
- Turn off the tool before changing accessories or performing maintenance.
5.2 Using the TS2 PRO Torque Screwdriver
- د تورک تطبیق:
- With the desired bit installed and torque set, place the bit into the fastener head.
- Hold the T-handle firmly and rotate clockwise to tighten the fastener.
- Continue rotating until you feel and hear a distinct "click." This indicates that the preset torque has been reached.
- Stop applying force immediately after the click to prevent over-tightening.
- Checking Torque: To verify the torque setting, you can re-engage the fastener. If it clicks immediately, the torque is correct. Do not continuously tighten after the click.
- د خوندیتوب احتیاطونه:
- Always use the correct size and type of bit for the fastener to prevent stripping.
- Do not use the torque screwdriver as a pry bar or hammer.
- Store bits securely in the handle when not in use.
6. ساتنه
6.1 عمومي ساتنه
- پاکول: Regularly wipe down both tools with a clean, dry cloth. Do not use harsh chemicals or abrasive cleaners.
- ذخیره کول: Store the tools and accessories in their original case or a dry, secure location away from direct sunlight and extreme temperatures.
- Battery Care (F2 Master): For optimal battery life, avoid fully discharging the tool frequently. Charge it periodically even if not in use for extended periods.
۵.۲ د لوازمو پاملرنه
- Rotary Tool Accessories: Inspect accessories before each use for wear or damage. Replace worn or damaged accessories immediately. Clean debris from accessories after use.
- د سکرو ډرایور ټوټې: Ensure bits are clean and free of rust. Replace any stripped or damaged bits to prevent fastener damage.
7. ستونزه حل کول
| ستونزه | احتمالي لامل | د حل لاره |
|---|---|---|
| F2 Master does not turn on. | ټیټ بیټرۍ. | Charge the tool fully. |
| F2 Master loses power during operation. | ډیر بار یا ټیټ بیټرۍ. | Reduce pressure on the workpiece. Recharge the battery. |
| Accessory slips in F2 Master collet. | Collet nut not tightened sufficiently or incorrect accessory shank size. | Ensure collet nut is tightened securely. Use only 3/32" (2.3mm) shank accessories. |
| TS2 PRO does not click at set torque. | Torque setting too high or mechanism not reset. | Verify torque setting. Ensure the adjustment ring is locked after setting. |
| Screwdriver bit strips fastener head. | Incorrect bit size or type, or excessive force. | Use the correct bit for the fastener. Ensure the torque is set appropriately. |
8. مشخصات
8.1 Fanttik F2 Master Mini Cordless Rotary Tool
- د بریښنا سرچینه: د بیټرۍ چلول
- د موټرو ډول: Brushless Hollow Cup
- اعظمي گردش سرعت: 25,000 RPM
- د سرعت ترتیبات: د 5 تنظیم وړ کچه
- Accessory Shank Size: ۵/۳۲" (۴ ملي متره)
- وزن: 0.22 lb
- شامل لوازم: 35 ټوټې
8.2 Fanttik TS2 PRO Torque Screwdriver
- د تورک سلسله: 15-75 in-lbs
- Torque Precision: 1 په پونډه
- بټ هولډر: ۱/۴" هیکس مقناطیسي
- شامل شوي ټوټې: 12 S2 Screwdriver Bits
- د لاسوند ډول: د T-Handle
9. تضمین او ملاتړ
Fanttik products are designed and manufactured to high-quality standards. For warranty information, technical support, or service inquiries, please refer to the official Fanttik webسایټ ته مراجعه وکړئ یا مستقیم د دوی د پیرودونکو خدماتو سره اړیکه ونیسئ. د پیرود ثبوت په توګه د پیرود رسید وساتئ.
Fanttik Official Webسایټ: www.fanttik.com


