1. پیژندنه
This instruction manual provides essential information for the safe and efficient operation of your Tornado TCM-1025A-GS Conical Burr Grinder Coffee Maker. Please read this manual thoroughly before first use and retain it for future reference. Proper use and maintenance will ensure optimal performance and longevity of your appliance.
۱.۱. د خوندیتوب مهم معلومات
کله چې د بریښنایی وسایلو کاروئ، د خوندیتوب لومړني احتیاطونه باید تل تعقیب شي ترڅو د اور، بریښنا شاک، او / یا خلکو ته د ټپي کیدو خطر کم کړي، په شمول د الندې:
- ټول لارښوونې ولولئ.
- ګرمو سطحو ته لاس مه ورکوئ. لاسونه او غوټۍ وکاروئ.
- د برقي شاک څخه د ساتنې لپاره، تار، پلګونه، یا د قهوې جوړونکي په اوبو یا نورو مایعاتو کې مه ډوبوئ.
- نږدې څارنه اړینه ده کله چې کوم وسیله د ماشومانو لخوا یا نږدې کارول کیږي.
- کله چې په کارولو کې نه وي او د پاکولو دمخه د آوټ لیټ څخه خلاص کړئ. د برخو ایښودلو یا لرې کولو دمخه ، او د وسیلې پاکولو دمخه یخ کولو ته اجازه ورکړئ.
- Do not operate any appliance with a damaged cord or plug or after the appliance malfunctions, or has been damaged in any manner. Contact customer service for examination, repair, or adjustment.
- د لوازمو ضمیمو کارول چې د وسایلو جوړونکي لخوا وړاندیز شوي ندي ممکن د اور ، بریښنا شاک یا خلکو ته زیان ورسوي.
- په بهر کې مه کاروئ.
- مه پریږدئ چې تار د میز یا کاونټر په څنډه کې ځړول شي، یا ګرمو سطحو ته لمس کړئ.
- د ګرم ګاز یا برقی برنر یا په ګرم تنور کې مه یا نږدې کیږدئ.
- تل د وسیلې سره پلګ وصل کړئ ، بیا وروسته د دیوال په ځای کې تار وصل کړئ. د منحل کولو لپاره، هر ډول کنټرول "بند" ته واړوئ، بیا د دیوال سایټ څخه پلګ لرې کړئ.
- د مطلوب کارونې پرته د نورو لپاره وسیله مه کاروئ.
3. د بسته محتويات
مهرباني وکړئ د لاندې توکو لپاره بکس وګورئ:
- Tornado TCM-1025A-GS Coffee Maker with Integrated Conical Burr Grinder
- Glass Carafe (1.5 L / 12-cup capacity)
- Reusable Filter Basket
- د اندازه کولو سکوپ
- د لارښوونې لارښود
4. محصول ختم شوview
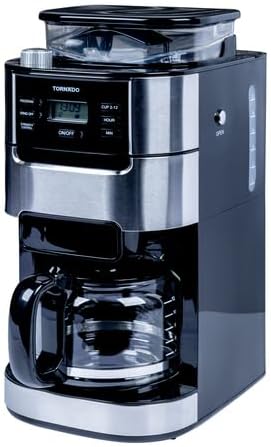
د خپل قهوه جوړونکي د برخو سره ځان بلد کړئ.

مخکی view of the Tornado TCM-1025A-GS coffee maker, showcasing its sleek black and stainless steel design with the control panel and glass carafe visible.

تفصيلي view of the coffee maker's control panel, featuring a digital display, 'PROGRAM', 'GRIND OFF', 'STRENGTH CONTROL', 'ON/OFF', 'CUP 2-12', 'HOUR', and 'MIN' buttons.

The removable filter basket and its holder, designed for easy access and cleaning, with a reusable mesh filter visible inside.
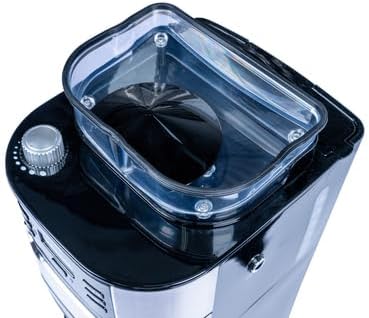
پورته view of the integrated conical burr grinder, with its transparent lid removed, showing the bean hopper and grinding mechanism.
شاته view of the coffee maker, showing the water reservoir with clear level markings and the power cord.
۳. تنظیم او لومړی کارول
۴.۱ د بسته بندۍ خلاصول او لومړنۍ پاکول
- د قهوې جوړونکي څخه ټول بسته بندي مواد په احتیاط سره لرې کړئ.
- Wash the glass carafe, lid, and reusable filter basket in warm, soapy water. Rinse thoroughly and dry.
- د کافي جوړونکي بهرنۍ برخه د اعلان سره پاک کړئamp ټوکر
۳.۴ د شرابو د جوړولو لومړی دوره (د پاکولو دوره)
Before brewing coffee for the first time, run a cleaning cycle to remove any manufacturing residues.
- د اوبو زیرمه د تازه او سړو اوبو سره ډکه کړئ تر ۱۲ پیالو پورې.
- Ensure the empty filter basket is in place. Do not add coffee beans or grounds.
- د شیشې خالي قافیه د هغې د پوښ سره د تودوخې په پلیټ کې ځای په ځای کړئ.
- د قهوې جوړونکی په یوه ځمکني بریښنایی پلورنځي کې ولګوئ.
- Press the 'ON/OFF' button to start a brew cycle. Allow the full cycle to complete.
- Discard the water from the carafe. Your coffee maker is now ready for use.
6. عملیاتي لارښوونې
6.1 Brewing Coffee with Whole Beans
- د اوبو ډکول: Open the water reservoir lid and fill with fresh, cold water to your desired cup level (2-12 cups).
- د قهوې لوبیا اضافه کړئ: Open the lid of the conical burr grinder and add whole coffee beans. Do not overfill.
- د کاراف ځای: ډاډ ترلاسه کړئ چې د شیشې قافله د هغې د پوښ سره په سمه توګه د تودوخې پلیټ کې موقعیت لري.
- د ګرینډ کولو ترتیب غوره کړئ: Use the grind adjustment knob (usually on top near the grinder) to select your preferred grind fineness. Finer for stronger coffee, coarser for lighter.
- Set Cup Quantity: Press the 'CUP 2-12' button repeatedly to select the number of cups you wish to brew.
- Adjust Strength Control: Press the 'STRENGTH CONTROL' button to choose your desired coffee strength (e.g., Regular, Bold).
- د څښاک پیل کول: Press the 'ON/OFF' button to begin the grinding and brewing process. The machine will grind the beans, then brew the coffee.
6.2 Brewing Coffee with Pre-Ground Coffee
- د اوبو ډکول: Follow step 1 from section 6.1.
- ځمکنی قهوه اضافه کړئ: Open the filter basket and add your desired amount of pre-ground coffee. Use approximately one scoop per cup, adjusting to taste.
- Disable Grinder: Press the 'GRIND OFF' button to ensure the grinder does not activate.
- د کاراف ځای: Follow step 3 from section 6.1.
- Set Cup Quantity: Follow step 5 from section 6.1.
- Adjust Strength Control: Follow step 6 from section 6.1.
- د څښاک پیل کول: Press the 'ON/OFF' button to begin the brewing process.
6.3 Programming Auto-Brew (Timer Function)
- اوسنی وخت ټاکل: Press the 'HOUR' button to set the current hour, then the 'MIN' button to set the current minutes.
- د قهوې جوړونکی چمتو کړئ: Follow steps for brewing with whole beans or pre-ground coffee (sections 6.1 or 6.2).
- د پروګرام وخت وټاکئ: Press the 'PROGRAM' button. The display will flash. Use the 'HOUR' and 'MIN' buttons to set your desired brew time.
- پروګرام فعال کړئ: Press the 'PROGRAM' button again to confirm the setting. The program indicator light will illuminate, indicating the timer is set.
- د قهوې جوړونکی به په اتوماتيک ډول په ټاکل شوي وخت کې پخول پیل کړي.
7. پاکول او ساتنه
Regular cleaning ensures the best coffee taste and extends the life of your appliance.
7.1 ورځنی پاکول
- تل د پاکولو دمخه د قهوې جوړونکي پلګ خلاص کړئ او پریږدئ چې په بشپړه توګه یخ شي.
- Remove the glass carafe, lid, and reusable filter basket. Wash them in warm, soapy water or place them on the top rack of your dishwasher.
- Wipe the exterior of the coffee maker, warming plate, and water reservoir with a damp ټوکر د کثافاتو پاکوونکي یا سکور کولو پیډونه مه کاروئ.
- Clean the grinder chute regularly with a small brush to prevent clogs from coffee grounds.
7.2 Descaling (Every 2-3 Months)
د اوبو څخه معدني زیرمې د وخت په تیریدو سره راټولیږي، چې فعالیت یې اغیزمن کوي. خپل د قهوې جوړونکي په منظم ډول اندازه کم کړئ.
- Mix 4 cups of white vinegar with 8 cups of cold water.
- مخلوط د اوبو ذخیره کې واچوئ.
- د تودوخې په پلیټ کې خالي کارفې ځای په ځای کړئ.
- Run a full brew cycle. After about 30 seconds, turn off the coffee maker and let it soak for 30 minutes.
- Turn the coffee maker back on and let the cycle complete.
- د سرکې محلول پریږدئ.
- Run 2-3 cycles with fresh, cold water to rinse out any remaining vinegar smell or taste.
8. ستونزه حل کول
که تاسو د خپل قهوه جوړونکي سره ستونزې سره مخ شئ، لاندې عامې ستونزې او حل لارې وګورئ:
| ستونزه | احتمالي لامل | د حل لاره |
|---|---|---|
| قهوه نه جوړېږي. | No water in reservoir; Coffee maker not plugged in; Power outage; Brew cycle not started. | Fill water reservoir; Plug in coffee maker; Check power supply; Press 'ON/OFF' button. |
| ګرینډر کار نه کوي. | 'GRIND OFF' button pressed; No beans in hopper; Grinder clogged. | Ensure 'GRIND OFF' is not active; Add beans; Clean grinder chute. |
| د قهوې خوند کمزوری یا ډېر قوي دی. | Incorrect coffee-to-water ratio; Grind setting incorrect; Strength control setting. | Adjust coffee amount; Adjust grind fineness; Change strength control setting. |
| له ماشین څخه اوبه بهېږي. | Water reservoir overfilled; Carafe not properly seated; Filter basket overflowing. | Do not overfill water reservoir; Ensure carafe is correctly placed; Do not overfill filter basket with grounds. |
9. مشخصات
| د ماډل شمیره | TCM-1025A-GS |
| ظرفیت | ۵ لیتره / ۲۰ پیالې |
| ځواک | 900-1050 W |
| وزن | 4.5 کیلو ګرامه |
| رنګ | تور |
| مواد | سټینلیس سټیل ، پلاستیک |
10. تضمین او ملاتړ
Your Tornado TCM-1025A-GS Coffee Maker is covered by a manufacturer's warranty against defects in material and workmanship. Please refer to the warranty card included with your purchase for specific terms and conditions, including the warranty period and coverage details.
For technical support, service, or warranty claims, please contact Tornado customer service through the contact information provided in your product packaging or on the official Tornado website. Please have your model number and proof of purchase ready when contacting support.


