پیژندنه
This manual provides detailed instructions for the safe and efficient operation, setup, and maintenance of your KATOOL ME Tire Changer and Balancer Machine Combo. This combo unit, featuring the ME Professional tire changer and the ME-620T computer balancer, is designed for professional and home garage use, accommodating a wide range of tire sizes. Please read this manual thoroughly before installation and operation to ensure proper use and longevity of the equipment.
د خوندیتوب معلومات
Always observe the following safety precautions to prevent injury and equipment damage:
- Ensure the machine is installed on a level, stable surface and securely anchored, especially the balancer.
- مناسب شخصي محافظتي تجهیزات (PPE) واغوندئ، په شمول د خوندیتوب عینکې او دستکشې.
- د هر ډول ساتنې یا سمون ترسره کولو دمخه بریښنا قطع کړئ.
- د عملیاتو په جریان کې لاسونه او جامې د حرکت کونکو برخو څخه پاک وساتئ.
- Do not exceed the specified maximum tire diameter (37") or wheel width (12").
- Ensure proper air pressure supply and filtration for pneumatic systems.
- یوازې روزل شوي پرسونل باید دا تجهیزات پرمخ بوځي.
اجزاء پای ته ورسیدلview
The KATOOL ME Tire Changer and Balancer Combo includes the following main components:
- ME Professional Tire Changer (Model 560): Features an assist arm, bead blaster, alloy steel jaws, and a stainless mounting head with plastic rim protection.
- ME-620T Computer Balancer (Model 620): Equipped with an automatic measurement ruler for A and D values.
- Shared Features: High-quality motor (120V/1ph/1.5HP for North America), pull-type pedal control system, and robust construction.

انځور 1: اوورview of the KATOOL ME Tire Changer and Balancer Machine Combo, showing both units and included accessories.
تنظیم او نصب کول
1. خلاصول او معاینه کول
- Carefully unpack all components. Inspect for any shipping damage.
- تصدیق کړئ چې د بسته بندۍ لیست کې لیست شوي ټولې برخې شتون لري.
2. Placement and Anchoring
- Position both the tire changer and balancer on a flat, level, concrete surface.
- The balancer machine باید be securely anchored to the floor to ensure accurate operation and stability. Refer to the balancer's specific instructions for anchoring points.
- Ensure adequate clearance around both machines for safe operation and maintenance.
3. بریښنایی پیوستون
- Connect the machines to a dedicated 120V/1ph power supply.
- Ensure the electrical circuit can handle the 1.5HP motor load.
- Verify all connections are secure and meet local electrical codes.
4. Pneumatic Connection (Tire Changer)
- Connect a compressed air line to the tire changer's air inlet.
- The machine includes a high-quality filter and pressure regulator. Ensure these are properly installed and functioning to provide clean, regulated air pressure.
- Check for air leaks before operation.

Image 2: Detail of the air filter and pressure gauge, essential for the pneumatic system's longevity.
Operating the Tire Changer (Model 560)
1. Preparing the Wheel
- Remove any weights or valve stems from the wheel.
- Deflate the tire completely.
2. Bead Breaking
- Position the wheel against the bead breaker spade.
- Use the pedal control to activate the bead breaker, carefully pushing the tire bead away from the rim. Repeat for both sides of the tire.
- The high-quality spade cover helps prevent damage to the rim.
3. Clamping the Wheel
- Place the wheel onto the turntable.
- Use the foot pedal to activate the clamping jaws. The machine supports outside clamping from 10"-20" and inside clamping from 12"-24".
- Ensure the alloy steel jaws, with their protective covers, securely grip the rim without causing damage.

Image 3: The tire changer clamping a wheel, illustrating the rim clamping capabilities (10"-20" outside, 12"-24" inside).
4. Tire Removal
- Position the stainless steel mounting head with its plastic cover at the edge of the rim.
- Utilize the assist arm to help lift and guide the tire bead over the mounting head.
- Rotate the turntable using the foot pedal to remove the first bead.
- Repeat the process for the second bead.

Image 4: The auxiliary assist arm in operation, demonstrating its function in removing tires with ease.
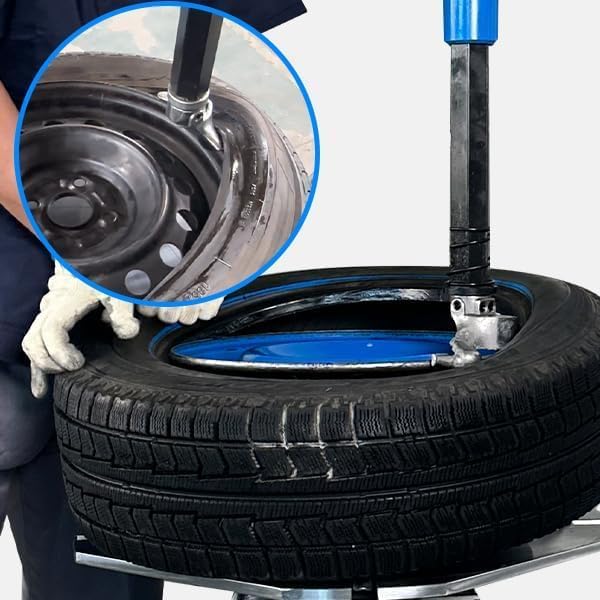
Image 5: Close-up of the stainless steel mounting head, featuring a plastic cover for rim protection.
5. Tire Mounting
- Lubricate the tire beads and rim edges.
- Position the new tire on the rim, using the mounting head and assist arm to guide the first bead onto the rim.
- Rotate the turntable.
- For the second bead, ensure the tire is properly seated and use the assist arm and mounting head to guide it over the rim.

Image 6: A tire securely fixed on the turntable, ready for mounting or demounting operations.
6. Inflation and Bead Seating
- Use the integrated inflation gauge with pedal control to inflate the tire.
- The bead blaster function can be used to help seat stubborn beads by providing a quick burst of air.
- Inflate to the manufacturer's recommended pressure.
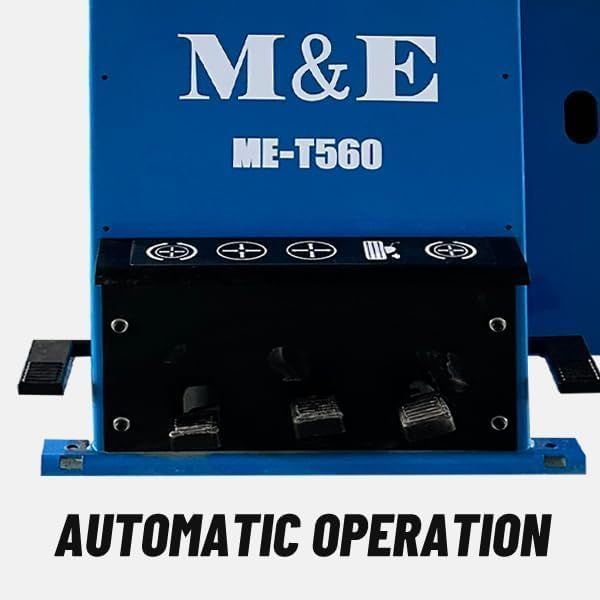
Image 7: The pull-type pedal control system, enabling automatic operation of the tire changer functions.
Operating the Wheel Balancer (Model 620)
1. Mounting the Wheel
- Mount the wheel securely onto the balancer's shaft using the appropriate cone and quick-release nut.
- Ensure the wheel is centered and tightened properly.

Image 8: The KATOOL ME-620T Computer Wheel Balancer, featuring a digital display for precise measurements.
2. Inputting Wheel Data
- Use the automatic measurement ruler to input the 'A' (distance) and 'D' (diameter) values.
- Manually input the 'W' (width) value if not automatically detected.
- Select the desired balancing mode (e.g., static, dynamic, alloy).

Image 9: The automatic measurement ruler, used for accurately inputting wheel dimensions for balancing.
3. Balancing Cycle
- Close the wheel guard (if applicable) and start the balancing cycle.
- The balancer will spin the wheel and display the required weight and its location.
4. Applying Weights
- Apply the indicated balance weights to the inner and/or outer rim flanges as directed by the machine's display.
- Re-spin the wheel to verify balance. Repeat if necessary until the display shows zero or acceptable tolerance.
ساتنه
ورځنی ساتنه
- Clean the machine surfaces to remove tire dust and debris.
- Check air pressure and ensure the filter is clean and functioning.
- Inspect all hoses and electrical cables for wear or damage.
اونۍ/میاشتنۍ ساتنه
- Lubricate moving parts as specified in the detailed product manual (not provided here).
- Check the tightness of all fasteners.
- Inspect the alloy steel jaws and mounting head for wear; replace protective covers if damaged.
- Drain any accumulated moisture from the air filter/regulator unit.
اوږد مهاله ساتنه
- Periodically check the calibration of the wheel balancer.
- Ensure the motor and electrical components are free from dust and moisture. The closed body design and advanced computer board technology help protect internal parts.
د ستونزو حل کول
| ستونزه | احتمالي لامل | د حل لاره |
|---|---|---|
| ماشین نه چالانېږي. | No power supply; tripped circuit breaker; faulty wiring. | Check power connection, circuit breaker, and consult an electrician if necessary. |
| Tire changer turntable not rotating. | Motor issue; pedal malfunction; power supply problem. | Verify power, check pedal connections, inspect motor for signs of damage. |
| Bead breaker or clamps not operating. | Insufficient air pressure; air leak; pneumatic cylinder issue. | Check air supply and pressure gauge, inspect hoses for leaks, ensure filter is clean. |
| Wheel balancer displays inaccurate readings. | Machine not level; improper wheel mounting; calibration required. | Ensure balancer is anchored and level, re-mount wheel securely, perform calibration procedure. |
| Tire beads difficult to seat. | Insufficient lubrication; tire/rim mismatch; low air pressure. | Apply more bead lubricant, verify tire and rim compatibility, use bead blaster, check inflation pressure. |
مشخصات
| فیچر | مشخصات |
|---|---|
| برانډ | KATOOL |
| Model (Tire Changer) | ME Professional (Model 560) |
| Model (Wheel Balancer) | ME-620T (Model 620) |
| ریم کلamping (Outside) | ۱۲.۶" - ۳۸.۲" |
| ریم کلamping (Inside) | ۱۲.۶" - ۳۸.۲" |
| اعظمي. د ټایر قطر | 37" |
| مکس د څرخ پلنوالی | 12" |
| د موټرو ځواک | 1.5 HP |
| بریښنایی اړتیاوې | ۲۲۰ وولټ / ۱ پړاو |
| د جوارو مواد | Alloy Steel with Carburization Treatment |
| Mounting Head Material | سټینلیس سټیل |
| د بدن جوړونه | 3mm thickness steel |
| ځانګړي ځانګړتیاوې | Bead Blaster, Assist Arm, Inflation Gauge with Pedal Control, Automatic Measurement Ruler (Balancer) |
تضمین او ملاتړ
For specific warranty details, please refer to the documentation included with your purchase or contact KATOOL customer service directly. Protection plans may be available for extended coverage.
For technical assistance, parts, or service inquiries, please contact KATOOL support through their official channels. Keep your model number (560+620) and purchase date readily available when contacting support.


