پیژندنه
The PREXISO 5-in-1 Multi-Purpose Detector is a versatile tool designed to assist with various home improvement and construction tasks. It combines the functions of a stud finder, metal detector, AC wire detector, laser level, and ultrasonic distance measurer. This manual provides detailed instructions for safe and effective use of the device.
د خوندیتوب معلومات
- د لیزر خوندیتوب: This product is a Class II laser with an output power less than 1mW. Avoid direct eye exposure to the laser beam.
- Sharp Needles: The auxiliary laser marking stud button features sharp needles. Exercise caution when pressing this button to prevent injury. These needles are intended for use on wallpaper and wooden surfaces only. Do not use on stone, metal walls, or low-density plasterboard.
- د AC تار کشف: Always be aware of the potential presence of live AC wires behind walls. The device will provide an audible and visual warning when AC wires are detected. Take appropriate precautions to avoid electrical hazards.
- د چاپیریال عوامل: Increased moisture on wall surfaces can affect the device's conductivity and may lead to inaccurate readings. Ensure surfaces are dry for optimal performance.
- Ultrasonic Measurement Accuracy: The ultrasonic distance measure function is intended for rough reference only and may not be as accurate as a laser distance measure.
محصول پای ته ورسیدview
Familiarize yourself with the components of your PREXISO 5-in-1 Multi-Purpose Detector:
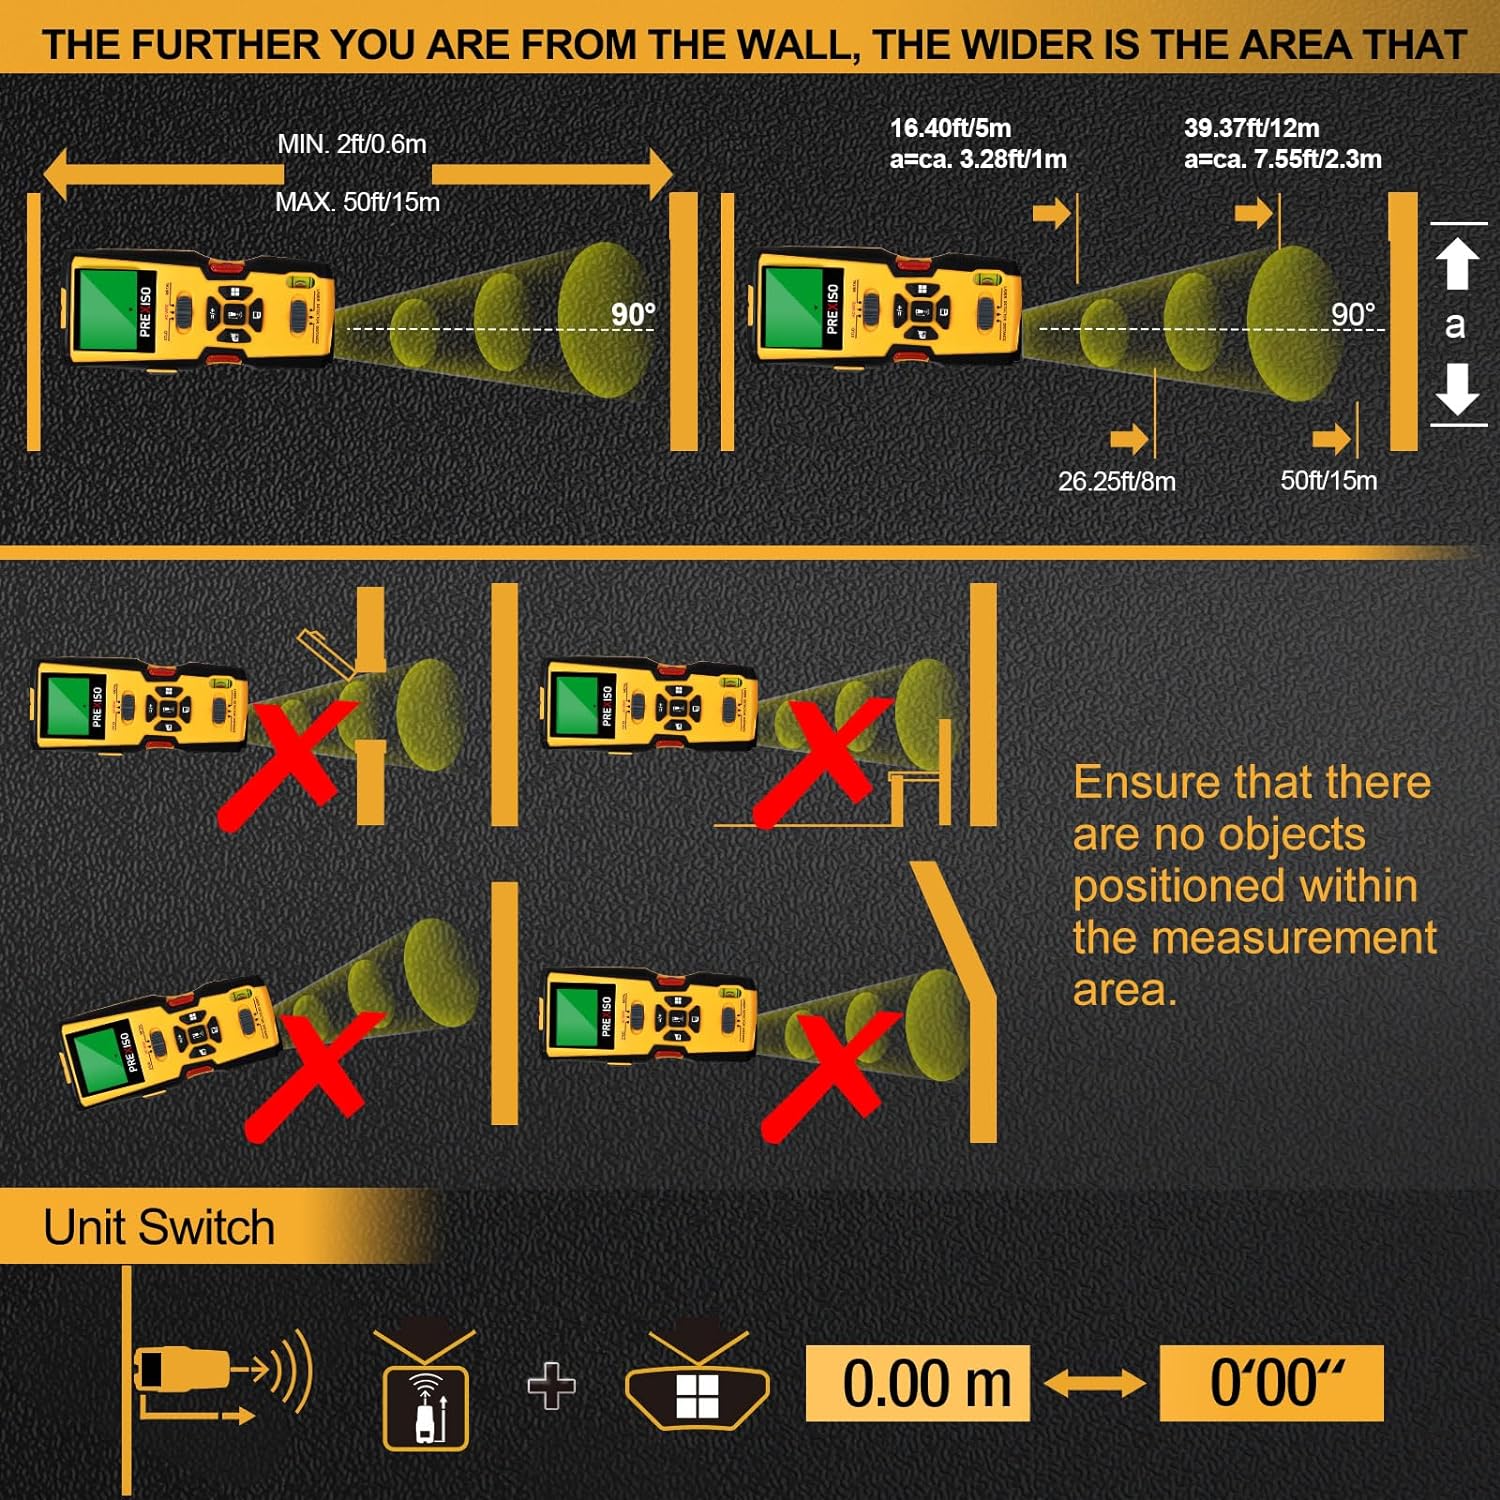
Figure 1: PREXISO 5-in-1 Stud Finder Component Diagram
- د LCD نندارې: Shows detection results, measurements, and mode indicators.
- Material Switch (STUD/AC WIRE/METAL): Selects the detection mode.
- Function Switch (LASER/DETECTOR/DISTANCE): Selects the primary function.
- Stud Button: Activates the stud marking needles (use with caution).
- Ultrasound Measure Buttons: For distance, area, volume, memory, and addition calculations.
- Spirit Level Bubble Vial: For horizontal leveling.
- Laser Beam Exit: Emits the laser line for marking.
- Ultrasound Sender/Receiver: For ultrasonic distance measurements.
- Contact Pads: Located on the back for detection.
- د بیټرۍ کڅوړه: د ۲۰ واټ بیټرۍ ساتي.
چمتو کول
د بیټرۍ نصب کول
- د آلې په شا کې د بیټرۍ کڅوړه ومومئ.
- د بیټرۍ پوښ خلاص کړئ.
- یوه 9V بیټرۍ دننه کړئ، د سم قطبیت ډاډ ترلاسه کړئ (+/-).
- د بیټرۍ پوښ په خوندي ډول وتړئ.
Video: PREXISO 5-in-1 Stud Finder with Laser Level Distance Measure - This video provides a visual overview of the product's features and basic operation, including battery installation and mode selection.
عملیاتي لارښوونې
1. کیلیبریشن
Before each use, especially for stud and metal detection, the device requires automatic calibration for maximum reliability and accuracy.
- Turn on the stud finder.
- Place the device flat against the wall surface where you intend to scan.
- Press and hold the scan button (usually on the side) until calibration is complete. The display will indicate when it's ready.
- Keep the button pressed down during the entire scanning operation.
2. Stud, Metal, and AC Wire Detection
This device offers three scanning modes to locate concealed objects:

Figure 2: Locating Concealed Objects
- حالت غوره کړئ: Use the Material Switch to select between STUD, AC WIRE, or METAL mode.
- اندازه کول: Perform calibration as described above.
- سکین: While holding the scan button, slowly slide the device horizontally across the wall surface.
- کشف: When an object is detected, the LCD screen will display arrows indicating its location, and an audible beep will sound. The center of the object is indicated by a solid dot on the screen.
- نښه کول: Use a pencil to mark the detected location.
Detection Depths:
- Wood Studs: Up to 1 inch (24mm) deep in drywall.
- Metal Objects: Up to 1-1/2 inches (38mm) deep.
- Live AC Wires: Up to 1-3/8 inches (35mm) deep.

Figure 3: 5-in-1 Multi-Purpose Detector Features
3. Laser Marking
The device can project a horizontal laser line for accurate leveling, useful for hanging pictures or shelves.

Figure 4: Laser Marking in Use
- حالت غوره کړئ: Slide the Function Switch to the LASER position.
- د وسیلې موقعیت: Place the device against the wall at the desired height. Use the built-in bubble vial to ensure the device is perfectly horizontal.
- Adjust Laser: If needed, use the plastic flip on the back to adjust the laser line position for uneven walls.
- نښه: The laser line will project across the wall, providing a guide for marking.
Caution: The stud button with needles is for auxiliary laser marking on wallpaper and wooden surfaces only. Do not use on stone or metal walls, or low-density plasterboard. Ensure the stud pins protector is engaged when not using the needles.
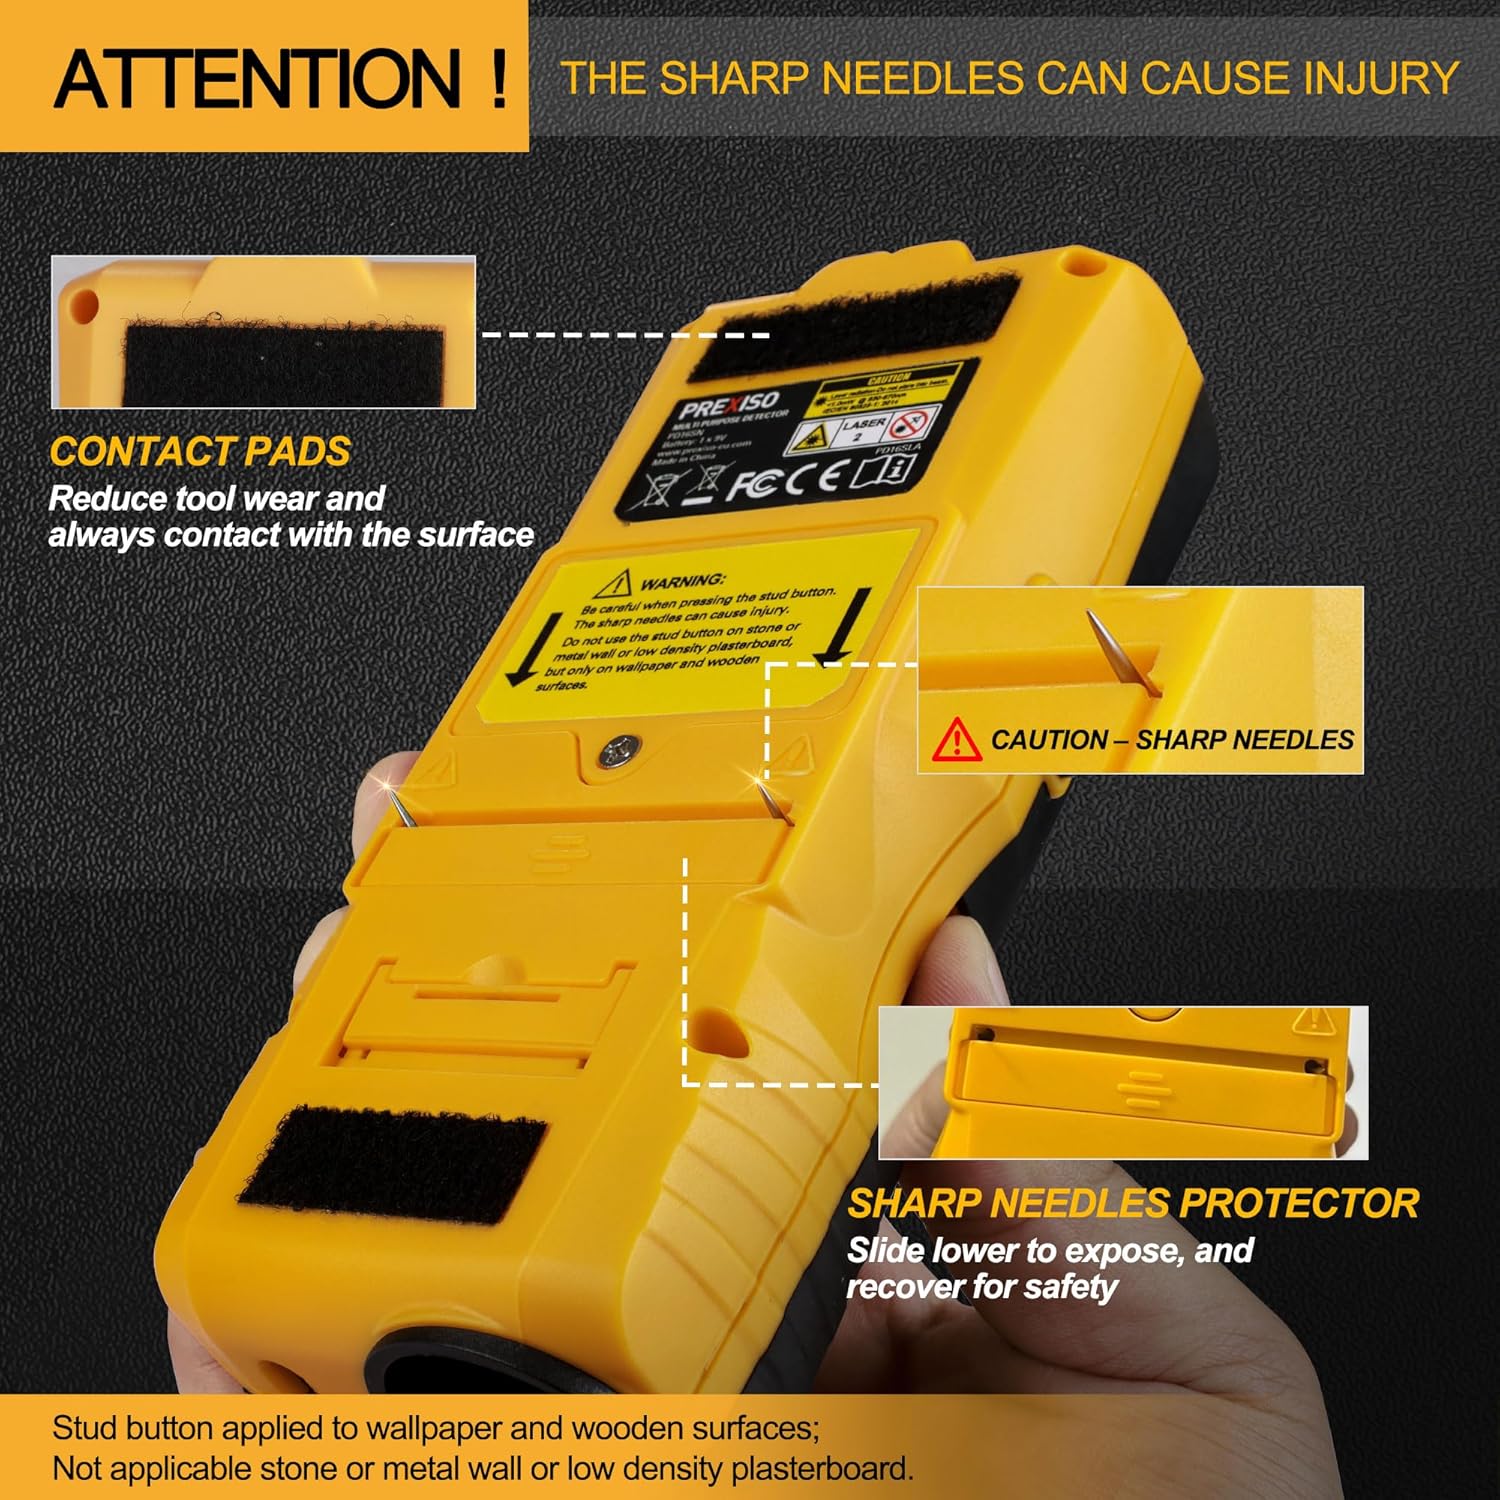
Figure 5: Sharp Needles Warning and Protector
4. Ultrasonic Distance Measurement
This function allows for measuring distances, areas, and volumes using ultrasound.

Figure 6: Ultrasonic Distance Measure Functions
- حالت غوره کړئ: Slide the Function Switch to the DISTANCE position.
- واټن اندازه کول: Point the ultrasound sender/receiver towards the target surface. Press the measurement button. The distance will be displayed on the LCD.
- د ساحې/حجم اندازه کول: Follow the on-screen prompts to take multiple distance measurements to calculate area or volume.
- Addition Measurement: The device supports adding multiple measurements.
- د واحد بدلول: Use the appropriate button to switch between metric (m) and imperial (ft/in) units.
Note: Ensure there are no objects positioned within the measurement area that could obstruct the ultrasonic waves. This function is for rough measurements and may not be as precise as laser distance measurement.
ساتنه
- وسیله پاکه او وچه وساتئ. د نرم، ډ سره مسح کړئamp ټوکر د کثافاتو پاکوونکي یا محلول مه کاروئ.
- که چیرې وسیله د اوږدې مودې لپاره ونه کارول شي ترڅو د لیکیدو مخه ونیسي، نو بیټرۍ لرې کړئ.
- Store the device in its protective carrying case in a cool, dry place.
- Regularly check the contact pads for wear and ensure they are clean for accurate detection.
د ستونزو حل کول
- ناسم لوستل: Ensure the wall surface is dry. High moisture levels can interfere with electromagnetic fields and cause false readings. Re-calibrate the device on a clear section of the wall.
- نه کشف: Verify that the correct mode (STUD, AC WIRE, or METAL) is selected. Ensure the scan button is continuously pressed during scanning.
- Ultrasonic Measurement Errors: Confirm there are no obstructions between the device and the target surface. The ultrasonic function works best on reflective surfaces.
- Laser Not Visible/Level: Check the battery level. Ensure the device is placed on a stable, level surface or adjusted using the plastic flip for leveling.
مشخصات
| فیچر | مشخصات |
|---|---|
| برانډ | پریکسیسو |
| د ماډل شمیره | 5-in-1 Stud Finder |
| رنګ | ژیړ |
| د بریښنا سرچینه | Battery Powered (1x 9V battery required) |
| مواد | پلاستیک |
| د توکي وزن | 13.6 اونس |
| د کڅوړې ابعاد | 9.18 x 4.09 x 2.24 انچه |
| Stud Scan Depth | تر ۱ انچه پورې |
| د فلزي سکین ژوروالی | تر ۲۴-۳/۸ انچو پورې |
| د AC تار سکین ژوروالی | تر ۲۴-۳/۸ انچو پورې |
| Ultrasonic Distance Measure Range | تر 50ft / 15m پورې |
| لیزر ټولګي | Class II, < 1mW |
تضمین او ملاتړ
For warranty information and customer support, please refer to the product packaging or contact PREXISO customer service directly. Keep your purchase receipt as proof of purchase.


